Perl Module XS configuration is hard

I wrote a simple little Perl Module recently, and it reminded me how frustrating it is to get it all working.

I’m not even talking about the .xs preprocessor (xsubpp)—that’s weird, but it’s fairly straightforward. Most contingencies are accounted for and you can make it do whatever you want, and in my case, the results were pretty minimal and beautiful in their own way. No, I’m talking about actually building it and making it compile in a cross platform way.

If you’re used to standard unix C source releases, you know you can just run ./configure and then make and it’ll (probably) just work. Behind the scenes configure is madness, but the principle it works on (feature detection by actually compiling things) is sound. My module is an interface to a small third party library. I can’t count on the library being installed on the machine already, so I want to statically link against it. It includes a configure script for unix machines and some windows source that isn’t covered by ./configure.

In Perl, there are two different ways to build your module: ExtUtils::MakeMaker and Module::Build. For pure Perl modules, I will only use Module::Build, as ExtUtils::MakeMaker seems too hairy. But for an XS module, I’m not sure. ExtUtils::MakeMaker looked fairly configurable so I try that first. It works very well for compiling XS Unix stuff, but because it builds a Makefile and lets you just drop your own rules in, it encouraged me to just call my library’s ./configure and then make in its directory:

use ExtUtils::MakeMaker;

WriteMakefile(
    # ... boilerplate stuff stripped for brevity...

    INC               => '-I./monotonic_clock/include',
    MYEXTLIB          => 'monotonic_clock/.libs/libmonotonic_clock.a'
);

sub MY::postamble {
'
$(MYEXTLIB): monotonic_clock/configure
    cd monotonic_clock && CFLAGS="$(CCFLAGS)" ./configure && $(MAKE) all
monotonic_clock/configure: monotonic_clock/configure.ac
    cd monotonic_clock && ./bootstrap.sh
'
}

This of course worked just fine on my Mac.

But it utterly failed everywhere else. Ugh, there’s hardly any green there! Ok, so I focused on the Unix failures first—I know this, I should be able to get stuff working. Turns out Linux wants -fPIC on the library’s code because I’m statically linking against it and it will end up in my modules shared library “.so” file. Ok, so I can just unilaterally add -fPIC:

sub MY::postamble {
'
$(MYEXTLIB): monotonic_clock/configure Makefile.PL
    cd monotonic_clock && CFLAGS="$(CCFLAGS) -fPIC" ./configure && $(MAKE) all
monotonic_clock/configure: monotonic_clock/configure.ac
    cd monotonic_clock && ./bootstrap.sh
'
}

That works on clang on the Mac and gcc on Linux. I actually tested on my Debian machine. Everything should be great now!

Nope. Half the Linuxes are still failing, some of the Macs too, and I haven’t even addresses Windows yet. I discover that -fPIC happens to be defined by ExtUtils::MakeMaker on the appropriate platforms in the CCCDLFLAGS make variable, and switch to it thinking this should solve the remaining Unix problems.

Then I start thinking about Windows. I boot up my Windows 8 VM where I have Strawberry Perl installed and try out my module. It fails utterly. I forgot—you can’t just call ./configure in windows! Plus my library doesn’t even handle Windows in its configure script. I start thinking about writing my own Makefile rules to build it so I can drop the configure script completely. But I don’t like it. I’m going to need to detect which back-end the library should be using. I basically have to recreate what configure does, but in a Makefile. And I don’t know how much shell I can use in my rules and still work on Windows, meaning the detection is going to be a huge issue.

So I decide to drop ExtUtils::MakeMaker and use Module::Build instead. It’s actually pretty straightforward:

use strict;
use warnings FATAL => 'all';
use Module::Build;

my $builder = Module::Build->new(
    # ... boilerplate stuff stripped for brevity...

    extra_compiler_flags => '-DHAVE_GETTIMEOFDAY', # We're going to assume everyone is at least that modern
    include_dirs => 'monotonic_clock/include',
    c_source     => ['monotonic_clock/src/monotonic_common.c'],
);

# Add the appropriate platform-specific backend.
#
# This isn't as good as the configure script that comes with
# monotonic_clock, since it actually tests for the feature instead of
# assuming that non-darwin unixes support POSIX clock_gettime. On the other
# hand, this handles windows.
push(@{$builder->c_source},
     $^O                 eq 'darwin'  ? 'monotonic_clock/src/monotonic_mach.c' :
     $builder->os_type() eq 'Windows' ? 'monotonic_clock/src/monotonic_win32.c' :
     $builder->os_type() eq 'Unix'    ? 'monotonic_clock/src/monotonic_clock.c' :
                                        'monotonic_clock/src/monotonic_generic.c');

$builder->create_build_script();

I figure out that I can abuse the c_source configuration option. It’s supposed to be a directory where the source code lives and they search it recursively for “*.c” files. But it turns out if I pass a C file to it instead of a directory, the recursive search finds that one C file! So now I can add specific C files for the particular platforms. I now have something that compiles on my Mac, my Debian machine, and my Windows VM. Hooray! That covers everything. Finally!

Sigh. That’s worse than my last Makefile.PL based version! What’s going on? Ok, my c_source hack is biting me. I noticed that it was helpfully adding -I options for the sources directory to the compiler, but since I was passing in actual files to c_source I was getting compiler lines like -Imonotonic_clock/src/monotonic_clock.c. This was a warning on my Debian gcc and on Windows gcc, but my Mac’s clang just ignored it with no message at all. So I blew it off. Well, it turns out other compilers are more strict.

So I start poking around the Module::Build source code. I discover that the c_source is adding to an internal include_dirs list. So I override the compile function to strip .c files out of the include_dirs list.:

# This hacks around the fact that we are using c_source to store files, when Module::Build expects directories.
my $custom = Module::Build->subclass(
    class => 'My::Builder',
    code  => <<'CUSTOM_CODE');
sub compile_c {
  my ($self, $file, %args) = @_;
  # Adding to c_source adds to include_dirs, too. Since we're adding files, remove them.
  @{$self->include_dirs} = grep { !/.c$/ } @{$self->include_dirs};
  $self->SUPER::compile_c($file, %args);
}
CUSTOM_CODE

It seems really hacky (I hate having to write Perl code in a string) and a bit fragile (I sure hope they don’t change the API in a new version) but it actually works! I publish that and wait to see my wall of green.

I don’t get to see it yet. This is baffling to me. The worst part is the test reports themselves. They aren’t showing me the build process, and they don’t try to identify the Linux distro, leaving me to intuit it from the versions of various things. It looks like one of the failing distros is Debian Wheezy (aka the current “stable”). So I as a last ditch effort use “debootstrap” to build a minimal install that I can chroot into. I try compiling and I can actually reproduce the error. This is phenomenal because I don’t have to guess any more.

After poking around for a while I discover that in older glibcs, the clock_gettime function that my library uses requires librt and therefore a -lrt option to the linker. Ok. But I don’t want to add that unilaterally—I got bit by that earlier in this process. I’m also frustrated that my backend detection code is just hardwired to Module::Builds os_type() function. Do I really know that old FreeBSDs support clock_gettime? No, I don’t, and I don’t want to figure it out. I think back wistfully to ./configure—it just detects stuff by compiling it and seeing if it works. That’s really what I want—it’s the only way to know for sure without researching and testing on every. single. platform.

And then it hits me, I guess I could do that. Module::Build uses ExtUtils::CBuilder internally, and so I can too. It turns out to actually not be that bad. The longest part of the code is redirecting stdout and stderr so you don’t see a bunch of compilation errors while it’s figuring things out:

# autoconf style feature tester. Can't believe someone hasn't written this yet...
use ExtUtils::CBuilder;
my $cb = ExtUtils::CBuilder->new(quiet=>1);

sub test_function_lib {
    my ($function, $lib) = @_;
    my $source = 'conf_test.c';
    open my $conf_test, '>', $source or return;
    print $conf_test <<"C_CODE";
int main() {
    int $function();
    return $function();
}
C_CODE
    close $conf_test;

    my $conf_log='conf_test.log';
    my @saved_fhs = eval {
        open(my $oldout, ">&", *STDOUT) or return;
        open(my $olderr, ">&", *STDERR) or return;
        open(STDOUT, '>>', $conf_log) or return;
        open(STDERR, ">>", $conf_log) or return;
        ($oldout, $olderr)
    };

    my $worked = eval {
        my $obj = $cb->compile(source=>$source);
        my @junk = $cb->link_executable(objects => $obj, extra_linker_flags=>$lib);
        unlink $_ for (@junk, $obj, $source, $conf_log);
        return 1;
    };

    if (@saved_fhs) {
        open(STDOUT, ">&", $saved_fhs[0]) or return;
        open(STDERR, ">&", $saved_fhs[1]) or return;
        close($_) for (@saved_fhs);
    }

    $worked
}

Using it is pretty easy:

my $have_gettimeofday = test_function_lib("gettimeofday", "");
my $need_librt = test_function_lib("clock_gettime", "-lrt");

The one annoyance is that the feature detection doesn’t completely work on Windows. The technique I used (stolen unabashedly from autoconf) just declares the function with the wrong arguments and return value and tries to link with it. This works in general because C doesn’t encode the arguments or return values into the symbol name. Except Windows apparently does with its API functions: my feature detector detects gettimeofday() just fine, but not QueryPerformanceCounter(). If I declare QueryPerformanceCounter() properly then Windows links with it, otherwise I get an undefined symbol error. I don’t care enough to properly research Windows’s ABI, so I decided to just check $^O, assuming that all Windows will work. A quick check of the Windows documentation reveals that it’s has been supported since Windows 2000 and that’s good enough for me.

I upload to CPAN and finally see that green I’ve been looking for.

But it makes me wonder, why did I have to write this? It’s 2015, has nobody ever needed to build their Perl XS module differently for different platforms? I know I can’t be the first, but I had a really hard time finding any documentation or discussion about it. I didn’t see anything on CPAN that looked like it might solve my problems. Should this be a feature in Module::Build? I’ve only written two XS modules in my life, but both times I needed different sources on different platforms. Does anyone want to point me to something that does this well, or failing that, build off this idea and make something neat? I would love it, certainly.

32-bit clang deficiencies on Mac OS X

I was pulling my hair out getting this compiler message tonight:

warning: property 'x' requires method 'x' to be defined - use @synthesize, @dynamic or provide a method implementation in this class implementation [-Wobjc-property-implementation]

According to Apple’s Objective C documentation:

By default, these accessor methods are synthesized automatically for you by the compiler, so you don’t need to do anything other than declare the property using @property in the class interface.

And yet, there was the compiler telling me otherwise! It turns out there’s a huge caveat that I don’t see mentioned in the docs anywhere: auto-synthesis of properties only works in 64 bit targets. If you are also including 32 bit targets in your build (as I was) then you have to do the whole manual synthesis thing. Yuck.

Thanks, random Stack Overflow commenter, for pointing this out!

Mac OS X codesigning woes

I just discovered this wonderful bug. Apparently “hdiutil makehybrid” is stripping code signatures in some cases.

I first verify the code signature on an App (a build of Emacs, in this case)—there are no errors:

$ codesign --verify _dmg-build/Emacs.app/
$

I then use “hdiutil makehybrid” to create a disk image out of the directory.

$ hdiutil makehybrid -hfs -hfs-volume-name "Emacs Test" -hfs-openfolder _dmg-build _dmg-build -o /tmp/tmp.dmg

I then mount the created image and run try to verify the signature again—but this time it fails!

$ open /tmp/tmp.dmg
$ codesign --verify /Volumes/Emacs\ Test/Emacs.app/
/Volumes/Emacs Test/Emacs.app/: code object is not signed at all
In subcomponent: /Volumes/Emacs Test/Emacs.app/Contents/MacOS/bin-i386-10_5/grep-changelog

Investigating further, I use “xattr” to list the extended attributes on the “grep-changelog” file. First, the good file:

$ xattr _dmg-build/Emacs.app/Contents/MacOS/bin-i386-10_5/grep-changelog
com.apple.cs.CodeDirectory
com.apple.cs.CodeRequirements
com.apple.cs.CodeSignature

And now the bad file:

$ xattr /Volumes/Test\ Emacs/Emacs.app/Contents/MacOS/bin-i386-10_5/grep-changelog
com.apple.FinderInfo

Yup, all the code signature stuff is completely gone! (The “FinderInfo” stuff is OK, it’s just there as a side effect of mounting the disk image).

I’m not exactly sure how to fix this. Apple recently changed code signing requirements so that 10.9.5 now requires deep signatures (way to change something fundamental in a point release, guys). Also the only thing that correctly makes the deep signatures is Xcode 6 which was released only about 1 week before 10.9.5 was released (way to give advanced warning, guys).

2014-10-03 Update:

I filed a bug with Apple and they suggested I use “hdiutil create -srcfolder” instead of “makehybrid“. This does copy the extended attributes correctly. I had originally not used “create” for two reasons: It didn’t have the “-hfs-openfolder” option and the man page claims that only “makehybrid” makes optimally small filesystems. Turns out that “create -srcfolder” automatically does the same thing as “makehybrid -hfs-openfolder” (though it is not documented in the man page) and in practice the resulting .dmgs are just as small or smaller. Problem solved!

Playstation 4 NW-31250-1 Error

All my Playstation 4 downloads were failing today with “DNS Error” and “NW-31250-1”.

I ran a tcpdump on my router and found this:

15:07:10.389761 00:ee:ff:aa:bb:cc (oui Unknown) > 11:22:33:44:55:66 (oui Unknown), ethertype IPv4 (0x0800), length 109: (tos 0x0, ttl 64, id 0, offset 0, flags [DF], proto UDP (17), length 95)
    red-death-router.porkrind.org.domain > 10.0.0.113.49218: [bad udp cksum 0x15cb -> 0xfee5!] 21068 ServFail q: A? ic.8e0b5f0d.0c2f0f.gs2.sonycoment.loris.llnwd.net. 0/0/0 (67)

That looks promising, a DNS SERVFAIL response to a query for “ic.8e0b5f0d.0c2f0f.gs2.sonycoment.loris.llnwd.net” (whatever that is).

My router is set up to use Google’s DNS: 8.8.8.8. So a quick test from my computer showed:

$ dig @8.8.8.8 ic.8e0b5f0d.0c2f0f.gs2.sonycoment.loris.llnwd.net

; <<>> DiG 9.8.3-P1 <<>> @8.8.8.8 ic.8e0b5f0d.0c2f0f.gs2.sonycoment.loris.llnwd.net
; (1 server found)
;; global options: +cmd
;; Got answer:
;; ->>HEADER<<- opcode: QUERY, status: SERVFAIL, id: 8788
;; flags: qr rd ra; QUERY: 1, ANSWER: 0, AUTHORITY: 0, ADDITIONAL: 0

;; QUESTION SECTION:
;ic.8e0b5f0d.0c2f0f.gs2.sonycoment.loris.llnwd.net. IN A

;; Query time: 58 msec
;; SERVER: 8.8.8.8#53(8.8.8.8)
;; WHEN: Wed Jun  4 15:09:39 2014
;; MSG SIZE  rcvd: 67

“status: SERVFAIL”! But when using Level 3’s venerable 4.2.2.2:

$ dig @4.2.2.2 ic.8e0b5f0d.0c2f0f.gs2.sonycoment.loris.llnwd.net

; <<>> DiG 9.8.3-P1 <<>> @4.2.2.2 ic.8e0b5f0d.0c2f0f.gs2.sonycoment.loris.llnwd.net
; (1 server found)
;; global options: +cmd
;; Got answer:
;; ->>HEADER<<- opcode: QUERY, status: NOERROR, id: 14680
;; flags: qr rd ra; QUERY: 1, ANSWER: 1, AUTHORITY: 0, ADDITIONAL: 0

;; QUESTION SECTION:
;ic.8e0b5f0d.0c2f0f.gs2.sonycoment.loris.llnwd.net. IN A

;; ANSWER SECTION:
ic.8e0b5f0d.0c2f0f.gs2.sonycoment.loris.llnwd.net. 300 IN A 208.111.144.58

;; Query time: 26 msec
;; SERVER: 4.2.2.2#53(4.2.2.2)
;; WHEN: Wed Jun  4 15:09:26 2014
;; MSG SIZE  rcvd: 83

Aha, it works! So Google’s DNS is broken!

To fix this I set up my PS4’s networking manually and added 4.2.2.2 as a secondary DNS server. Then all my downloads started working again. I didn’t have to delete them and start over, either—just clicked retry and they continued from wherever they were.

Mac OS X 10.9 (Mavericks) and SSH pkcs8 keys

After upgrading to Mavericks (Mac OS X 10.9) I found that ssh-add wasn’t working. After investigating I discovered that the SSH shipped with Mavericks has a regression and doesn’t support pkcs8 keys. Mac OS X 10.8’s SSH supported these keys just fine.

Earlier in the year I had read an article about using pkcs8 formatted keys to encrypt your SSH private keys more strongly. I went ahead and did this because 10.8 (and my Linux machines) supported it just fine. 10.9, however ships with a different SSH. “ssh -V” outputs:

OpenSSH_6.2p2, OSSLShim 0.9.8r 8 Dec 2011

The previous version did not have “OSSLShim”, but rather used OpenSSL. My guess is that Apple replaced OpenSSL with some sort of API shim to another (Apple built?) library that doesn’t have support for pkcs8. Weak.

Anyway, the workaround is to use the openssl command line program to decrypt the key like this:

openssl pkcs8 -in ~/.ssh/id_rsa | ssh-add -

I put that in a file called “~/mavericks_sucks” so that I can just do:

. mavericks_sucks

in the terminal after I boot my computer and then everything works after that.

I’ve submitted a bug to Apple’s bug reporter, but it was marked as a duplicate of bug 14776937 but of course I can’t read bug 14776937 or get status on it because Apple’s whole bug reporting system is a piece of crap. Oh well. Hopefully their stupid shim will support all the features of normal OpenSSL (before 10.10).

iMessage on Mac OS X not working

My iMessage suddenly stopped working in the Messages app and I couldn’t get it to log in properly. In the accounts section it would spin for a while when I typed my password and then give this error:

The registering device does not have appropriate credentials

I finally decided it must be some background task that was hosed and so I poked around and discovered “imagent”:

/System/Library/PrivateFrameworks/IMCore.framework/imagent.app/Contents/MacOS/imagent

Killing that processes caused launchd to re-launch it and after that I could log in again. So if you’re having those symptoms, just do this in Terminal:

killall imagent

If you don’t want to do that, then just reboot.

“An Ancient Piece of Computer Lore in a Place You’d Never Expect” or “Dungeon (Zork) Map in Duplicity”

Back in March of 2012 I was watching Duplicity and I noticed something odd about 28 minutes in:

In the top right corner there’s an 11×17 paper with an image on it that’s really hard to make out. I recognized it instantly. I first saw the image in question over 30 years ago when my dad brought home from work the November 1982 issue of a magazine called “The DEC Professional” that had the image in it. The image is a hand drawn map of Dungeon.

For the uninitiated, Zork is Infocom’s classic text adventure game. They renamed it to Dungeon at some point, but changed the name back to Zork when they started selling it. My dad had a copy of the Fortran translated version of Dungeon on his PDP-11. My friends and I called “Dungeo” since the filesystem only allowed 7 letters in the name—I didn’t get that it was actually called Dungeon until I was much older [Ed. 2022-07-08: I recently created dungeo.org in homage to the name, check it out!]. So when he brought the magazine home, it was specifically because of the included map and because he knew I loved the game.

Here is a scan of that map (from Tom Almy’s Dungeon page):

Map of Dungeon

I must have stared at this map for days, cumulatively. My cousin traced it, enlarged it and hung it on his wall (and recently recreated and enhanced it). I currently have a black and white photocopy hanging in my computer room. I always thought it was a very good map (even though it lacked the “end game”). The point is, I’ve known and loved this image forever.

But it’s also obscure! How many people had PDP-11s and played Dungeon and happened to see the map in “The DEC Professional”? And how many of them had this map make an impact on their lives? To me it seems like that can’t be a very large number…

And so it was crazy to me that I’d happen to see that map that had made such an impact on me be in a movie that came out 27 years after the map’s publishing in an obscure computer magazine. Who was the set decorator that grabbed the map? Did he know what it was? Was it someone else’s and he just thought it looked cool? If so, whose was it? IMDB says the set decorator in Duplicity was George DeTitta Jr. But what it doesn’t say is, “why?”

libvirt based QEMU VM pausing by itself

I just debugged this for hours. I have a bunch of QEMU VMs and different sets of them would start pausing themselves. If I resumed them they would immediately pause themselves again. Checking logs showed nothing. I found a disk with a bunch of S.M.A.R.T. errors but it turned out to be a red herring (though it’s still getting replaced ASAP). In the end I was reading the QEMU man page and found this:

werror=action,rerror=action

Specify which action to take on write and read errors. Valid actions are: “ignore” (ignore the error and try to continue), “stop” (pause QEMU), “report” (report the error to the guest), “enospc” (pause QEMU only if the host disk is full; report the error to the guest otherwise).  The default setting is werror=enospc and rerror=report.

After reading that and checking to see that those options were not specified on my QEMU command line, it finally dawned on me that maybe my disk was out of space. Sure enough, one of the VMs had filled its sparse image to the point where there was no room left on the real disk.

Poor planning on my part, yes, but I still wish that ENOSPC would show up in some log file somewhere. It would have saved me hours of debugging.

The Core Memory Module from my dad’s homebuilt PDP-11/05

Here is one:

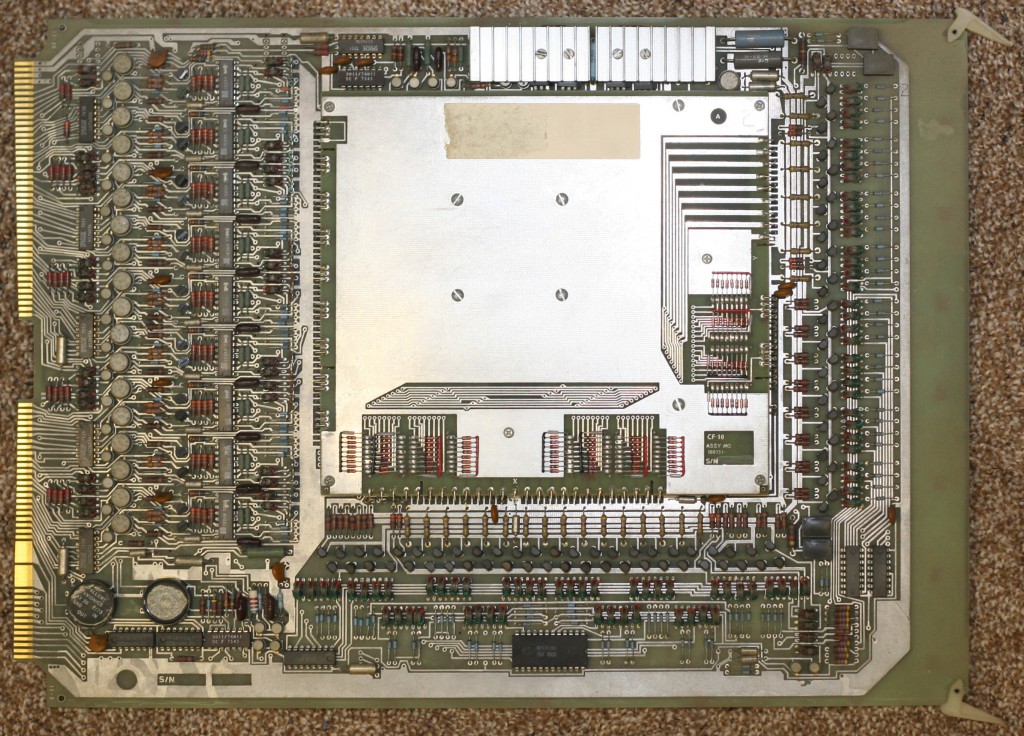
Core Memory ModuleThis is basically the 1974 version of a DIMM. It measures 16″ by 11.5″ and holds 16 kilobytes. It’s technically 18 bits wide but only 16 were used in the PDP-11. The raised part in the middle is where the cores are actually stored. Each bit is a little ring with 3 wires running through the middle. By running current through the wires you could magnetize or demagnetize each ring. One interesting tidbit is that reading is destructive! When you read a bit you are actually demagnetizing the ring and the memory controller had to then do a write cycle to restore the bit. You can’t see the rings in the picture (I’m guessing they kept them covered because they were fragile), but you can see some nice pictures and a more in-depth explanation at the Wikipedia page.

The cool thing about the module is that everything is discrete. There’s not a custom chip in sight. Along the bottom and right edges of the board you can see the row and column drivers. On the right you can see 18 instances of the sense amplifiers and inhibit drivers (1 for each bit in the word).

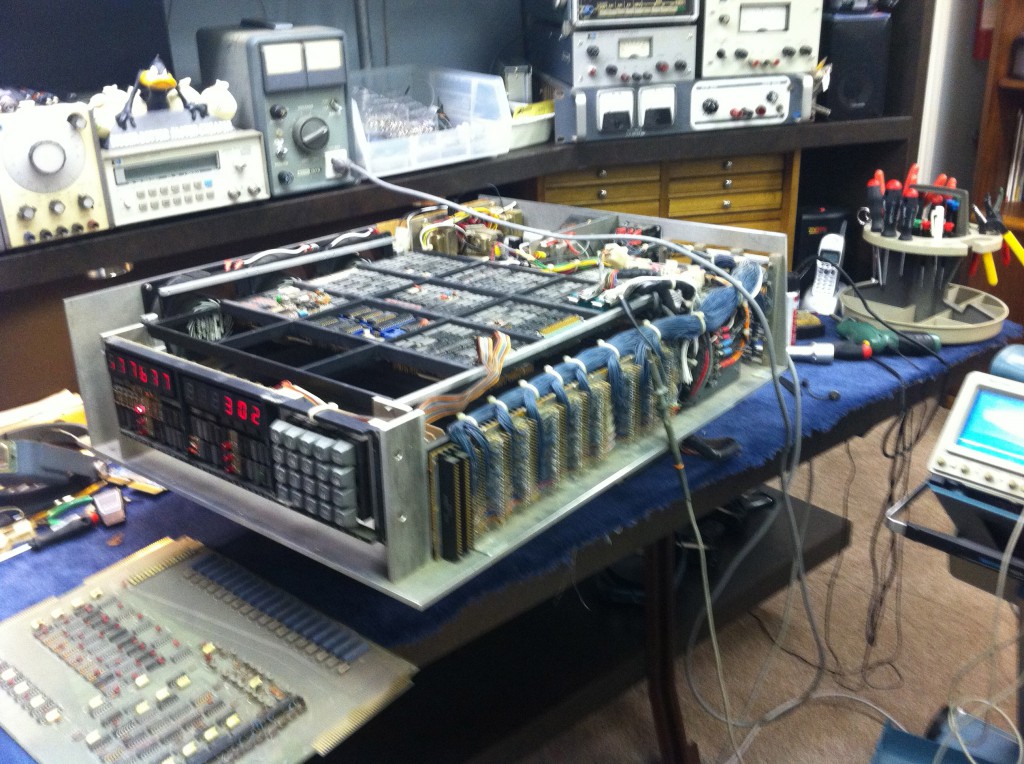
Here’s some pictures of the computer it came out of:

PDP-11/05That is a PDP-11/05 that my dad built from scratch. That top part is the main computer (the processor is not a microprocessor, instead it’s made from discrete parts). It was all wire-wrapped by hand. Here’s the back:

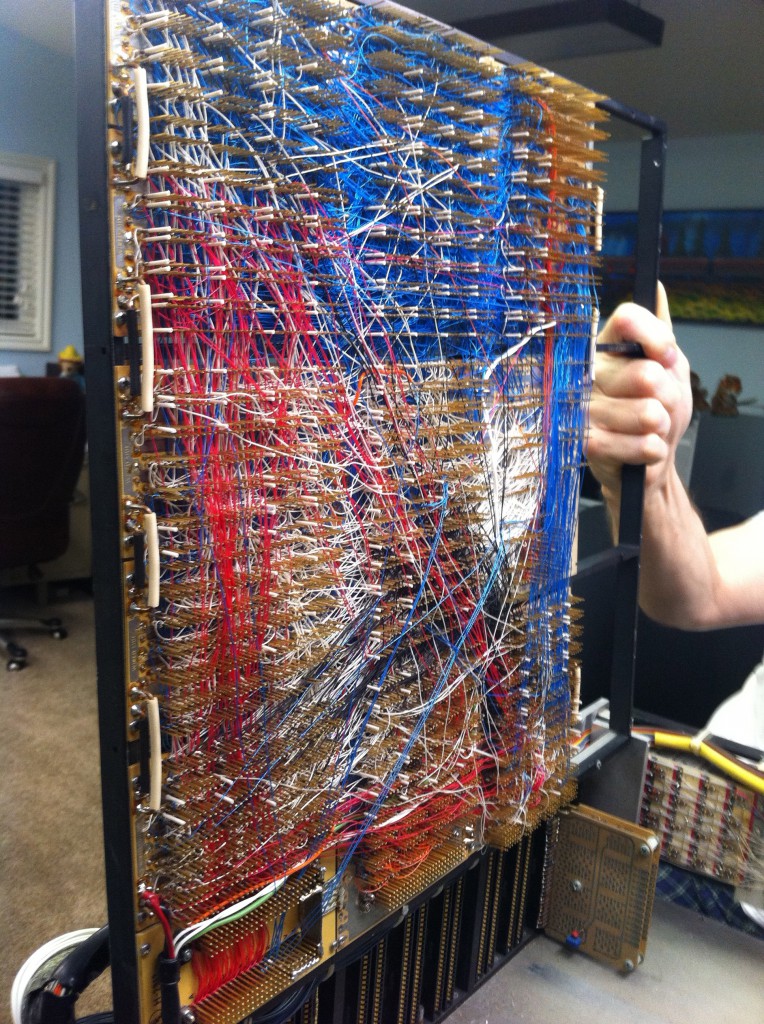
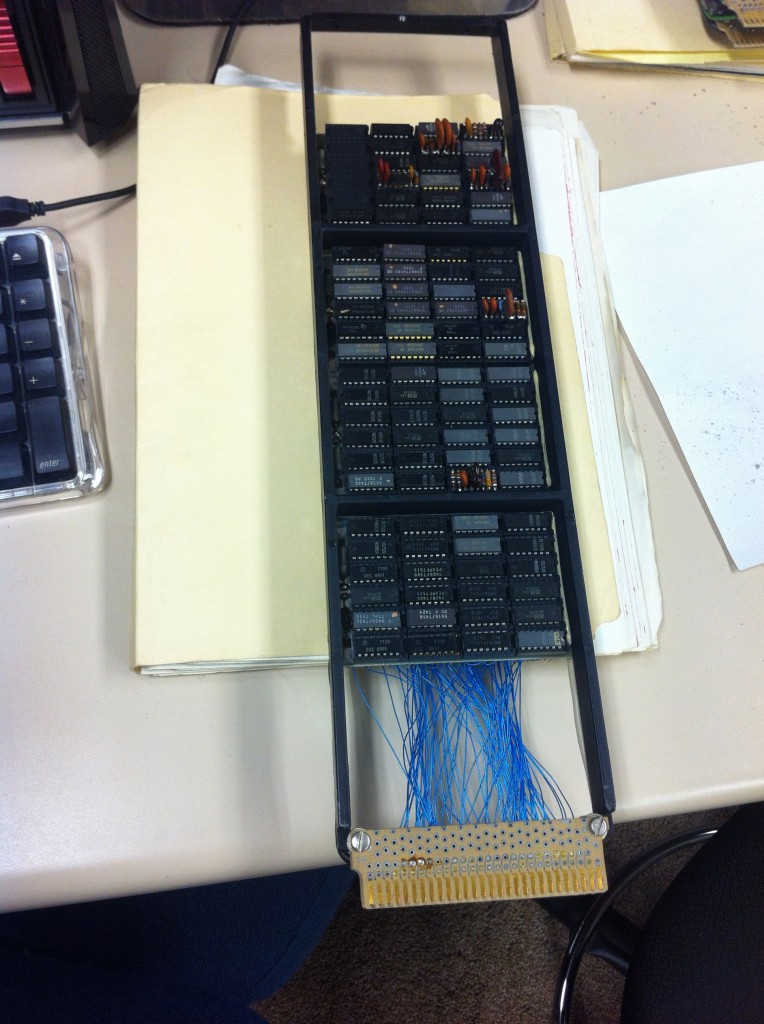
PDP-11/05 WirewrappingI can’t even imagine having the patience to do that! All the colors of wire mean different things, too (they’re grouped by logical parts of the computer–data paths, control paths, clocks, etc). The slots below the board are for expansions cards–electrically they are Unibus but their physical form factor is custom to his computer. Here’s the hard disk controller card:

Hard DIsk Controller CardThis disk controller could support 2 10MB hard disks. The computer also has a floppy controller (for 8″ floppy drives) and a RS/232 controller card (3 ports).

It’s funny that I grew up with this computer (and later a PDP-11/34 with 2 rack of equipment) but never cared about what kind of thought and work must have gone into it… I was always way more interested in my pirate Apple ][+ clone that I put together from a kit in second grade (if you’ve never used an Apple ][ before, try this emulator I recently wrote in HTML5). But now my dad decided to get the PDP back up and running so he’s been showing me all the little parts and I think I’m old enough now to appreciate it.

The interesting thing for me about all this old technology was how amazingly straight forward 90% of it is. For instance, the front panel has a keyboard that shifts 3 bits at a time into a shift register and then lets you generate bus cycles (all driven by state machines in hardware). This was instead of the DEC’s computers which makes you enter binary with 16 individual switches–it’s a nice, simple addition that makes it way more pleasant to work with than the standard PDP-11 and it’s totally understandable.

Emacs For OS X . com gets a new Mac Mini

I recently used Funded By Me to help raise some money for a new build server for Emacs for Mac OS X . com. I set it up and then decided to start publicizing it on a Friday and by the end of the following Monday all the money had been raised! I was blown away by people’s generosity—I hadn’t people to donate so much so quickly. In fact, I even got Lena, my awesome contact at Funded By Me, to lower the minimum donation amount to $5 because I didn’t expect anyone to actually donate more than that! I had set the campaign to run for 30 days—further evidence of my underestimation of the Free Software users out there. It made me worry that I’d have to sit around for the better part of a month before being able to get at the money but it turns out Funded By Me let me take an early payment since I had hit my required minimum. So on Friday I took a trip to the Apple store and bought a Mac Mini. Here’s a picture of me posing dorkily with it:

Me and the new Mac Mini

I thought about taking a picture in front of the Apple Store itself but got embarrassed at the cheesiness of it and chickened out.

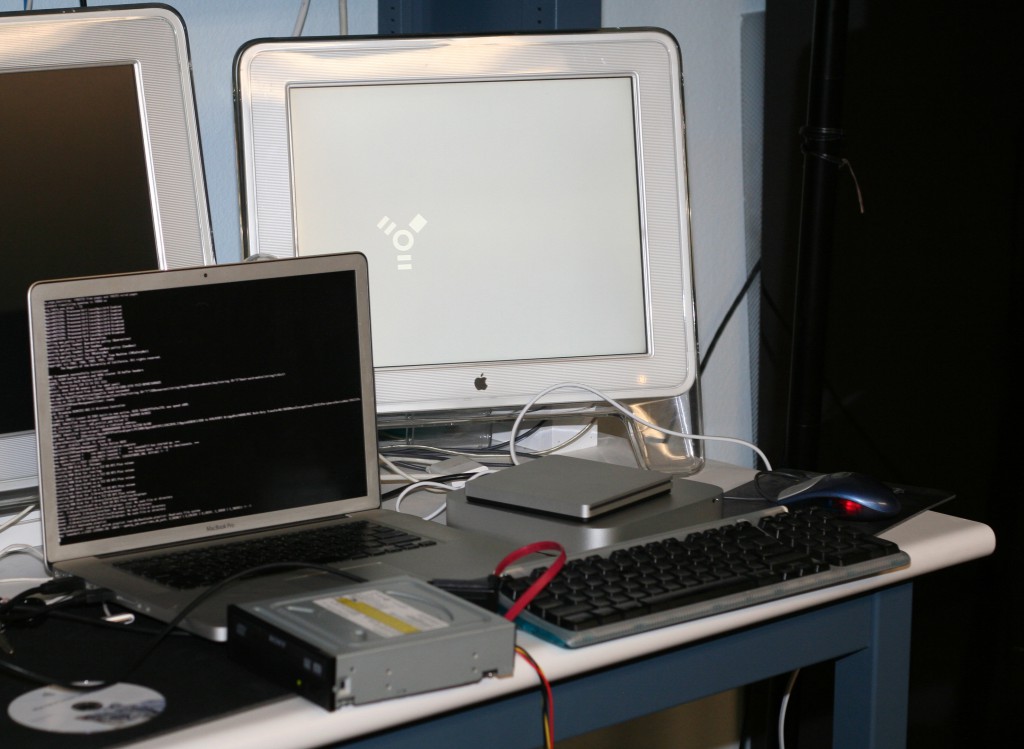
The next part was tricky: I had to get Snow Leopard installed on it. It turns out that they revved the Mac Mini back in July, just after Lion was released. Luckily I found out from this article that Snow Leopard runs just fine, but can be a little tricky to install. Luckily I had all the right pieces. Here’s a look at the setup involved:

The Convoluted Install

The Mac Mini is in FireWire target mode (boot up holding the “t” key down”). It’s connected to the FireWire port of my MacBook (seen here booting off the CD—yeah, I “nvram boot-args=-v” because I’m hard core!). I replaced the optical drive in my MacBook with an SSD so I had to hook up an external drive to boot off of. The external Apple drive I borrowed wouldn’t work with my MacBook (my brother claims it needs some sort of special non-standard high voltage USB ports) so I had to use the big clunky one with a SATA to USB converter.

Crazily enough, all that worked! I used my MacBook’s install CDs to put Snow Leopard on the Mac Mini and then booted the MacBook up so that I could do a software update. After the software update was done, the Mac Mini booted up just fine under Snow Leopard and I was up and running.

The new build server is up and running!

On the builds page there are now 2 builds from the new machine. The 2011-11-05 nightly was build by hand as I tested the build script and got the list of >= $30 donors installed on the disk image (and also set up the donor web page I promised). The 2011-11-06 was the first build that was built unattended from cron. From here on out it should be smooth sailing.

Thanks to everyone!

I’m very pleased that all the future builds will be on this machine that the community paid for. Again I’ll say thanks—I was blown away by the generosity of complete strangers. It makes me want to donate more of my own money and time to things I believe in.

VLC 64 Bit Problems

I just spent way too long trying to figure out why VLC wasn’t opening DVDs. I was getting this error in the log window:

no access module matched "dvdnav"

Turns out the problem is that VLC 1.1.11 only has 32-bit versions of its DVD plugins (or perhaps its 64-bit versions are broken–the end result is the same). So if you download the main 32/64 bit universal binary from their site it will not work unless you check the “Open in 32-bit mode” checkbox in Finder’s “Get Info” window.

Daemon-Manager: Manage your non-privileged daemons

It seems I’ve been writing little daemons a lot lately–small things that don’t want to run as root but still need to be launched in the background as services. I’ve been noticing because it’s such a pain to integrate them into the system once they are written (or installed). I have to mess around as root creating /etc/init.d shell scripts (probably by copy and pasting–who out there can actually make those from scratch?) or maybe tweaking some upstart or systemd config file.

And then when I’m done it annoys me that I have to be root to start or stop a daemon that ends up running as my login user anyway.

Enter Daemon Manager

So last October (2010) I sat down and wrote daemon-manager. It started from a few core ideas:

  1. It must be possible for a user to set up and configure their daemons—no root access must be required for a user to create a new daemon or restart one of their daemons.
  2. It must be secure—users should not be allowed to control other users’ daemons (unless they are given explicit permission).
  3. It should allow for good security practices—users should be allowed to launch a daemon as a user other than themselves if root has explicitly allowed it. This is so you can run your daemons as a “nobody” style user.1
  4. It should restart the daemons if they crash (I’m looking at you, php-cgi).
  5. It should be easy to use—1 config file per daemon and a simple command line interface to interact with the running daemons.

There are programs out there that do parts of that list, but none that do everything:

  • daemon tools: I’ve used it before and I really like its philosophy of being small and simple. But it seems to really want to run as root which means you have to be root to control it. Also, setting up new daemons is kind of a pain.
  • Upstart: It’s very similar and it makes setting up a new daemon pretty easy but since it’s an “init” replacement it doesn’t seems very adept at running programs meant for non-root users. I’ve done it before but there was a lot of “sudo” configuration and it wasn’t easy. Also the config files are stored in /etc/init and only root can write new ones.
  • Systemd: I really love systemd. Or the idea of it, really—some day it will make it into Debian and I’ll start actually using it. But its philosophy is great. But again, being an “init” replacement gives it most of the same downsides as upstart.

A Quick Tutorial Through Examples

Master config: /etc/daemon-manager.conf

[runs_as]
david: www-data
michaelc: www-data
amy: www-data
joann: www-data
jim:
greenfelt: greenfelt-daemon

[manages]
david: michaelc,amy,joann,greenfelt
michaelc: amy, joann
bill: joann
jim: greenfelt

The main section is the “runs_as” section. This section tells Daemon Manager which users are allowed to start daemons and which users the daemons can be run as. In the above example, “david”, “michaelc”, “amy”, and “joann” can launch daemons as themselves and also “www-data”. “greenfelt” can launch daemons as itself and the “greenfelt-daemon” user. “jim” is only allowed to launch daemons as himself. No other users on the system are allowed to launch daemons at all because they weren’t explicitly listed.

The “manages” section is a little experimental at this point, but the idea is that “david” is allowed to manage (start, stop, or restart) the daemons of “michaelc”, “amy”, “joann”, and “greenfelt” in addition to his own daemons. This is so you can have help desk type users who can stop or restart other users’ daemons even though they may not have read or write access to the users’ home directories. As you might expect, “root” is always allowed to start and stop anyone’s daemons.

Daemon: deluged.conf

dir=/home/david
start=exec deluged -d

This is a simple Daemon Manager config file that launches the deluge bittorrent daemon. “dir” and “start” are the only required entries in the config file. “dir” is the working directory and “start” is a one line shell script to run. Because it is a shell script it needs to “exec”, otherwise Daemon Manager can’t manage it properly.2

Daemon: wordpress.conf

dir=/home/amy/wordpress
user=www-data
start=exec php-cgi -q -b wordpress.socket

This starts a PHP FastCGI daemon in a WordPress directory and starts it running with as the “www-data” user (“amy” was given explicit permission to start daemons as the www-data user in “/etc/daemon-manager.conf”).

Daemon: greenfelt.conf

dir=/var/www/greenfelt.net
user=greenfelt-daemon
start=exec ./script/greenfelt_fastcgi.pl -l greenfelt.socket -n 1
output=log

This is a paraphrase of the config file that runs greenfelt.net which is a Catalyst app that talks to nginx via FastCGI through the “greenfelt.socket” unix domain socket. It runs as the user “greenfelt-daemon” so it can have less privileges than the main “greenfelt” user. The “output” parameter tells Daemon Manager to collect the stdout and stderr of the daemon and save it to a log file in the “~/.daemon-manager/logs/” directory (the default setting is to throw away stdout and stderr).

Controlling Daemon Manager

Daemon Manager is controlled using the “dmctl” command. It is relatively simple at this point, allowing you to start, stop and restart daemons. It also lets you scan for new config files and query for daemon statistics. Here’s an example output the “status” command:

$ dmctl status
daemon-id                      state              pid respawns cooldown   uptime    total
david/deluge-web               running           2948        0       0s     3w3d     3w3d
david/deluged                  running           2950        0       0s     3w3d     3w3d
david/greenfelt                stopped              0        0       0s       0s       0s
david/minecraft                stopped              0        0       0s       0s       0s
david/moviefile                running           2951        0       0s     3w3d     3w3d
david/pytivo                   running          22905        0       0s     4d7h     4d7h
david/streamium                running           2958        0       0s     3w3d     3w3d
david/wordpress                running          27012       33       0s   12h57m     3w3d

Notice that the wordpress server (good old php-cgi) has crashed 33 times (and has been automatically respawned by Daemon Manager).

Download and Use

Daemon Manager is licensed under the GPL and can be downloaded here (the source is also available on github). If you use Debian there’s a Debian branch available for building a package. The version as of this writing is 0.9 which means that there are some obvious things that need to be fixed3 and that I’m not sure it’s 100% secure or bug free yet, though I have been using it for months now and I absolutely love it–it filled a void I wasn’t even sure was really there when I started.

For a more detailed version of the history of Daemon Manager, see this blog post.

  1. That way, if there is a security hole in your code the attacker doesn’t get access to your main login account.
  2. I would like to change that but I’m having trouble getting dash (/bin/sh on my Debian system) to pass signals onto its child processes. Bash seems to work correctly and so the exec is not needed if /bin/sh is bash on your system.
  3. The dmctl commands and arguments should be reversed so it’s more like system v init scripts or the “service” command: “dmctl wordpress stop” instead of the current “dmctl stop wordpress”.

Crysis 2–weapon stuck in semiautomatic mode.

So I was playing Crysis 2 and hit a random button on my xbox controller and my weapon went into semiautomatic mode. I could not for the life of me figure out what I had done or get it to switch back. Apparently I’m just dumb but it was so frustrating I tried to search google but came up empty.

Turns out later I discovered it was the “under barrel” option and that you can switch firing modes with the left d-pad.

So if anyone out there is as dumb as me, that’s how to get your Scarab out of semi-auto mode.

Snow Leopard Time Machine Tweaks

Sparse bundles created by Time Machine in the latest versions of Snow Leopard are created slightly differently than they used to be. It used to be that Time Machine would create a sparse bundle with a name like “machine-name_001122334455.sparsebundle” where the “001122334455” part was your main ethernet port’s MAC address. Now it creates just “machine-name.sparsebundle”. So how does it associate a machine with the sparsebundle?

Well, it turns out they added a new file inside the bundle. Now, alongside “Info.plist” there is a new file called “com.apple.TimeMachine.MachineID.plist”. Inside this file is some info:

<?xml version="1.0" encoding="UTF-8"?>
<!DOCTYPE plist PUBLIC "-//Apple//DTD PLIST 1.0//EN" "http://www.apple.com/DTDs/PropertyList-1.0.dtd">
<plist version="1.0">
<dict>
	<key>VerificationDate</key>
	<date>2011-04-09T19:57:48Z</date>
	<key>VerificationExtendedSkip</key>
	<false/>
	<key>VerificationState</key>
	<integer>1</integer>
	<key>com.apple.backupd.BackupMachineAddress</key>
	<string>00:11:22:33:44:55</string>
	<key>com.apple.backupd.HostUUID</key>
	<string>01234567-1234-5678-9abc-12345678abcd</string>
</dict>
</plist>

The “com.apple.backupd.BackupMachineAddress” is where the MAC address is now stored, but there’s one other extra field: “com.apple.backupd.HostUUID”. This value can be found by launching “System Profiler” (hold down the option key while selecting the Apple menu to get there quickly). On the first page (titled “Hardware Overview”) is something called “Hardware UUID”. This is what goes in the HostUUID field.

So if you ever need to create a Time Machine sparse bundle from scratch, you’ll need to make this file and fill out those 2 fields. There are some other fields in there but I have no idea what they do. I think they have to do with when “fsck” was last run on the sparse bundle and whether or not the bundle is valid, but I haven’t explored it yet.

Introducing Daemon Manager

The idea for Daemon Manager came about when I was converting a web site from Apache to Nginx. Nginx doesn’t launch FastCGI programs itself—it only connects to FastCGI sockets and so it requires that you manage the FastCGI server yourself.

For a simple web site it might be OK to manually create an /etc/init.d script, but even for our relatively simple solitaire site we ended having about 5 separate FastCGI servers (between the blog, the forum, and our test servers). At home I host virtual servers for various members of my family and so there’s a ton of accounts and blogs and forums and other random stuff. I just can’t abide copy and pasting 20 /etc/init.d scripts and then managing them all as they slowly fork away from each other over time. Not to mention that ordinary users can’t manage /etc/init.d scripts themselves (without compromising system security) and if the script does any sort of setuid() calls then they can’t even restart their FastCGI servers without there being some sort of arcane sudo configuration.

I also ran into a problem with PHP. I wanted to run WordPress on Nginx which meant I had to run the “php-cgi” FastCGI server. The problem is that “php-cgi” seems to just die randomly which means I needed some sort of watchdog that starts it back up when it fails.

What I really wanted is a program that lets non-privileged users launch and respawn their own daemons securely and very simply.

Daemon Manager is the result.

Design

The main principles of Daemon Manager’s design were:

  1. It must be possible for a user to set up and configure their daemons—no root access must be required for a user to create a new daemon or restart one of their daemons.
  2. It must be secure—users should not be allowed to control other users’ daemons (unless they are given explicit permission).
  3. It should allow for good security practices—users should be allowed to launch a daemon as a user other than themselves if root has explicitly allowed it. This is so you can run your FastCGI server as a “nobody” style user.1
  4. It should restart the daemons if they crash (I’m looking at you, php-cgi).
  5. It should be easy to use—1 config file per daemon and a simple command line interface to interact with the running daemons.

There are programs out there that do parts of that list, but none that do everything:

  • daemon tools: I’ve used it before and I really like its philosophy of being small and simple. But it seems to really want to run as root which means you have to be root to control it. Also, setting up new daemons is kind of a pain.
  • Upstart: It’s very similar and it makes setting up a new daemon pretty easy but since it’s an “init” replacement it doesn’t seems very adept at running programs meant for non-root users. I’ve done it before but there was a lot of “sudo” configuration and it wasn’t easy. Also the config files are stored in /etc/init and only root can write new ones.
  • Systemd: I really love systemd. Or the idea of it, really—some day it will make it into Debian and I’ll start actually using it. But its philosophy is great. But again, being an “init” replacement gives it most of the same downsides as upstart.

Implementation

From those ideas Daemon Manager was born. I prototyped it in Perl in about 8 hours. The idea seemed sound but I was unhappy with the memory requirements of Perl. I wanted it to be something really small and lean, without any external dependencies. So I rewrote it in C++. It now takes up hardly any RAM which makes it suitable for smaller or embedded environments. The main loop just poll()s on the control sockets and calls wait() when necessary, occasionally restarting a crashed daemon.

I tried to think about security because if it’s insecure then nobody is going to want to use it seriously. Daemon Manager will refuse to read config files that don’t have the right permissions. It uses Unix domain sockets to communicate with users (1 socket for each user in ~/.daemon-manager/command.sock) and makes sure that each socket has the correct permissions when it starts—this way user authentication is handled by the operating system’s filesystem permissions layer. By default users of the system are not allowed to run anything—root must authorize each user and specify which users their daemons can be run as.

A Quick Tutorial Through Examples

Master config: /etc/daemon-manager.conf

[runs_as]
david: www-data
michaelc: www-data
amy: www-data
joann: www-data
jim:
greenfelt: www-data

[manages]
david: michaelc,amy,joann,greenfelt
michaelc: amy, joann
bill: joann
jim: greenfelt

The main section is the “runs_as” section. This section tells Daemon Manager which users are allowed to start daemons and which users the daemons can be run as. In the above example, “david”, “michaelc”, “amy”, “joann”, and “greenfelt” can launch daemons as themselves and also “www-data”. “jim” is only allowed to launch daemons as himself. No other users on the system are allowed to launch daemons at all because they weren’t listed.

The “manages” section is a little experimental at this point, but the idea is that “david” is allowed to manage (start, stop, or restart) the daemons of “michaelc”, “amy”, “joann”, and “greenfelt” in addition to his own daemons. This is so you can have help desk type users who can stop or restart other users’ daemons even though they may not have read or write access to the users’ home directories.

Daemon: deluged.conf

dir=/home/david
start=exec deluged -d

This is a simple Daemon Manager config file that launches the deluge bittorrent client daemon. “dir” and “start” are the only required entries in the file. “dir” is the working directory and “start” is a one line shell script to run. Because it is a shell script it needs to “exec”, otherwise Daemon Manager can’t manage it properly.2

Daemon: wordpress.conf

dir=/home/user/wordpress
user=www-data
start=exec php-cgi -q -b wordpress.socket

This starts a PHP FastCGI daemon in a WordPress directory and starts it running with as the “www-data” user.

Daemon: greenfelt.conf

dir=/var/www/greenfelt.net
user=www-data
start=exec ./script/greenfelt_fastcgi.pl -l greenfelt.socket -n 1
output=log

This is a paraphrase of the config file that runs greenfelt.net which is a Catalyst app. The “output” parameter tells Daemon Manager to collect the stdout and stderr of the daemon and save it to a log file in the “~/.daemon-manager/logs/” directory.

Controlling Daemon Manager

Daemon Manager is controlled using the “dmctl” command. It is relatively simple at this point, allowing you to start, stop and restart daemons. It also lets you scan for new conf files and query for daemon statistics. Here’s an example output the “status” command:

$ dmctl status
daemon-id                      state              pid respawns cooldown   uptime    total
david/deluge-web               running           2948        0       0s     3w3d     3w3d
david/deluged                  running           2950        0       0s     3w3d     3w3d
david/greenfelt                stopped              0        0       0s       0s       0s
david/minecraft                stopped              0        0       0s       0s       0s
david/moviefile                running           2951        0       0s     3w3d     3w3d
david/pytivo                   running          22905        0       0s     4d7h     4d7h
david/streamium                running           2958        0       0s     3w3d     3w3d
david/wordpress                running          27012       33       0s   12h57m     3w3d

Notice that the wordpress server (good old php-cgi) has crashed 33 times (and has been automatically respawned by Daemon Manager). Also notice that despite FastCGI being the impetus for creating Daemon Manager, most of my running daemons are not actually FastCGI servers.

Download and Use

Daemon Manager is licensed under the GPL and can be downloaded here (the source is also available on github). If you use Debian there’s a Debian branch available for building a package. The version as of this writing is 0.9 which means that there are some obvious things that need to be fixed3 and that I’m not sure it’s 100% secure or bug free yet, though I have boldly started using it on a couple sites and so far it’s been working great.

  1. That way, if there is a security hole in your code the attacker doesn’t get access to your main login account.
  2. I would like to change that but I’m having trouble getting dash (/bin/sh on my Debian system) to pass signals onto its child processes. Bash seems to work correctly and so the exec is not needed if /bin/sh is bash on your system.
  3. The dmctl commands and arguments should be reversed. “dmctl wordpress stop” instead of the current “dmctl stop wordpress”.

How to get fsaclctl off your Leopard install DVD

Leopard came with a program called fsaclctl that let you turn on and off ACL control for a filesystem. For some reason they stopped shipping it in Snow Leopard and so if you’ve upgraded the file has been deleted from your disk.

Well, I couldn’t find anyone that had an Intel 10.5 install (well, couldn’t find anyone quickly–I’m impatient) and so I stuck in the 10.5 install DVD that came with my computer to see if I could extract it from there. I was able to do–here’s how:

First, get into Terminal and go to where the package all hang out:

cd "/Volumes/Mac OS X Install Disc 1/System/Installation/Packages"

Then look for a likely candidate. I tried ACL.pkg first but it wasn’t there and then I tried “BaseSystem.pkg” but it wasn’t there either. Finally I found it in “BSD.pkg”.

Ok, so what are these .pkg files? They are not normal installer .pkg files. Turns out they are “xar” files. Some weird package format Apple invented so they could put crazy meta data in the header or something. Anyway, xar is installed by default (at least on my 10.6 machine) so you just have to extract it:

mkdir /tmp/bsd
xar -xzf BSD.pkg -C /tmp/bsd

That runs for a minute and leaves 5 or so files in /tmp/bsd:

Bom
PackageInfo
Payload
Scripts

The “Bom” file (Bill of Materials) is the first thing we are interested in. Use “lsbom” to check it out:

lsbom /tmp/bsd/Bom | grep fsaclctl

Success! This is where it’s at. So all that’s left is extracting it. One of the other files in there is called “Payload” and is just a tar file. Extracting is easy:

tar xf /tmp/bsd/Payload -C /tmp/bsd/ *fsacl*

Now if you check the /tmp/bsd directory you will see that tar has extracted the stuff to “usr”.

find /tmp/bsd/usr

…will produce:

/tmp/bsd/usr
/tmp/bsd/usr/sbin
/tmp/bsd/usr/sbin/fsaclctl
/tmp/bsd/usr/share
/tmp/bsd/usr/share/man
/tmp/bsd/usr/share/man/man1
/tmp/bsd/usr/share/man/man1/fsaclctl.1

Yay!

How to find out what Mac OS X system is installed on a random disk

Ok, so you have a random disk lying around and you plug it in and it looks like it has Mac OS X installed on it. How do you tell what version it is without booting into it?

First, launch terminal and cd into the root of the disk (“/Volumes/whatever“). Then run this command:

sed -e 's/.*\(10\.[[:digit:]]*\.[[:digit:]]*\).*/\1/' \
    -e '/^10/q' -e d System/Library/CoreServices/SystemVersion.plist

Magic! :-)

CentOS (RHEL) 5.4 kernel source

My annoying, non-google-able problem of the day: Say you want to build the source tree for a RHEL/CentOS 5.4 kernel (2.6.18-164.11.1.el5 in my case) and you are running a recent Debian or Fedora system. You might get patch failure errors that look like this:

Patch #212 (linux-2.6-x86-support-rdtscp-for-gtod.patch):
+ + /bin/cat /Users/david/rpmbuild/SOURCES/linux-2.6-x86-support-rdtscp-for-gtod.patch
/usr/bin/patch -s -p1 --fuzz=0
1 out of 7 hunks FAILED -- saving rejects to file arch/x86_64/kernel/time.c.rej
error: Bad exit status from /var/tmp/rpm-tmp.5n4IVi (%prep)


This is caused by newer versions of rpmbuild passing --fuzz=0 to patch. You can fix it by putting this line in the kernel-2.6.spec file:

%define _default_patch_fuzz 2

That’s it. I just saved you 8 hours of screwing around and looking for pre-patched kernels sources. ;-)

Last Modified on: Dec 31, 2014 18:59pm