I spent a bunch of time trying to get Texinfo to work correctly with Nix on macOS. I wanted my nix-env installed packages to have the info files and top level index file (called dir, confusingly 🙂). I don’t really use the info cli tool, but I use Emacs and I want to view the make info manual in particular. Getting it working was harder than I expected and I had to delve into way too much source code to figure it out. A couple years ago I set some overlays up so that my nix-env was declarative instead of adding packages ad-hoc with nix-env -i.
Nixpkgs separates some of their outputs so that you can choose which ones you want (“man”, “info”, “doc”, etc.). The first annoyance is that nix-env doesn’t include “info” outputs even when texinfoInteractive (the curses info viewer package) is installed. The solution to that was adding a custom package to my list of packages:
This adds a package called info-dir which contains “info” outputs of all the packages I’ve selected and builds a symlink tree in its $out/share/info which nix-env then symlinks into my profile.
However, this isn’t enough by itself. Texinfo (and Emacs) want the top level index file. Nothing in nixpkgs makes that for us so we have to do it ourselves by adding a postBuild to the info-dir package definition:
        postBuild = ''
          (set -x
          if [ -x ${super.texinfoInteractive}/bin/install-info -a -w "$out/share/info" ]; then
            shopt -s nullglob
            for i in {$out,${super.texinfoInteractive}}/share/info/*.info{,.gz}; do
              ${super.texinfoInteractive}/bin/install-info "$i" $out/share/info/dir
            done
          fi
          )
        '';
However, that still wasn’t enough! To my chagrin the dir file did not appear in ~/.nix-profile/share/info/dir. But when I inspected the info-dir package in the nix-store, it was there! What?? So someone is stripping it off? Now I started digging through source code but I couldn’t find anything good in the nixpkgs repo: info/dir only appears there once but in some random package I wasn’t using. Next I checked the Nix binaries repo and my git grep yielded this:
        /* The files below are special-cased to that they don't show
         * up in user profiles, either because they are useless, or
         * because they would cause pointless collisions (e.g., each
         * Python package brings its own
         * `$out/lib/pythonX.Y/site-packages/easy-install.pth'.)
         */
        if (hasSuffix(srcFile, "/propagated-build-inputs") || hasSuffix(srcFile, "/nix-support")
            || hasSuffix(srcFile, "/perllocal.pod") || hasSuffix(srcFile, "/info/dir") || hasSuffix(srcFile, "/log")
            || hasSuffix(srcFile, "/manifest.nix") || hasSuffix(srcFile, "/manifest.json"))
            continue;
Wait, it’s hard coded to ignore “dir” files in “info” directories with no way to override that??? Oh, come on. Well, perhaps the original commit can shed some light and suggest some work-around. So I went to work with git blame, working back through the code as it was rewritten from Perl to C++ and finally found the original commit (from 2005!):
          ;; Try several variants of specified name.
          ;; Try upcasing, appending `.info', or both.
          (let* (file
             (attrs
              (or
               (progn (setq file (expand-file-name "dir" truename))
                  (file-attributes file))
               (progn (setq file (expand-file-name "DIR" truename))
                  (file-attributes file))
               (progn (setq file (expand-file-name "dir.info" truename))
                  (file-attributes file))
               (progn (setq file (expand-file-name "DIR.INFO" truename))
                  (file-attributes file))
               ;; Shouldn't really happen, but sometimes does,
               ;; eg on Debian systems with buggy packages;
               ;; so may as well try it.
               ;; https://lists.gnu.org/r/emacs-devel/2012-03/msg00005.html
               (progn (setq file (expand-file-name "dir.gz" truename))
                  (file-attributes file)))))
Aha! It did! They try some capitalization and also dir.info. So I changed my postInstall to this:
        postBuild = ''
          (set -x
          if [ -x ${super.texinfoInteractive}/bin/install-info -a -w "$out/share/info" ]; then
            shopt -s nullglob
            for i in {$out,${super.texinfoInteractive}}/share/info/*.info{,.gz}; do
              ${super.texinfoInteractive}/bin/install-info "$i" $out/share/info/dir.info
            done
          fi
          )
        '';
And dir.info slipped through! Yay! It appears that both info and Emacs see dir.info, so the solution is universal to both.
Finally, “Make” shows up when I do C-h i in Emacs. Yay!
I wanted to make a script that updated to the latest nix channel automatically when it was released, the same way I do with my Debian boxes.
Nix doesn’t have any nice way of querying the list of channels programmatically, but you can query their git repository since releases are created as branches there:
nixos-??.??: only show remote branches/tags that match this pattern. If you wanted to match a different official channel type, this is what you’d change. For instance you might want nixos-??.??-small or nixpkgs-??.??-darwin.
--sort=-v:refname: Print the branch names in reverse (-) version order (v:) of their refname. Version sort correctly sorts numbers amid letters so nix-1.10 would sort before nix-10.1.
This awk script takes the 2nd column (in awk, commands are run for each line and columns are loaded into $1, $2, $3, etc.) and erases the text matched by the regular expression ^.*/. This clears out the refs/heads/ text. The exit make awk quit the script immediately after printing once, so we only get the first line (equivalent to head -1). Since we’re sorting by reverse order of version, the latest release (the one with the highest number) gets printed.
Firefox version 115 introduced Quarantined Domains to protect user privacy and security when we discover significant security issues presented by malicious actors. This feature allows us to prevent attacks by malicious actors targeting specific domains when we have reason to believe there may be malicious add-ons we have not yet discovered.
However they don’t go on to explain how to get a list of them! Turns out it’s pretty easy, they’re in the about:config:
Open about:config and then search for extensions.quarantinedDomains.list. Copy and paste the link because Firefox doesn’t like linking to about:config (nor does it allow url filters, grrrrrr 😡).
I got a weird error while trying to compile a slint program with the skia backend on my macOS machine:
   Compiling skia-bindings v0.75.0
error: failed to run custom build command for `skia-bindings v0.75.0`

[…a huge section of output snipped…]

  clang -MD -MF obj/third_party/externals/libpng/libpng.png.o.d -DPNG_SET_OPTION_SUPPORTED -DNDEBUG  -w -Wno-attributes -ffp-contract=off -fstrict-aliasing -fPIC -fvisibility=hidden -isysroot /Applications/Xcode.app/Contents/Developer/Platforms/MacOSX.platform/Developer/SDKs/MacOSX14.5.sdk -target arm64-apple-macos11 -O3 -O0 -isystem /Users/me/.cargo/registry/src/index.crates.io-6f17d22bba15001f/skia-bindings-0.75.0/skia/third_party/libpng -isystem /Users/me/.cargo/registry/src/index.crates.io-6f17d22bba15001f/skia-bindings-0.75.0/skia/third_party/externals/libpng -isystem /Users/me/.cargo/registry/src/index.crates.io-6f17d22bba15001f/skia-bindings-0.75.0/skia/third_party/externals/zlib  -c ../../../../../../../../.cargo/registry/src/index.crates.io-6f17d22bba15001f/skia-bindings-0.75.0/skia/third_party/externals/libpng/png.c -o obj/third_party/externals/libpng/libpng.png.o
  In file included from ../../../../../../../../.cargo/registry/src/index.crates.io-6f17d22bba15001f/skia-bindings-0.75.0/skia/third_party/externals/libpng/png.c:14:
  /Users/me/.cargo/registry/src/index.crates.io-6f17d22bba15001f/skia-bindings-0.75.0/skia/third_party/externals/libpng/pngpriv.h:945:4: error: ZLIB_VERNUM != PNG_ZLIB_VERNUM       "-I (include path) error: see the notes in pngpriv.h"
  #  error ZLIB_VERNUM != PNG_ZLIB_VERNUM \
     ^
  1 error generated.
  [767/827] compile ../../../../../../../../.cargo/registry/src/index.crates.io-6f17d22bba15001f/skia-bindings-0.75.0/skia/third_party/externals/libpng/pngerror.c
  FAILED: obj/third_party/externals/libpng/libpng.pngerror.o
There wasn’t a lot of info online (Google returned nothing of interest for "ZLIB_VERNUM != PNG_ZLIB_VERNUM") but DuckDuckGo eventually led me to this. I checked and noticed I had this environment variable set:
I’ve been annoyed recently with a bunch of junk in my dmesg output:
[Thu Jul 11 10:29:27 2024] docker0: port 5(veth9509698) entered blocking state
[Thu Jul 11 10:29:27 2024] docker0: port 5(veth9509698) entered disabled state
[Thu Jul 11 10:29:27 2024] veth9509698: entered allmulticast mode
[Thu Jul 11 10:29:27 2024] veth9509698: entered promiscuous mode
[Thu Jul 11 10:29:27 2024] docker0: port 5(veth9509698) entered disabled state
[Thu Jul 11 10:29:27 2024] veth9509698 (unregistering): left allmulticast mode
[Thu Jul 11 10:29:27 2024] veth9509698 (unregistering): left promiscuous mode
[Thu Jul 11 10:29:27 2024] docker0: port 5(veth9509698) entered disabled state
This repeats every couple seconds ad infinitum and pollutes the log making it hard when it’s time to debug other things.
I finally decided to track it down and found a fewdifferent solutions but none of them worked. I finally found a mention in a bug report that it was normal. Surely it’s not normal to spew messages constantly, though… right?
After pondering it a bit and re-reading some context it seemed like they were saying it was normal to print that every time a container started, not just printing it constantly. That led me to thinking, what if I’ve got a container that’s constantly starting and stopping? What would cause that and how do I find it?
Poking around in the docker command I found docker events, which sounded promising. Sure enough, after running it I saw that a container was constantly starting and stopping. It turns out this container was a failed attempt at something and it had a systemd service that was constantly trying to get it to run. When I stopped working on it I forgot remove the .service file from /etc/systemd/system. Once I stopped the service and deleted the service file, the spewing stopped. Ahhhhhhh.
I was trying to compile a third party Rust crate today on a Debian box and I was getting a weird error I’d never seen:
  = note: cc: fatal error: cannot read spec file './specs': Is a directory
          compilation terminated.
I’ve done a bunch of embedded C stuff in the past so I knew what a specs file was—but why couldn’t gcc open its specs file? The first clue was that this particular crate had a directory at its top level called “specs”. I moved it away and the error went away. Ok. But why is gcc looking for a specs file in my cwd??
Rust printed out the linker command it was using to invoke gcc with so I could look through that but there was nothing referencing a spec file there.
I figured it might be something set up incorrectly on my local machine but there’s practically no documentation about where gcc looks for specs files. I ended up downloading the gcc source (thank heavens for apt source!) and grepping it for “cannot read spec file”, which lead me to the load_specs() function in gcc/gcc.c. Ok. So I poked around that file, following the thread of function calls around and just sort of looking for anything. I eventually noticed startfile_prefixes which appeared to be where they searched for specs. Searching around the file led me to a section where it looped over LIBRARY_PATH and added each component to startfile_prefixes. This stuck out to me because I had LIBRARY_PATH set in my env.
I looked at it more closely and noticed it was
LIBRARY_PATH=/usr/local/lib:
Hmm. Why does it have a stray : on the end? Maybe that’s it. I tested it with:
LIBRARY_PATH=/usr/local/lib cargo build
And everything built just fine! Yay!
So it was my fault after all… Sigh. I checked my .bashrc and found a bug in one of my path construction functions which was putting the extra : on the end. Then I spent some time relearning a bunch of excruciating shell details and getting everything fixed. 🙂
I can’t remember who wrote this first, but my friend and I have been using some version of this shell snippet for years:
ssh_find() {
    for agent in "$SSH_AUTH_SOCK" /tmp/ssh-*/agent.* /tmp/com.apple.launchd.*/Listeners* /tmp/keyring-*/ssh; do
        SSH_AUTH_SOCK="$agent" ssh-add -l 2>/dev/null
        case "$?" in # 0 some keys, 1 no keys, 2 no agent
            0) export SSH_AUTH_SOCK="$agent"; echo "Found Keys." ; break ;;
            1) export SSH_AUTH_SOCK="$agent"; echo "Found Agent.";  ;; # Keep looking
        esac
    done
}
This function looks through /tmp for ssh-agent sockets (using various macOS, Linux, openssh naming schemes) and then finds the first one that (a) it has permissions for and (b) have keys unlocked in them (giving precedence to any currently active ones). If it can find some valid agents but none of them have keys then it will use the last one it found.
Later in .bashrc I have a section for interactive shells and I call it from there:
#
# Interactive only stuff:
#
if [[ "$-" =~ i ]]; then
    ...snipped...

    # ssh related stuff
    ssh_find

    if [ x$SSH_AUTH_SOCK == x ]; then
        exec ssh-agent bash
    fi

    ...snipped...
fi
That looks for an agent and starts one up if there were none running12.
How is this actually useful?
Basically it makes it so ever tab I open in my terminal (or in a tmux) latches on to an existing ssh-agent so that ssh just works from anywhere without ever thinking about it.
It’s also useful for cron jobs. I have some cron jobs that look like this:
I also have similar ones that do some git operation that needs an ssh key.
It is generally convenient for things that need ssh keys to run, but where you don’t necessarily want the keys sitting around on the disk in unencrypted form. This lets them sit unencrypted in RAM, which is a little better (but at the expense of needing to ssh-add them manually every reboot).
This is kinda gross, since exec throws out the entire bash progress and starts things over but with a new running ssh-agent (more or less doubling the startup time). This only happens on interactive logins so it’s not as bad as you might expect. I do it this way instead of eval $(ssh-agent) so that if the agent was started by ssh-ing into the machine then it gets killed when the ssh process dies (ie, on logout).
This is also racy—picture the case where a gui terminal program starts up and remembers that you had 7 tabs open, so it opens those 7 tabs and starts shells in them in parallel. On my Debian box I have a super complicated and impossible to read fix for this that involves the flock(2) command. I hate it and am embarrassed by the whole thing so fixing the race is left as an exercise to the reader. 🙂
I played around with Apple’s Automator app when it was first released, but I could never really find a good use for it (I wrote some actions but I would never reliably use them for whatever reason). But I did eventual write one that I use constantly.
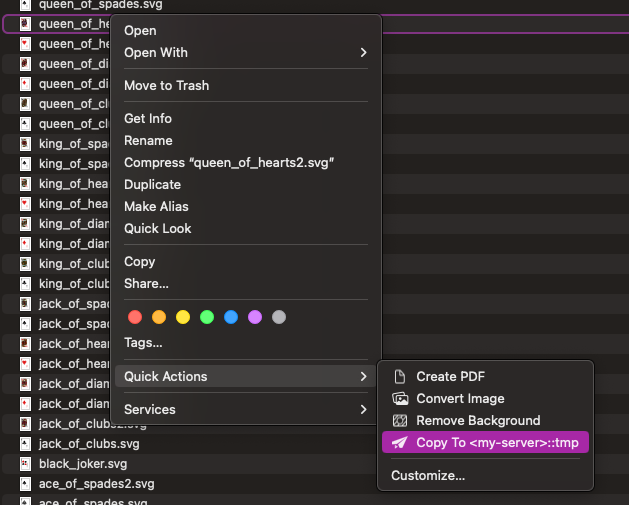
It’s a “Quick Action”, which means it shows up in Finder when you right click:
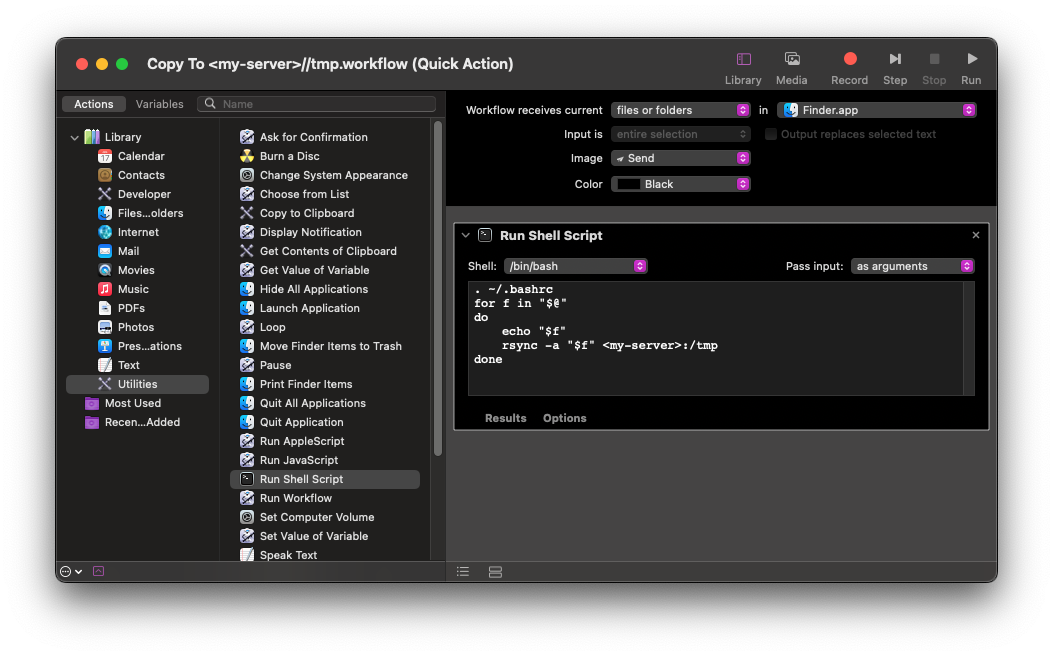
It extremely simple on the Automator side:
Note: My real script replaces <my-server> with the actual server name.
The key things are to set “Workflow receives current” to “files or folders”, “in” to “Finder.app” and in the “Run Shell Script” section, “Pass input” to “as arguments”. I set the Image to “Send” because it seemed reasonable.
The script it self is trivial:
. ~/.bashrc
for f in "$@"
do
    echo "$f"
    rsync -a "$f" <my-server>:/tmp
done
The trickiest part here is getting SSH working without asking for your password (since this script effectively runs headless). I set up my ~/.bashrc to search through ssh-agent socket files to find one that it has permission to read and that has keys. It then sets up environment variables so that ssh uses that agent, giving me password-less ssh nearly 100% of the time.
I actually have several variants of this Automator action that rsync to different places (some of which are watched by inotify and kick other things off when files appear there). It’s really handy for them to just show up in the Finder right-click menu like that, and I find myself constantly using them to move stuff I’ve downloaded through my local web browser over to my server. I find it way more reliable than trying to keep the remote server mounted through smb or nfs.
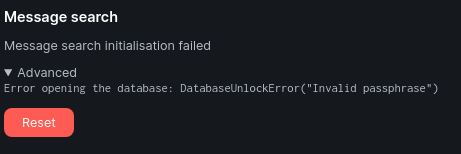
My MacOS Element Matrix client (Electron based) started getting errors when I searched. My Windows Matrix client worked just fine, so I was pretty sure it wasn’t a server issue. When I typed anything into the message search I’d get this error right underneath:
“Message search initialisation failed, check your settings for more information”
And when I clicked the “settings” link I’d see this:
Error opening the database: DatabaseUnlockError(“Invalid passphrase”)
Clicking on the “Reset” button brought a scary warning dialog (“you probably don’t need to do this”—yeah, I kinda think I do) but clicking through it didn’t actually seem to do anything.
Searching for those terms got me to a github issue. Nothing seemed resolved but I found a message in the middle that helped me fix the problem.
Here’s what I did:
Close the app
cd ~/Library/Application Support/Riot. I had to poke around till I found that. There was also a ~/Library/Application Support/Element but it seemed older and out of date, oddly.
tar cjf EventStore-bad-2023-06-18.tar.bzr EventStore. This made a backup copy of the EventStore directory just in case I needed it (I didn’t).
My brother nerd sniped me the other day. He wanted to see if he could extract the images out of an old game by Ambrosia Software called “Slithereens”. It was released on 1998-12-15 for Mac OS 9. That sounds easy enough…
Digging though resource forks
Old Mac OS had the ability to have a 2nd plane of data on a file called a “resource fork”. Rather than being just arbitrary binary blobs, they had some structure to them. Back in the day there was tool called “ResEdit” from Apple that let you poke around Resource Forks. Today there are open source clones out there. I grabbed “ResForge” to look around with a nice GUI. I could have also used /usr/bin/derez which still ships with the developer tools even on the latest macOS 13.
Here’s the list of resources in the Slithereen Sprites resource files:
There’s just a handful of types. Poking around it looks like the SpRt resources contain metadata about the animations and the SpRd resources are just raw data, probably bitmaps.
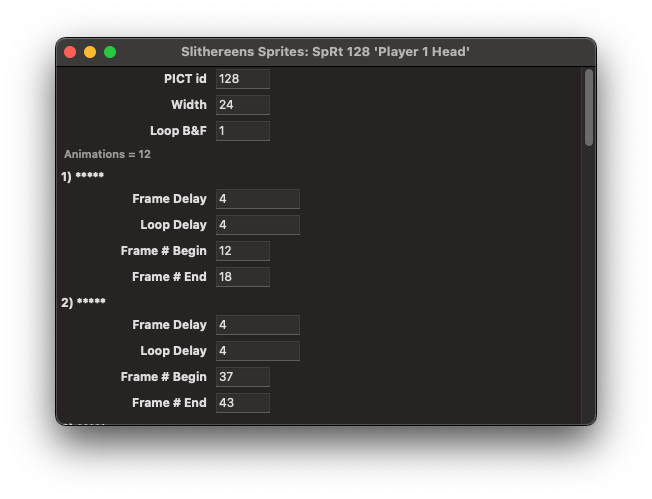
Here’s a SpRt resource for the “Player 1 Head” sprite:
That’s got a bunch of stuff, but really the only super interesting piece of data is the width: 24 pixels.
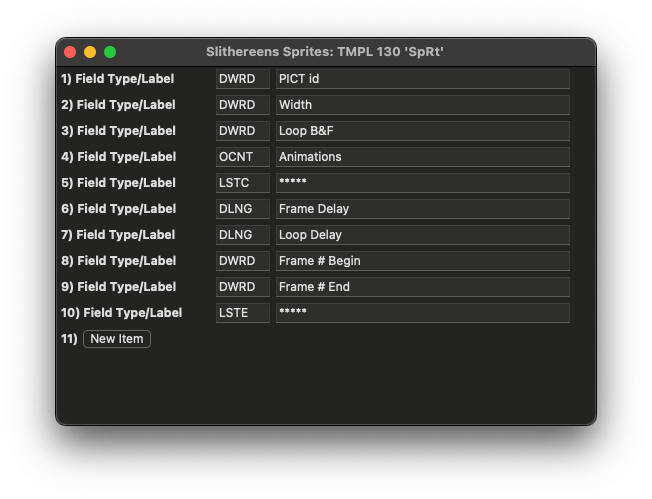
As an aside, how did they get their custom animation data to show up parsed like that? That’s actually a cool feature of ResEdit—you can defined TMPL resources in your file and ResEdit will use them to decode and print your data nicely, allowing you to edit stuff right right from ResEdit and without any custom tools. Many programs would ship with their TMPLs and so you could open the application with ResEdit and poke around their data. It’s sort of the equivalent of finding a .json file in someones app nowadays. Here’s the TMPL for the SpRt resource:
I didn’t want to start with the “Player 1 Head” sprite though. I wanted something more recognizable that would help when looking for patterns. A 24×24 square with a semi-circular snake head in the middle seemed to hard. I checked out the screenshot and noticed the “Level” text in the bottom right corner, which seemed promising:
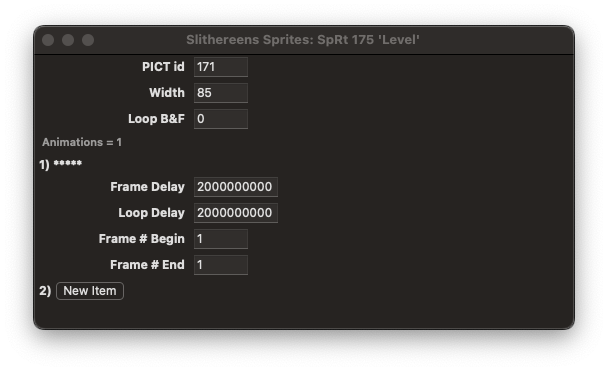
Distinctive shape, wider than it is tall. It looked like it was in a sprite called “Level”, so I checked out the SpRt resource:
It’s just a single animation frame, which seems like a good idea to start with—less complications up front.
Width 85. I can remember that number… But no Height for some reason. I zoomed up the screenshot and manually counted the pixels in the Level sprite. It looks like it is 22 pixels high.
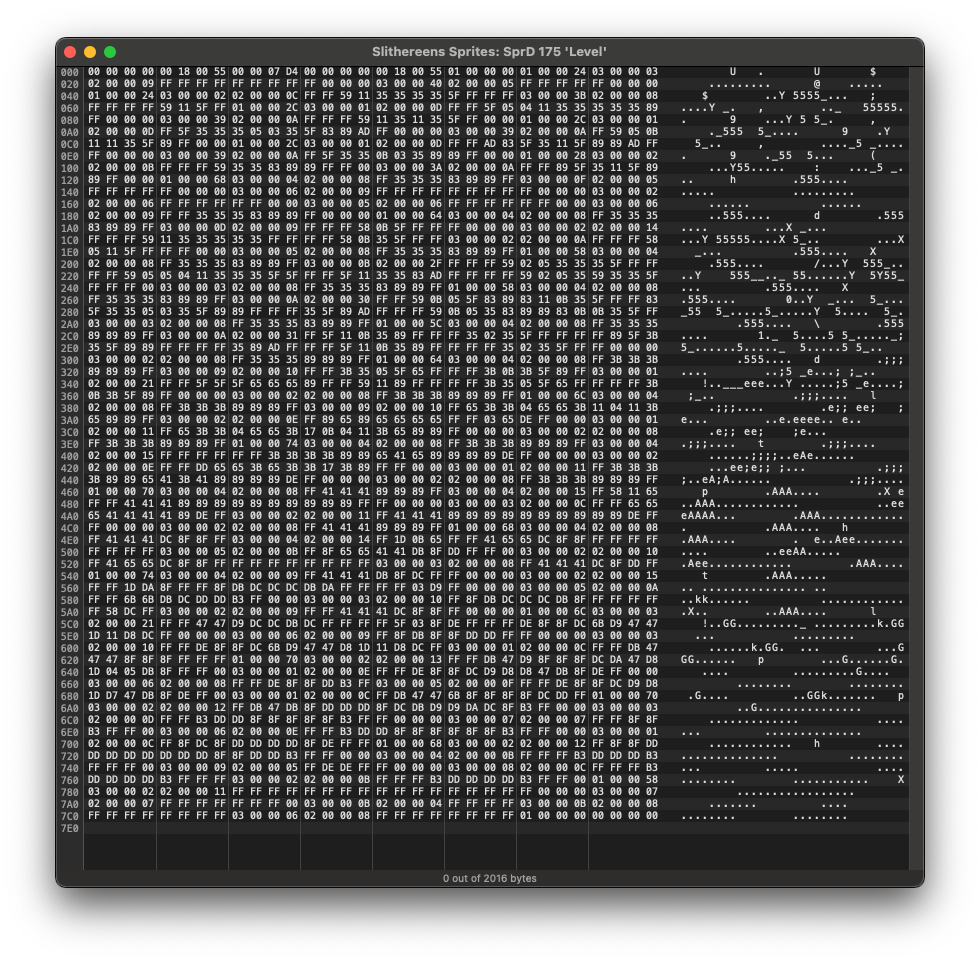
Now lets look at the data (in the SpRd resource):
I glance at this a little, but my eyes glaze over. It’s probably just bitmap data, after all.
What I don’t know, though, is the layout of the bitmap data. It probably goes top left to bottom right (as was the style of the time), but that’s not a given. What if it’s rotated or something weird? And how many Bits per Pixel (“BPP”) is it? 8 bit seems reasonable for that timeframe, but it could also be 4—it doesn’t look like the sprites each have a ton of color.
So I’m thinking I want a little data structure that I can read arbitrary bits from so that I can try rendering the bitmap with different BPPs. I decided to write it in Ruby and came up with this little class:
class Bits
  def initialize(bytes=[])
    @bytes = bytes
  end

  def get(offset, length)
    v=0
    while length > 0
      start = offset / 8
      bit   = offset % 8

      bs = bit
      be = [8, bs+length].min
      bits = be - bit
      v = v<<bits | @bytes[start] >> (8 - be) & 0xff >> (8 - bits)

      offset+=bits
      length-=bits
    end
    v
  end
end
I also need the sprite data. I’ve saved the RsRd file out from ResForge and I can poke an prod it from the command line now. I read the man page for xxd and discovered the -i option which sounds perfect:
-i | -include: Output in C include file style. A complete static array definition is written (named after the input file), unless xxd reads from stdin.
Neat. Now I can just do:
$ xxd -i Level.sprd > level.rb
And then convert the C-ism to Ruby-ism in Emacs.
I also write a little dump routine to dump the bitmap in rows and columns:
It doesn’t really look like anything. If you kind of squint the different patterns look like different greyscale blobs. Kinda. I play around with some numbers and run it a bunch of times but I can’t make the it look like anything except gibberish.
I end up tweaking the code to output either X or Space instead of the numbers (full program here):
dump(level, 85, 22, 8) {|pix| pix==0 ? " " : "X"}
produces
     X X  XX     X XX   X  XX  XX  XXXXXXXXXX   X  XX  XXXXXX   X  XX  XX  XXXXXXXXXXX
XXXX  XX  XXXXXXXXXX  XX  XX  XXXXXXXXXXXXXX   X  XX  XXXXXXXXXXX  X  XX  XX  XXXXXXXX
XXXXXXX   X  XX  XXXXXXXXXXX  X  XX  XX  XXXXXXXXXXXXXX   X  XX  XXXXXXXXXXX  X  XX  X
XX  XXXXXXXXXXXX X  XX  XXXXXXXXXXX  X  XX  XX  XXXXXXXXXX  XX  XXXXXX   X  XX  XXXXXX
XXXXX   X  XX  XXXXXXX  X  XX  XXXXXXX  X  XX  XXXXXXXXXX   X  XX  XX  XXXXXXXXXX  XX
  XXXXXXXXXX   X  XX  XXXXXXXXXXXXXXXXXXXXXX  XX  XXXXXXXXXXX  X  XX  XXXXXXXXXX  XX
 XX  XXXXXXXXXX  XX  XXXXXXXXXXXXXXXXXXXXXXXXXXXXXXXXXXXXXXXXXXXXXXXX X  XX  XXXXXXXXX
XX  XX  XX  XXXXXXXXXX  XX  XXXXXXXXXXXXXXXXXXXXXXXXXXXXXXXXXXXXXXXXXXXXXXXXXX  XX  XX
XXXXXXXXX  XX  XX  XXXXXXXXXX  XX  XXXXXXXXXXXXXXXXXXXXXXXXXXXXXXXXXXXXXXXXXXXXXXXXXX
   X  XX  XXXXXXXXXX  XX  XX  XXXXXXXXXX  XX  XXXXXXXXXXXXXXXXXX  XX  XXXXXXXXXXXXXXXX
XXXXXXXXXXXXXXXXXXX   X  XX  XXXXXXXXXX  XX  XX  XXXXXXXXXX  XX  XXXXXXXXXXXXXXXXXX  X
XX  XXXXXXXXXXXXXXX  X  XX  XXXXXXXXXXXXXXXXXX   X  XX  XXXXXXXXXX  XX  XX  XXXXXXXXXX
X  XX  XXXXXXXXXXXXXXXXXXXXXX   X  XX  XXXXXXXXXXXXXXX  X  XX  XXXXXXXXXXXXXXXXXX   X
  XX  XXXXXXXXXX  XX  XX  XXXXXXXXXX  XX  XXXXXXXXXXXXXXXXXXXXXX   X  XX  XXXXXXXXXXXX
XXX  XX  XXXXXXXXXXXXXXXXXX   X  XX  XXXXXXXXXX  XX  XX  XXXXXXXXXX  XX  XXXXXXXXXXXXX
XXXXXXXXXX  XX  XXXXXXXXXXXX X  XX  XXXXXXXXXXXXXXXXXX  XX  XXXXXXXXXX  XX  XX  XXXXXX
XXXXX   X  XX  XXXXXXXXXXXXXXXXXXXXXX   X  XX  XXXXXXXXXXX  X  XX  XXXXXXXXXXXXXXXXXX
  XX  XXXXXXXXXX   X  XX  XX  XXXXXXXXXXXXXXXXXXXXXXXXXXXXXXXXXX   X  XX  XXXXXXXXXX
  X  XX  XXXXXXXXXXXXXXXXXX  XX  XXXXXXXXXXXXXX  XX  XX  XXXXXXXXXXXXXXXXXXXX X  XX  X
XXXXXXXXXXXXXXX  X  XX  XXXXXXXXXX  XX  XXXXXXXXXXXXXXXX X  XX  XXXXXXXXXXXXXX  XX  XX
X  XXXXXXXXXXXXXXXXXXX  X  XX  XXXXXXXXXXXXXX   X  XX  XXXXXXXX X  XX  XXXXXXXXXXXXXXX
X  X  XX  XXXXXXXXXXXXXX  XX  XX  XXXXXXXXXXXXXXXXXXX  X  XX  XXXXXXXXXXXX X  XX  XXXX
XXX   X  XX  XXXXXXXXXXXXXX  XX  XXXXXXXXXXXX X  XX  XX  XXXXXXXXXXXXXXXXXX   X  XX  X
That doesn’t look like anything. I tweak more numbers but each time I have to edit the file then run it to get results. It feels slow. I need my turn-around time faster! I kinda want a little UI and maybe have it respond to keystrokes. I start to think a web app could be nice…
So I rewrite those same little code chunks in javascript. Now that I have a browser I can drop <input> tags down, grab a canvas and draw actual rectangles of different colors instead of printing Xs. I get it working and it’s still kinda slow, deleting those numbers and incrementing them—sounds dumb but requires thought and I want to focus on looking for patterns not remembering how to type numbers quickly.
The easy answer is to make “PgUp” and “PgDown” increment and decrement the number (and “Home” and “End” to increment and decrement by 10). This finally feels good. So I sit down and play:
Can you get it to display something resembling the words “Level”? I sure couldn’t. I started thinking this probably wasn’t a straight bitmap.
Take 2
My next guess was some sort of run length encoding (“RLE”). This can be used to compress the data (very simply). My brother had another idea though—he thought they might be PICT files. I wasn’t sure—why wouldn’t they put them in PICT resources then? But I don’t remember how PICTs work so I couldn’t rule it out.
Turns out the Inside Macintosh series of books described the PICT format. I still have mine on the shelf in the other room, but it’s much easier to just search google. Luckily, Apple still has them on their web site.
data 'PICT' (129) {
$"0078"     /* picture size; don't use this value for picture size */
$"0002 0002 006E 00AA"  /* bounding rectangle of picture */
$"0011"     /* VersionOp opcode; always $0011 for version 2 */
$"02FF"     /* Version opcode; always $02FF for version 2 */
$"0C00"     /* HeaderOp opcode; always $0C00 for version 2 */
            /* next 24 bytes contain header information */
   $"FFFF FFFF"   /* version; always -1 (long) for version 2 */
   $"0002 0000 0002 0000 00AA 0000 006E 0000"   /* fixed-point bounding
                                                   rectangle for picture */
   $"0000 0000"   /* reserved */
$"001E"     /* DefHilite opcode to use default hilite color */
$"0001"     /* Clip opcode to define clipping region for picture */
   $"000A"  /* region size */
   $"0002 0002 006E 00AA"  /* bounding rectangle for clipping region */
$"000A"     /* FillPat opcode; fill pattern specifed in next 8 bytes */
   $"77DD 77DD 77DD 77DD"  /* fill pattern */
$"0034"     /* fillRect opcode; rectangle specified in next 8 bytes */
   $"0002 0002 006E 00AA"  /* rectangle to fill */
$"000A"     /* FillPat opcode; fill pattern specified in next 8 bytes */
   $"8822 8822 8822 8822"  /* fill pattern */
$"005C"     /* fillSameOval opcode */
$"0008"     /* PnMode opcode */
$  "0008"   /* pen mode data */
$"0071"     /* paintPoly opcode */
   $"001A"  /* size of polygon */
   $"0002 0002 006E 00AA"  /* bounding rectangle for polygon */
   $"006E 0002 0002 0054 006E 00AA 006E 0002"   /* polygon points */
$"00FF"     /* OpEndPic opcode; end of picture */
}
Lets hex dump our SpRd data and see if it matches up. All these dumps are big endian, as the all the old 680×0 and PowerPC Macs were big endian machines (technically PowerPC CPUs could run in either little endian or big endian mode, but MacOS Classic always run in big-endian mode):
That looks more promising. In fact the entire thing seems to be u32 aligned and the first bytes seem mostly similar.
The 01, 02, 03 words don’t start right away, which means there’s probably a file header up front.
I remember that the SpRt resource for the “Level” sprite says the width is “85”—that’s is 0x55 in hex. I see that in the first few words a couple times:
0x18 is 24 decimal, which is what we think the height of the sprites is (annotate). I got 22 by pixel counting, but 24 is close enough. There are some zeros that I don’t understand yet (annotate), and a 0x7d4 (annotate). That looks big enough to maybe be a length. I ls -l the file which says it’s 2016 bytes long, which is 0x7e0. That’s extremely close to 0x7d4, so it’s probably related. In fact, if we subtract them to see just how close they are then we get 12, or 0xc. Aha! That corresponds to the file offset just after the length (annotate), which means that is the length of the rest of the file.
So far the theory is that this is a header with some zeros that are unknown, a height and width, the length of the file (measure from just after reading that u32), and then the zeros and width and height again for some reason. Let’s not worry about that for now, let’s look at the rest.
After staring at the data for a while I notice that whenever there are words that don’t start with 01, 02, or 03, that they always come after a 02. If we take some random sections of the file and look at them maybe we can see a pattern:
00000020: [02][000009]  .... => Command 2, Length = 9 #data_l
00000024: [ffffffff]  .... => Data #data_b
00000028: [ffffffff]  .... => Data #data_b
0000002c: [ff][000000]  .... => Data #data_b, Padding for alignment #align

000000e8: [02][00000a]  .... => Command 2, Length = 0xa (10) #data_l
000000ec: [ff5f3535]  ._55 => Data #data_b
000000f0: [0b033589]  ..5. => Data #data_b
000000f4: [89ff][0000]  .... => Data #data_b, Padding for alignment #align

000003f0: [02][000008]  .... => Command 2, Length = 8 #data_l
000003f4: [ff3b3b3b]  .;;; => Data #data_b
000003f8: [898989ff]  .... => Data #data_b

0000055c: [02][000015]  .... => Command 2, Length = 0x15 (21) #data_l
00000560: [ffff1dda]  .... => Data #data_b
00000564: [8fffff8f]  .... => Data #data_b
00000568: [dbdcdcdc]  .... => Data #data_b
0000056c: [dbdaffff]  .... => Data #data_b
00000570: [ffff03d9]  .... => Data #data_b
00000574: [ff][000000]  .... => Data #data_b, Padding for alignment #align
The longer the trailing data is (until the next 01 or 03), the larger that lower byte in the 02 u32. In fact, I count them and it looks like that is a precise byte count (annotate). When it doesn’t align to 32 bits it’s filled with zeros (annotate)! Skimming through the file I don’t see anything that counters this. So lets code it up and see if it’s really true. I decide to call these u32s that start with 01, 02 and 03 (and the 00 I notice at the very end) “commands”, though I don’t know exactly what they are yet.
I need to add a couple helper functions to the Bits class (which got converted to Javascript) to read bytes in a more file like way:
Hey, that theory looks correct. It even ends on a nice 00 command as some kind of null terminator.
But what are 01 and 03 for??
000000e4: [03][000039]  ...9 => Command 3, Repeat count #repeat_l
000000e8: [02][00000a]  .... => Command 2, Data count #+data_l
000000ec: [ff5f3535]  ._55 => Data #+data_b
000000f0: [0b033589]  ..5. => Data #+data_b
000000f4: [89ff][0000]  .... => Data #+data_b, Padding for alignment #+align
000000f8: [01][000028]  ...( => Command 1, Skip count? #skip_l
000000fc: [03][000002]  .... => Command 3, Repeat count? #repeat_l
00000100: [02][00000b]  .... => Command 2, Data count #+data_l
00000104: [ffffff59]  ...Y => Data #+data_b
00000108: [35358389]  55.. => Data #+data_b
0000010c: [89ffff][00]  .... => Data #+data_b, Padding for alignment #+align
00000110: [03][00003a]  ...: => Command 3, Repeat count? #repeat_l
00000114: [02][00000a]  .... => Command 2, Data count #+data_l
00000118: [ffff895f]  ..._ => Data #+data_b
0000011c: [35115f89]  5._. => Data #+data_b
00000120: [89ff][0000]  .... => Data #+data_b, Padding for alignment #+align
00000124: [01][000068]  ...h => Command 1, Skip count? #skip_l
00000128: [03][000004]  .... => Command 3, Repeat count? #repeat_l
0000012c: [02][000008]  .... => Command 2, Data count #+data_l
00000130: [ff353535]  .555 => Data #+data_b
00000134: [838989ff]  .... => Data #+data_b
00000138: [03][00000f]  .... => Command 3, Repeat count? #repeat_l
0000013c: [02][000005]  .... => Command 2, Data count #+data_l
Since I suspect it’s some sort of RLE, I start thinking along those lines. With a run length encoding you usually have some sort of “repeat” code. I notice that the 03 command always comes before a 02 command. So I make a guess. I think maybe 03 is a “repeat” command (annotate). But then what is 01? I think that may be a “skip” command (annotate)—it’s kind of sporadic but it always comes before the repeat. And the 02 command must be verbatim data (annotate). Well… Just theorizing gets us nowhere, lets try it out!
First I need another couple functions in the Bits class, one for writing and a quickie hex dump function to check my work…
The write() function replaces the bytes at the cursor with the data passed in (it does not insert).
Now I modify up the unpack() function (which is finally living up to its name!):
function unpack(data) {
    let out = new Bits()
    console.log("header")
    console.log(`  x,y?   ${data.read16()},${data.read16()}`)
    console.log(`  height ${data.read16()}`)
    console.log(`  width  ${data.read16()}`)
    let length = data.read32()
    console.log(`  length ${dec_and_hex(length)} ` +
                   `(end:${dec_and_hex(data.tell() + length)})`)
    console.log(`  again x,y?   ${data.read16()},${data.read16()}`)
    console.log(`  again height ${data.read16()}`)
    console.log(`  again width  ${data.read16()}`)

    let c = 0
    let repeat;
    while (true) {
        let command = data.read(4)
        console.log(`command[${c} (${hex(data.tell())})] ${command[0]} ` +
                        `[${hex(...command)}]`)
        if (command[0] == 0) break;
        if (command[0] == 1) // skip forward (write zeros)?
            out.write(Array(command[3]).fill(0))
        else if (command[0] == 3) // repeat the next command n times?
            repeat = command[3]
        else if (command[0] == 2) {
            let chunk = data.read(command[3]);
            // this is wrong if len == 0: -1%4 => -1 in js. yuck.
            let align = data.read((3 - ((command[3]-1) % 4)));
            console.log(`    chunk  ${hex(...chunk)} | ${hex(...align)}`);
            out.write(Array(repeat).fill(chunk).flat())
        }
        c += 1
    }

    console.log(`end @ ${hex(data.tell())}`)

    console.log(out.dump())
    return out;
}
I get some data out! Lets graph it to see if it works:
Play around, can you find the image?
[spoiler] I couldn’t either. 🙁
Hmm. I start looking at the output, and it just doesn’t make any sense. First off it’s way too big—85×24 at 8 bits per pixel is 2040 bytes and the output is 9627 bytes long. And that’s not off by a good multiple either. Second off, the repeat counts on some stuff is really high which seems wrong.
Back to the drawing board
I decide this is just wrong and stare at the “command list” again. My brother and I started screen sharing so we could have 2 heads working on the problem. I really wanted to figure out what the 01 commands are for. That first one with zeros is weird, and there’s another one like that at the end. So my initial “skip” thought doesn’t really make sense because why skip zero? What could its number mean? We search through the file and notice the number after the 01 command generally gets bigger as we go farther into the file. On a whim I go through and stick a newline before each 01 command. It ends up looking like this:
Interestingly, not only do the numbers get bigger through the file, the distance between 01 commands gets bigger, too. Also I notice those numbers are very round, the lower nibble of every 01 command is 0, 4, 8, or c. That’s u32 aligned. It must be a length! Sure enough, That first non-zero chunk has a 0x24. If we add that to the next address (same as the length in the header) we get 0x24+0x1c => 0x40, which is exactly the address where the next 01 commands starts (annotate). Eureka! We spot check a few more and they all agree with this.
Still, what does 01 signify? It has a length like it’s wrapping something, but what concept is it wrapping? I decided to see how many there are in the file. There are 24 including the ones with 00 length. Hey! 24 is the height! These are lines! (annotate) And that makes some sense, too: earlier I said I pixel counted and got 22 pixels on the level font, but the file said it was 24 high. The reason for that discrepancy is 2 blank lines, and 00 length makes a lot of sense for a blank line.
So that seems like very strong evidence to me but we can’t decode without figuring out what the other commands do. I’m pretty sure I was right about the 02 command meaning “verbatim data”, but what is the 03? Well, let’s look at the first non-blank line again:
00000018: [01][000024]  ...$ => Line Command, Line length (0x24 + 0x0000001c == 0x00000040) #+command_1_l
0000001c: [03][000003]  .... => Command 3 #+skip, Skip count #skip_c
00000020: [02][000009]  .... => Verbatim Data Command #+data, Verbatim Data Length #+data_l
00000024: [ffffffff]  .... => Data #+data_b
00000028: [ffffffff]  .... => Data #+data_b
0000002c: [ff][000000]  .... => Data #+data_b, Padding #+align
00000030: [03][000040]  ...@ => Command 3 #+skip, Skip count #skip_c
00000034: [02][000005]  .... => Verbatim Data Command #+data, Verbatim Data Length #+data_l
00000038: [ffffffff]  .... => Data #+data_b
0000003c: [ff][000000]  .... => Data #+data_b, Padding #+align
I have a guess… I think it’s the skip (which I previously thought was command 01). (annotate) Before coding we can do a spot check to see if this seems correct: We can look at the commands in this line and see if they make sense.
That would be: skip 0x3, verbatim 0x9, skip 0x40, verbatim 0x5. In total that’s 0x51, which is 81 in decimal. That’s very close to the width of 85! It’s even kind of centered comparing against the first skip (3 vs 4). So that’s looking promising, let’s code it up!
function unpack(data) {
    console.log("header")
    console.log(`  x,y?   ${data.read16()},${data.read16()}`)
    console.log(`  height ${data.read16()}`)
    console.log(`  width  ${data.read16()}`)
    let length = data.read32()
    console.log(`  length ${dec_and_hex(length)} ` +
                   `(end:${dec_and_hex(data.tell() + length)})`)
    console.log(`  again x,y?   ${data.read16()},${data.read16()}`)
    let height = data.read16();
    let width = data.read16();
    console.log(`  again height ${height}`)
    console.log(`  again width  ${width}`)

    let out = new Bits(Array(width * height).fill(0))

    let c = 0
    let repeat;
    let line = -1
    while (true) {
        let command = data.read(4)
        console.log(`command[${c} (${hex(data.tell())})] ${command[0]} [${hex(...command)}]`)
        if (command[0] == 0) break;
        else if (command[0] == 1) { // Line header
            line += 1
            let sol = line * width
            out.seek(sol)
        } else if (command[0] == 3) { // Skip forward (write zeros)?
            out.write(Array(command[3]).fill(0))
        } else if (command[0] == 2) {
            let chunk = data.read(command[3])
            // this is wrong if len == 0: -1%4 => -1 in js. yuck.
            let align = data.read((3 - ((command[3]-1) % 4)));
            out.write(chunk)
        }
        c += 1
    }
    return out;
}
And that produces…
Woohoo! Success!
“But what about the colors”, my brother asks. Oh. Well, that’s probably not too hard…
Color
I explain about color lookup tables (often called “cluts”) and we find one named “standard” in a resource file. He dumps it to binary and we take a look with xxd -c 8:
00000000: [0000 0000] [0000 00ff]  ........ => First color index #zeros, Last color index #max_color
00000008: [0000] [ffff] [ffff] [ffff]  ........ => Color index #index, Red #red, Green #green, Blue #blue
00000010: [0001] [ffff] [ffff] [cccc]  ........ => Color index #index, Red #red, Green #green, Blue #blue
00000018: [0002] [ffff] [ffff] [9999]  ........ => Color index #index, Red #red, Green #green, Blue #blue
00000020: [0003] [ffff] [ffff] [6666]  ......ff => Color index #index, Red #red, Green #green, Blue #blue
00000028: [0004] [ffff] [ffff] [3333]  ......33 => Color index #index, Red #red, Green #green, Blue #blue
00000030: [0005] [ffff] [ffff] [0000]  ........ => Color index #index, Red #red, Green #green, Blue #blue
00000038: [0006] [ffff] [cccc] [ffff]  ........ => Color index #index, Red #red, Green #green, Blue #blue
00000040: [0007] [ffff] [cccc] [cccc]  ........ => Color index #index, Red #red, Green #green, Blue #blue
00000048: [0008] [ffff] [cccc] [9999]  ........ => Color index #index, Red #red, Green #green, Blue #blue
[ ... ]
000007d8: [00fa] [7777] [7777] [7777]  ..wwwwww => Color index #index, Red #red, Green #green, Blue #blue
000007e0: [00fb] [5555] [5555] [5555]  ..UUUUUU => Color index #index, Red #red, Green #green, Blue #blue
000007e8: [00fc] [4444] [4444] [4444]  ..DDDDDD => Color index #index, Red #red, Green #green, Blue #blue
000007f0: [00fd] [2222] [2222] [2222]  .."""""" => Color index #index, Red #red, Green #green, Blue #blue
000007f8: [00fe] [1111] [1111] [1111]  ........ => Color index #index, Red #red, Green #green, Blue #blue
00000800: [00ff] [0000] [0000] [0000]  ........ => Color index #index, Red #red, Green #green, Blue #blue
That looks pretty straightforward. A u32 0 (probably the minimum color number), a u32 max color (255 in this case), and then each entry is u16[4]: index, r, g, b. (annotate) So we write a little clut decoder:
function load_clut(inc) {
    inc.read(7);
    let colors = inc.readn(1);
    let table = Array(colors);
    while (inc.tell() < inc.length()) {
        inc.read8();
        let c = inc.read8();
        table[c] = { r: inc.read16() / 65535 * 255,
                     g: inc.read16() / 65535 * 255,
                     b: inc.read16() / 65535 * 255 }
    }
    return table;
}
And then use the clut in the draw function instead of just making up a greyscale value:
diff a/main.js b/main.js
--- a/main.js
+++ b/main.js
@@ -12,7 +13,7 @@ function erase() {
     view.clearRect(0,0, view_el.width, view_el.height);
 }

-function draw(data, width, height, bpp, start=0, stride=undefined) {
+function draw(clut, data, width, height, bpp, start=0, stride=undefined) {
     if (stride==undefined)
         stride = width * bpp;
     else
@@ -22,8 +23,7 @@ function draw(data, width, height, bpp, start=0, stride=undefined) {
     for (let y=0; y<height; y++) {
         for (let x=0; x<width; x++) {
             let pix=data.get(start*8 + y * stride + x * bpp, bpp);
-            let pix255=pix*255/(2**bpp-1);
-            view.fillStyle = `rgb(${pix255},${pix255},${pix255})`;
+            view.fillStyle = `rgb(${clut[pix].r},${clut[pix].g},${clut[pix].b})`;
             view.fillRect(x*zoom, y*zoom, zoom, zoom);
         }
     }
@@ -40,13 +40,15 @@ function main() {
     let level_packed = new Bits(level_sprd);
     let level = unpack(level_packed);

+    let clut = load_clut(new Bits(Standard_clut));
+
     let width, height, bpp, offset;
     let go = (event) => {
         width = +el.width.value;
         height = +el.height.value;
         bpp = +el.bpp.value;
         offset = +el.offset.value;
-        draw(level, width, height, bpp, offset);
+        draw(clut, level, width, height, bpp, offset);
     };
     Object.values(el).forEach(el => el.oninput = go);
And…
Success again!
Wait, it’s not done??
Now that we’ve gotten “Level” to render, we plug in the snake head sprite in its place:
Uh oh! Why one head? It’s supposed to have a bunch of frames of animation… And why is it so wide?
Time to dive back into the command stream, but let’s just start with the header:
00000000: [0000][0000]  ....   => Unknown zeros #+b-top, Unknown zeros #+b-left,
00000004: [0018][0018]  ....   => Height #+b-bottom, Width #+b-right
00000008: [00000250]  ...P     => File length #+length
[0000000c]: [0000][0113]  .... => Offset the length is based from #+offset, Unknown zeros #+d-top, Wait those aren't zeros! #+d-left
00000010: [0018][012b]  ...+   => Height (Again!) #+d-bottom, Wait that's not the width! #+d-right
Right off the bat it’s different. The other header had the length/width repeated twice, this one has totally different stuff the 2nd time. Also That 0x250 length doesn’t look quite right: the file is 64K and that’s nowhere close to it. This header must just represent one animation frame and not the whole file (annotate). But what is with those 2nd sets of numbers?
Previously I kind of skimmed over the zeros in the first and fourth u32s since they didn’t really seem to affect anything, but now one of them was a 0x113. And why is the width 0x12b (299 decimal)? I started thinking it may be a stride—an offset between rows somehow. That kind of explained why the sprite with a single frame had the stride equal to the width. But then what was the 0x113 (275 decimal) number? Some sort of vertical stride/interleave number? Neither of those seemed reasonable. We pursued a bunch of leads here, adding and subtracting offsets from all over the file trying to make things line up. And then at one point it suddenly dawned on us:0x12b –0x113 was 0x18. Then it struck me—that’s not an (x,y) offset plus (width,height) that I was assuming—it’s the old Mac standard way of specifying a rectangle (top, left, bottom, right)! (annotate) Aha, and that explained the zeros in the first u32. Those first 4 u16s are also a rectangle. They must be the bounds of the sprite, and the second rectangle must be the destination in the sprite sheet they’re building (annotate).
Let find out how to find the other sprite frames and maybe it will become clear. Using the 0x250 length (at offset 8 in the header) and adding it to 0xc (I am able to do that addition in my head) we can check what’s past the first sprite:
[00000258]: [00][000000]  .... => #line-258, Picture command terminator #+command-null, Zeros #+command-null

[0000025c]: [0000][0000]  .... => #line, Bounds rect top #b-top, Bounds rect left #b-left,
[00000260]: [0018][0018]  .... => #line, Bounds rect bottom #b-bottom, Bounds rect right #b-right
[00000264]: [0000022c]  ...,   => #line, Frame length #length
[00000268]: [0000][012c]  ..., => Offset the frame length is based from #offset, Destination rect top #d-top, Destination rect left #d-left
[0000026c]: [0018][0144]  ...D => #line, Destination rect bottom #d-bottom, Destination rect right #d-right
(The 0x258 line is the null termination command of the first sprite, shown here just for context).
Well… that just looks like another whole header. That seems easy enough. (annotate) But how do we know how big to make our sprite sheet? I guess we could go through every sprite and calculate the max (bottom,left) to know how big we need to make our canvas. But… I don’t really want to do that, it seems annoying. Then I had a thought, “what if I just ignore their ‘destination’ rectangle?”
After all, we just want to be able to grab one and display it, we don’t necessarily need to recreate their sprite sheet verbatim. That also makes it really easy. We’ll pass an extra parameter to our unpack() function (the sprite number) and to a loop over all the pictures until we get to the one we want. That’s super easy because we can just jump to the next one using the length in the header—we don’t need to parse anything in the actual picture.
Here’s just the top half of the new unpack() function (since it’s getting big now and the bottom part didn’t really change):
function unpack(data, want_frame=0) {
    data.seek(0);
    let frame = 0;
    let width,height,out;
    while (data.tell() < data.length()) {
        console.log("header")
        let bounds_top    = data.read16()
        let bounds_left   = data.read16()
        let bounds_bottom = data.read16()
        let bounds_right  = data.read16()
        height = bounds_bottom - bounds_top
        width = bounds_right - bounds_left
        console.log(`  bounds rect (${bounds_top},${bounds_left},${bounds_bottom},${bounds_right}) ` +
                                  `(width  ${width}, height ${height})`)
        let length = data.read32()
        let next_frame = data.tell() + length;
        console.log(`  length ${dec_and_hex(length)} (end:${dec_and_hex(next_frame)})`)
        let dest_top    = data.read16()
        let dest_left   = data.read16()
        let dest_bottom = data.read16()
        let dest_right  = data.read16()
        console.log(`  dest rect (${dest_top},${dest_left},${dest_bottom},${dest_right})`)

        if (frame != want_frame) {
            data.seek(next_frame);
            frame++;
            continue;
        }

        out = new Bits(Array(width * height).fill(0))
[ ... ]
I also decided to add another text entry for setting which frame to look at (just like all the others you can PgUp and PgDown to increment or decrement), and a popup menu to set which sprite-set to display:
\o/
Now I think we’re done—we’ve successfully figured out every byte of the file format and can unwrap any sprite and display it on the screen with the correct colors.
Say I wanted to pass all the pids of a program that forks a lot to strace. I could do:
strace $(printf -- "-p %s " $(ps aux | grep fcgiwr[a]p | f 2))
An aside, you may have noticed that non-standard f command in the ps pipeline. I got that from here a long time ago (2008 according to the file’s timestamp) and it’s really fantastic—perfect for all sorts of unixy things that output tables (ps, ls -l, etc).
I was banging my head against a wall trying to get help for go build with go build help (and for some reason go doesn’t support go build --help, but I kept getting this error:
package help is not in GOROOT (/opt/homebrew/Cellar/go/1.18.3/libexec/src/help)
Does brew not come with docs by default? How else am I supposed to interpret that?
Last night I was playing Maquette and I got stuck on the final level (called “The Exchange”) for a really long time. I was at a place with some towers with crystals above them and I had opened the doors to the first tower; Inside was a switch. Flipping the switch made a bunch of arches appear, leading to another building.
But aside from that nothing happened. I wandered around for about an hour before getting ashamed that I couldn’t solve the puzzle and looking up the answer on the internet. But it turns out, I had encountered a bug! Flipping the switch is supposed to open a door! But instead I just got the switch sound and nothing else happened. I tried loading my last autosave but the same thing happened.
Finally I tried selecting the “Restart” option from the pause menu. I was nervous (restart what exactly? The Level, the Area, the Game?) so I hard saved my game first. Turns out it just reset back to the beginning of “The Exchange”. Within 1 minute I was back at the switch in question and this time I could hear (and see) it open a door when I hit it!
So, if you’re stuck in that section of the game and it seems like you’re just not getting it, it’s not you, the game is just bugged.
My nightly Emacs builds stopped about a month and a half ago. A couple days after I noticed it was failing I tried to debug the issue and found that building openssl was hanging—I found that Jenkins was timing out after an hour or so. I should mention that it’s dying on a Mac OS X 10.10 (Yosemite) VM, which is currently the oldest macOS version I build Emacs for. I tried building manually in a terminal—the next day it was still sitting there, not finished. I decided it was going to be annoying and so I avoided looking deeper into it for another month and a half (sorry!). Today I tracked it down and “fixed” it—here is my tale…
I (ab)use homebrew to build openssl. Brew configures openssl then runs make and then make test. make test was hanging. Looking at the process list, I could see 01-test_abort.t was the hanging test. It was also literally the first test. Weird. I checked out the code:
Well, that seems straightforward enough. Why would it hang? I tryed to kill off the test process to see if it would continue. There was a lib wrapper, a test harness and the actual binary from the source shown above—they all died nicely except for the actual aborttest executable. I couldn’t even kill -9 that one—that usually means there’s some sort of kernel issue going on—everything should be kill -9able.
Next I ran it by hand (./util/shlib_wrap.sh test/aborttest) and confirmed that the test just hung and couldn’t be killed. I built it on a different machine and it worked just fine there. So I dug into the openssl code. What does OPENSSL_die() do, anyway?
So it got to the kernel with pthread_kill() and hung after that. So I tried another sanity check: In one terminal I ran sleep 100. In another I found the process id and did kill -ABRT $pid. The kill returned, but the sleep was now hung and not able to be killed by kill -9, like everything else. Now I was very confused. This can’t be a real bug, everyone would be seeing this! Maybe it’s a VM emulation issue caused by my version of VMWare? I can’t upgrade my VMWare because the next version after mine requires Mac OS 10.14 but this Mac Mini of mine only supports 10.13. Sigh. Also, the Emacs builds were working just fine and then they suddenly stopped and I hadn’t updated the OS or the host OS or VMWare. Nothing was adding up!
As I sanity check, I decided to reinstall the OS on the VM (right over top of the existing one, nothing clean or anything). There was a two hour long sidetrack here with deleting VM snapshots, resizing the VM disk (which required booting into recovery mode), downloading the OS installer and finally letting the install run. But that’s not important. The important part is that I opened up terminal immediately after the OS installed and ran my abort() test:
Yay! But why?? I don’t actually know. Was it a corrupt kernel? A bad driver that got installed? (What drivers would get installed on this Jenkins builder?) I don’t feel very satisfied here. I’m quite skeptical, in fact! But it’s working. Emacs builds should start coming out again. And I can ignore everything again until the next fire starts! 🙂
On Wednesday as I was going to bed I noticed it was quite hot in my house. I checked my central air blower unit and there was frost on the coils and the blower wasn’t moving. It kept trying to start but not being able to start. The 7 segment led was showing “b5” which I was able to find in the manual:
So the next day I removed the blower assembly and tried to extract the motor. The motor shaft extended quite far past the end of the fan and it was rusty so it didn’t want to come off. I attempted to get it off using gravity and a hammer:
I failed. I was only able to get it this far:
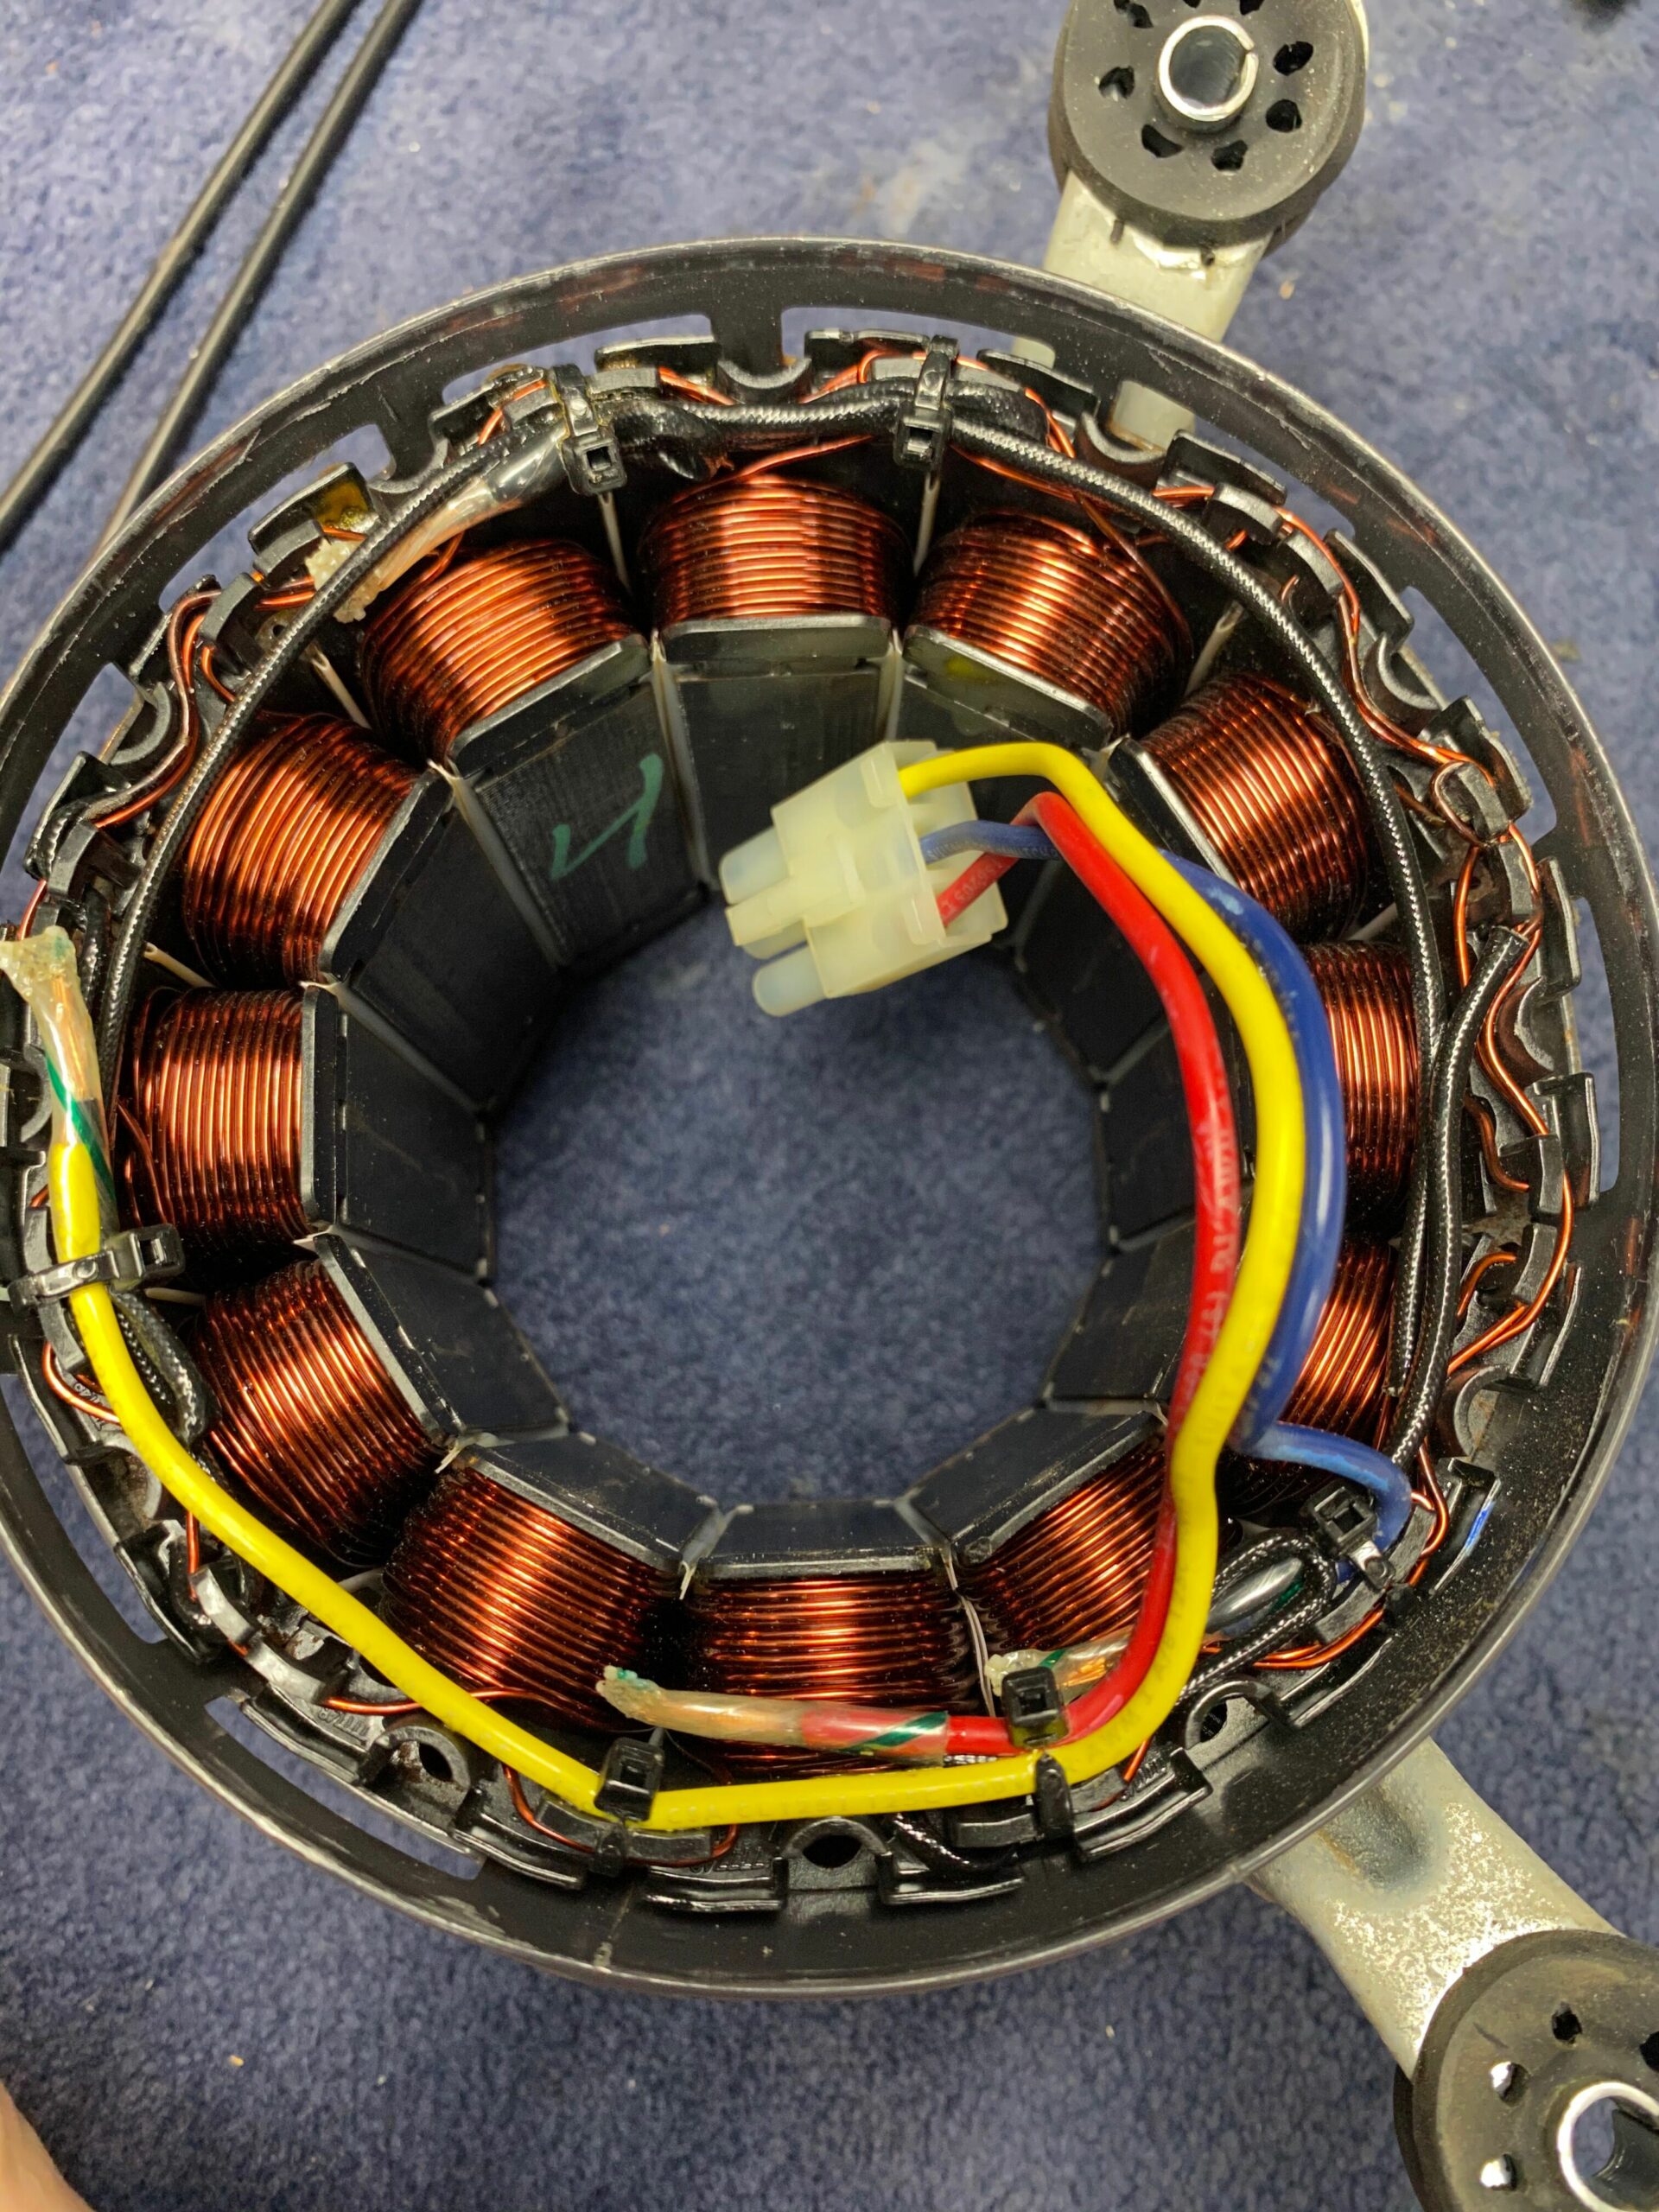
So I took it to my dad’s house because he has a better tools than I do. We ended up drilling the end of the shaft out to get the motor removed. We tested on the bench and read a lot of troubleshooting manuals and determined that the motor was shorted. It was hard to turn and there were very obvious magnetic “detents” we could feel when turning it by hard. We took the motor apart and looked around:
We measured the resistance across all the pairs of pins on the 3 pin motor connector: 2 pairs measured 3 ohms and one pair was at 0.9 ohms. We kept the meter plugged into the shorted pair and moved a bunch of wires around. At some point we noticed it had changed up to 3 ohms but we weren’t sure which part we had messed with to make it that way. All attempts to short it out again to identify the bad wire area failed. From this point on it was never shorted.
We put it all back together, fixed the drilled out shaft by cutting it off with a hacksaw and then sanding off all the sharp edges and rust. I took it home installed it and it spun up. It ran for about two minutes and then died. Same symptoms. I kind of expected it since we really didn’t fix anything, just shuffled things around, but it was still disappointing.
The next day I ordered a used motor off ebay and suffered through a hot July Friday.
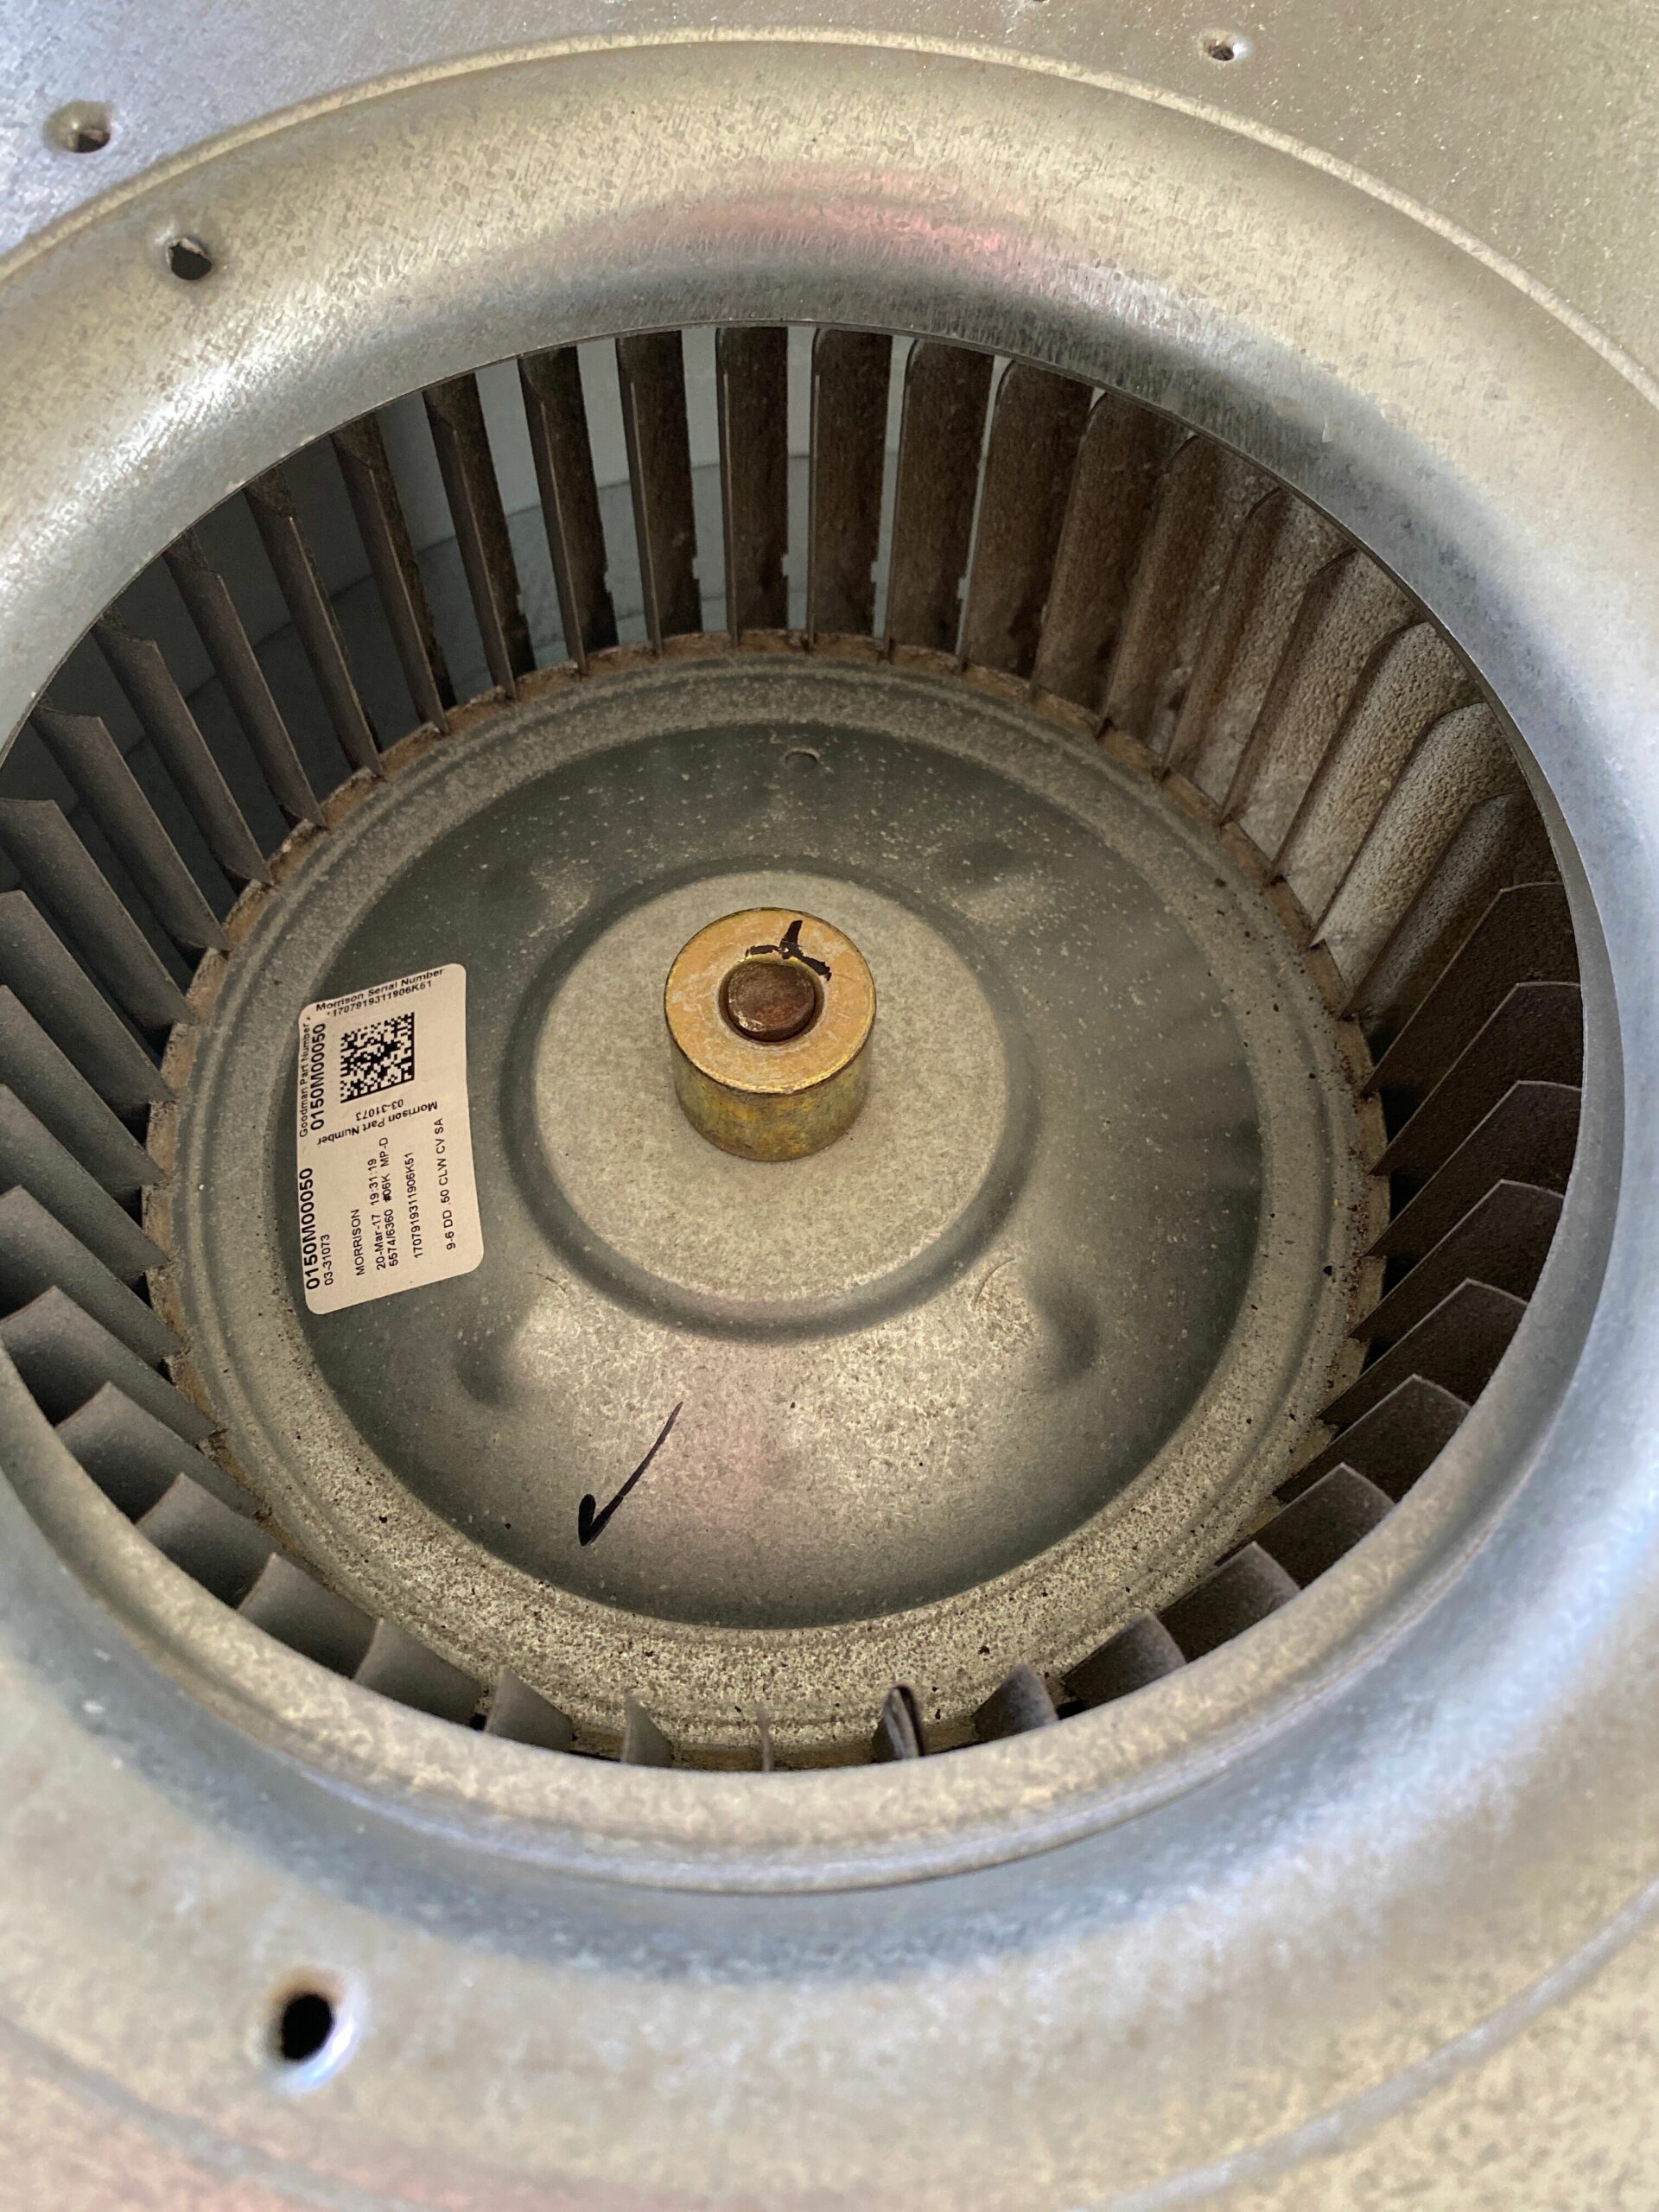
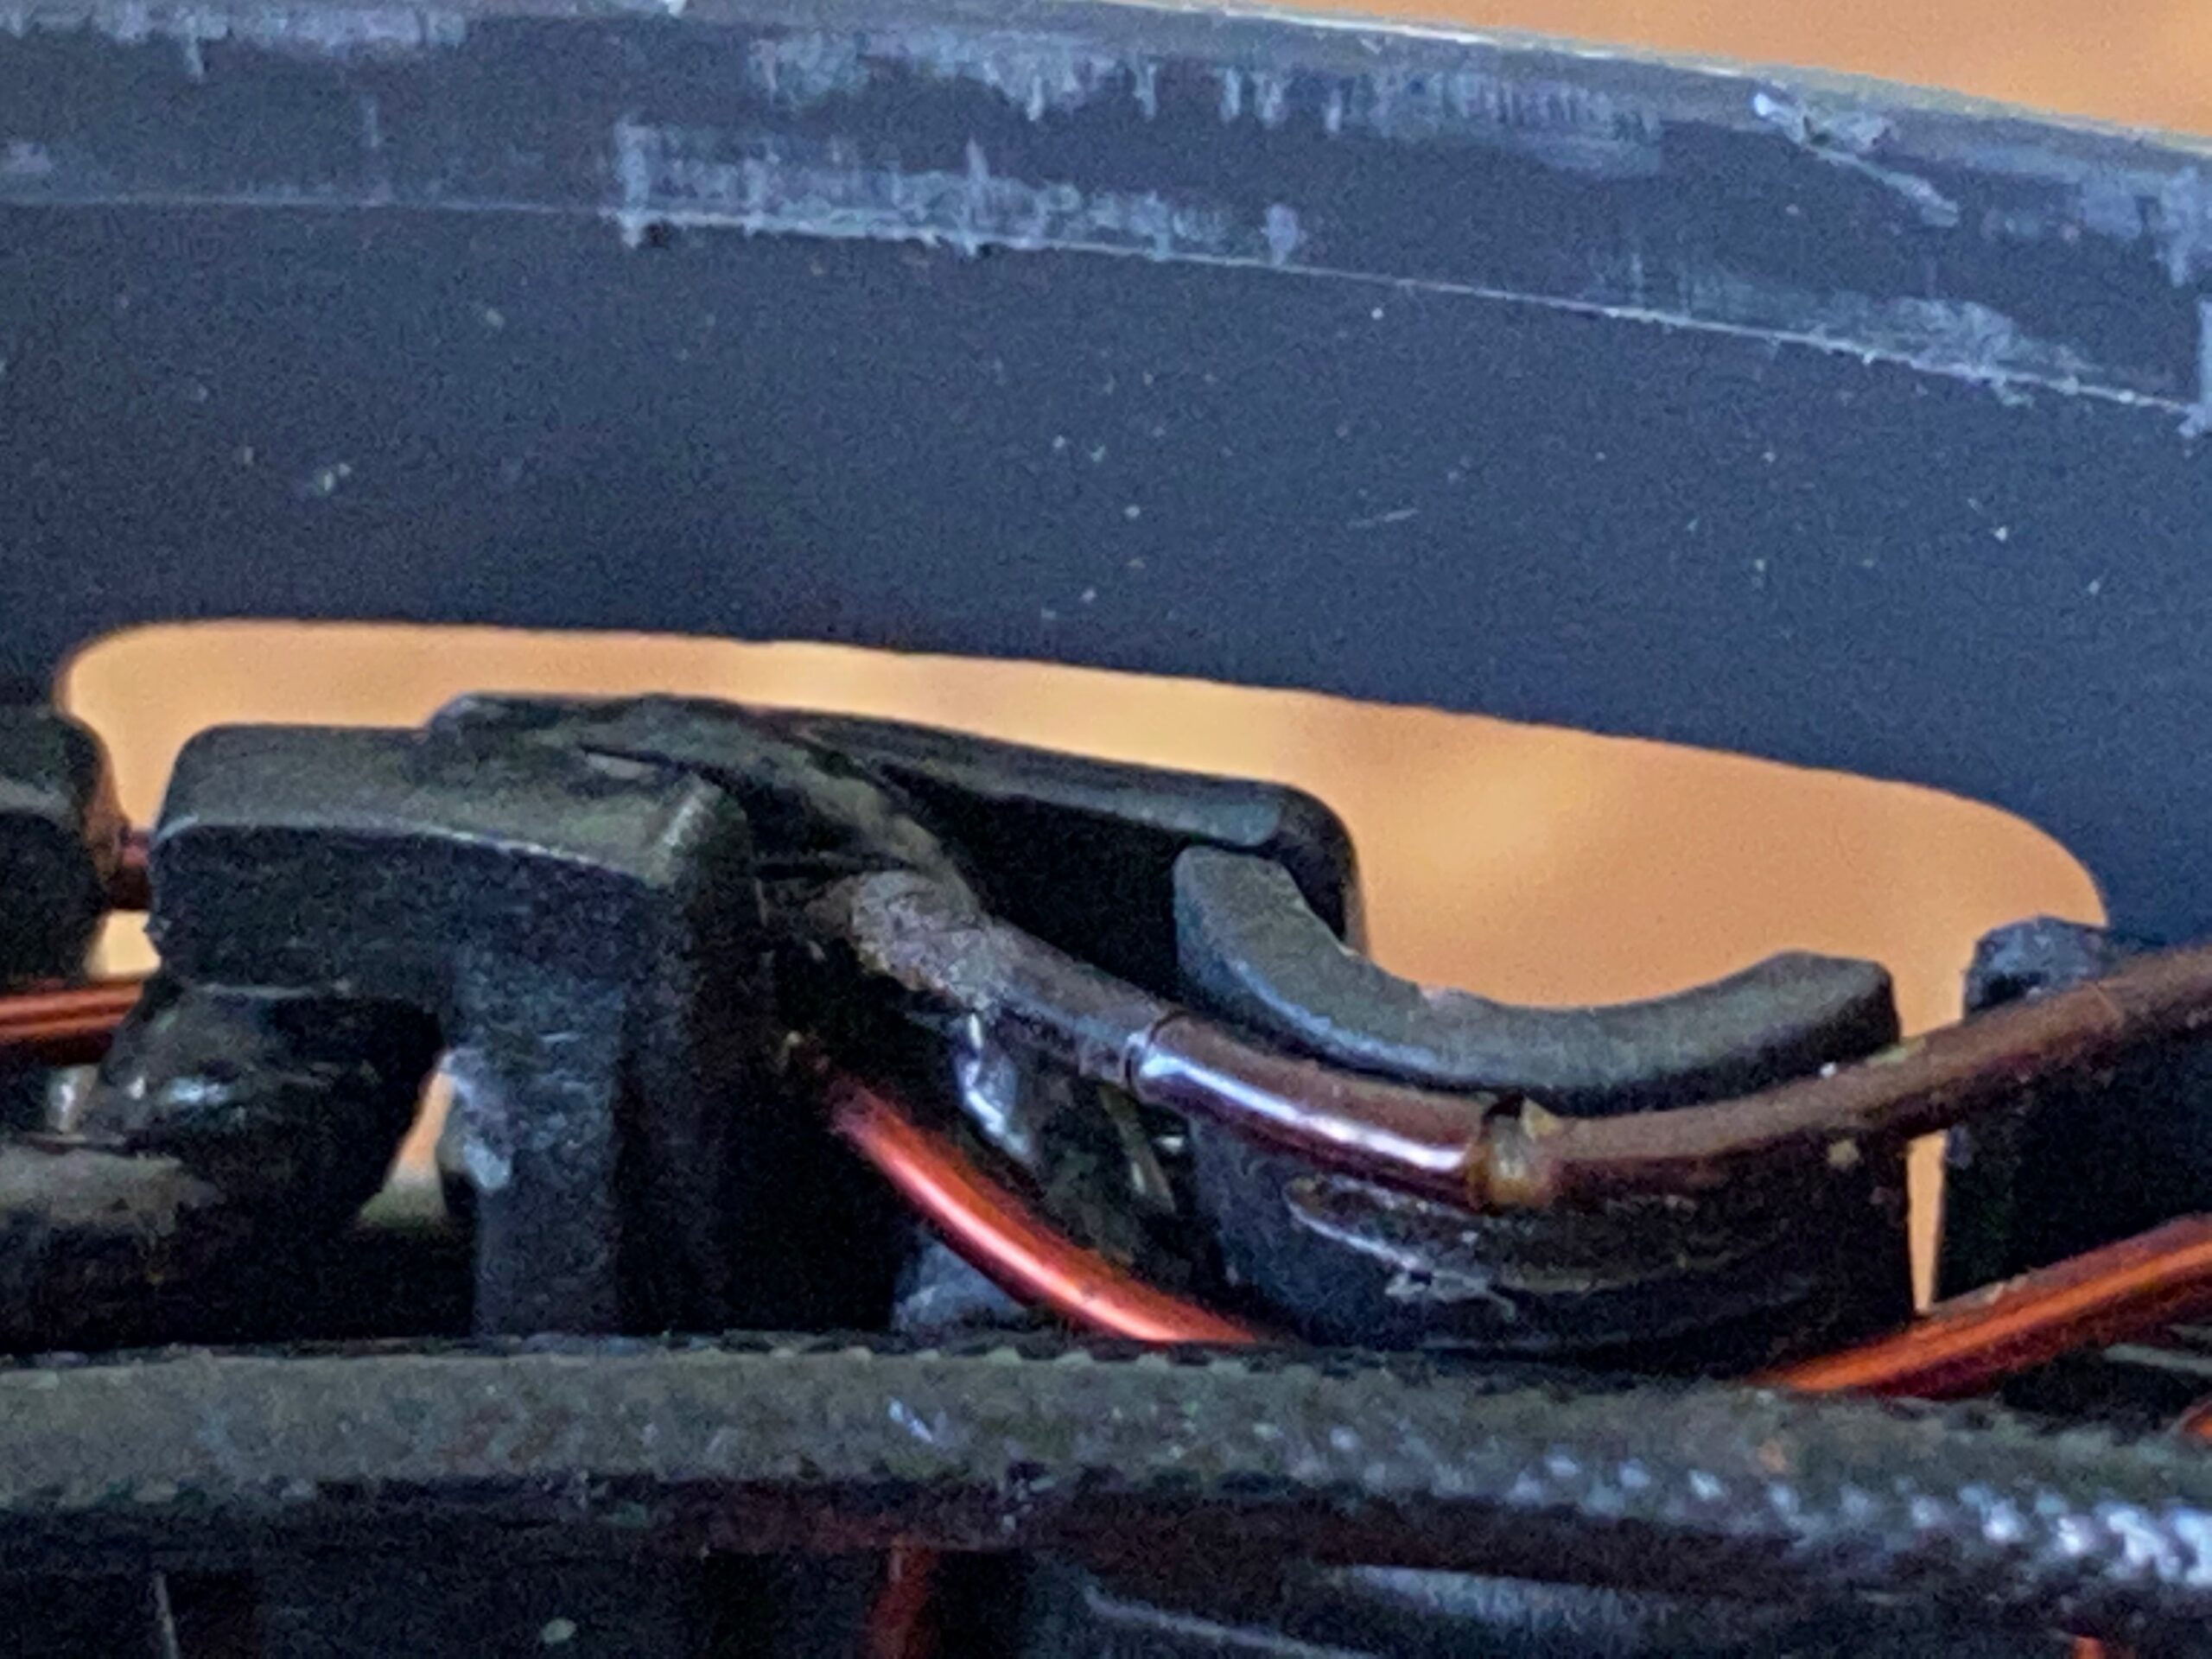
Saturday I decided to have one last ditch effort to fix it since the weekend was supposed to be upwards of 90ºF. I got it apart and found this:
That looks obviously bad and you’d wonder how we could miss it, but that’s only because it’s blown up so big. That wire is one of the skinny winding wires around the motor. In fact I couldn’t actually see the issue at all until I used my phone camera as a magnifying glass. I pulled out some slack on the wire around that break to see if there were any more issues. it looked like this:
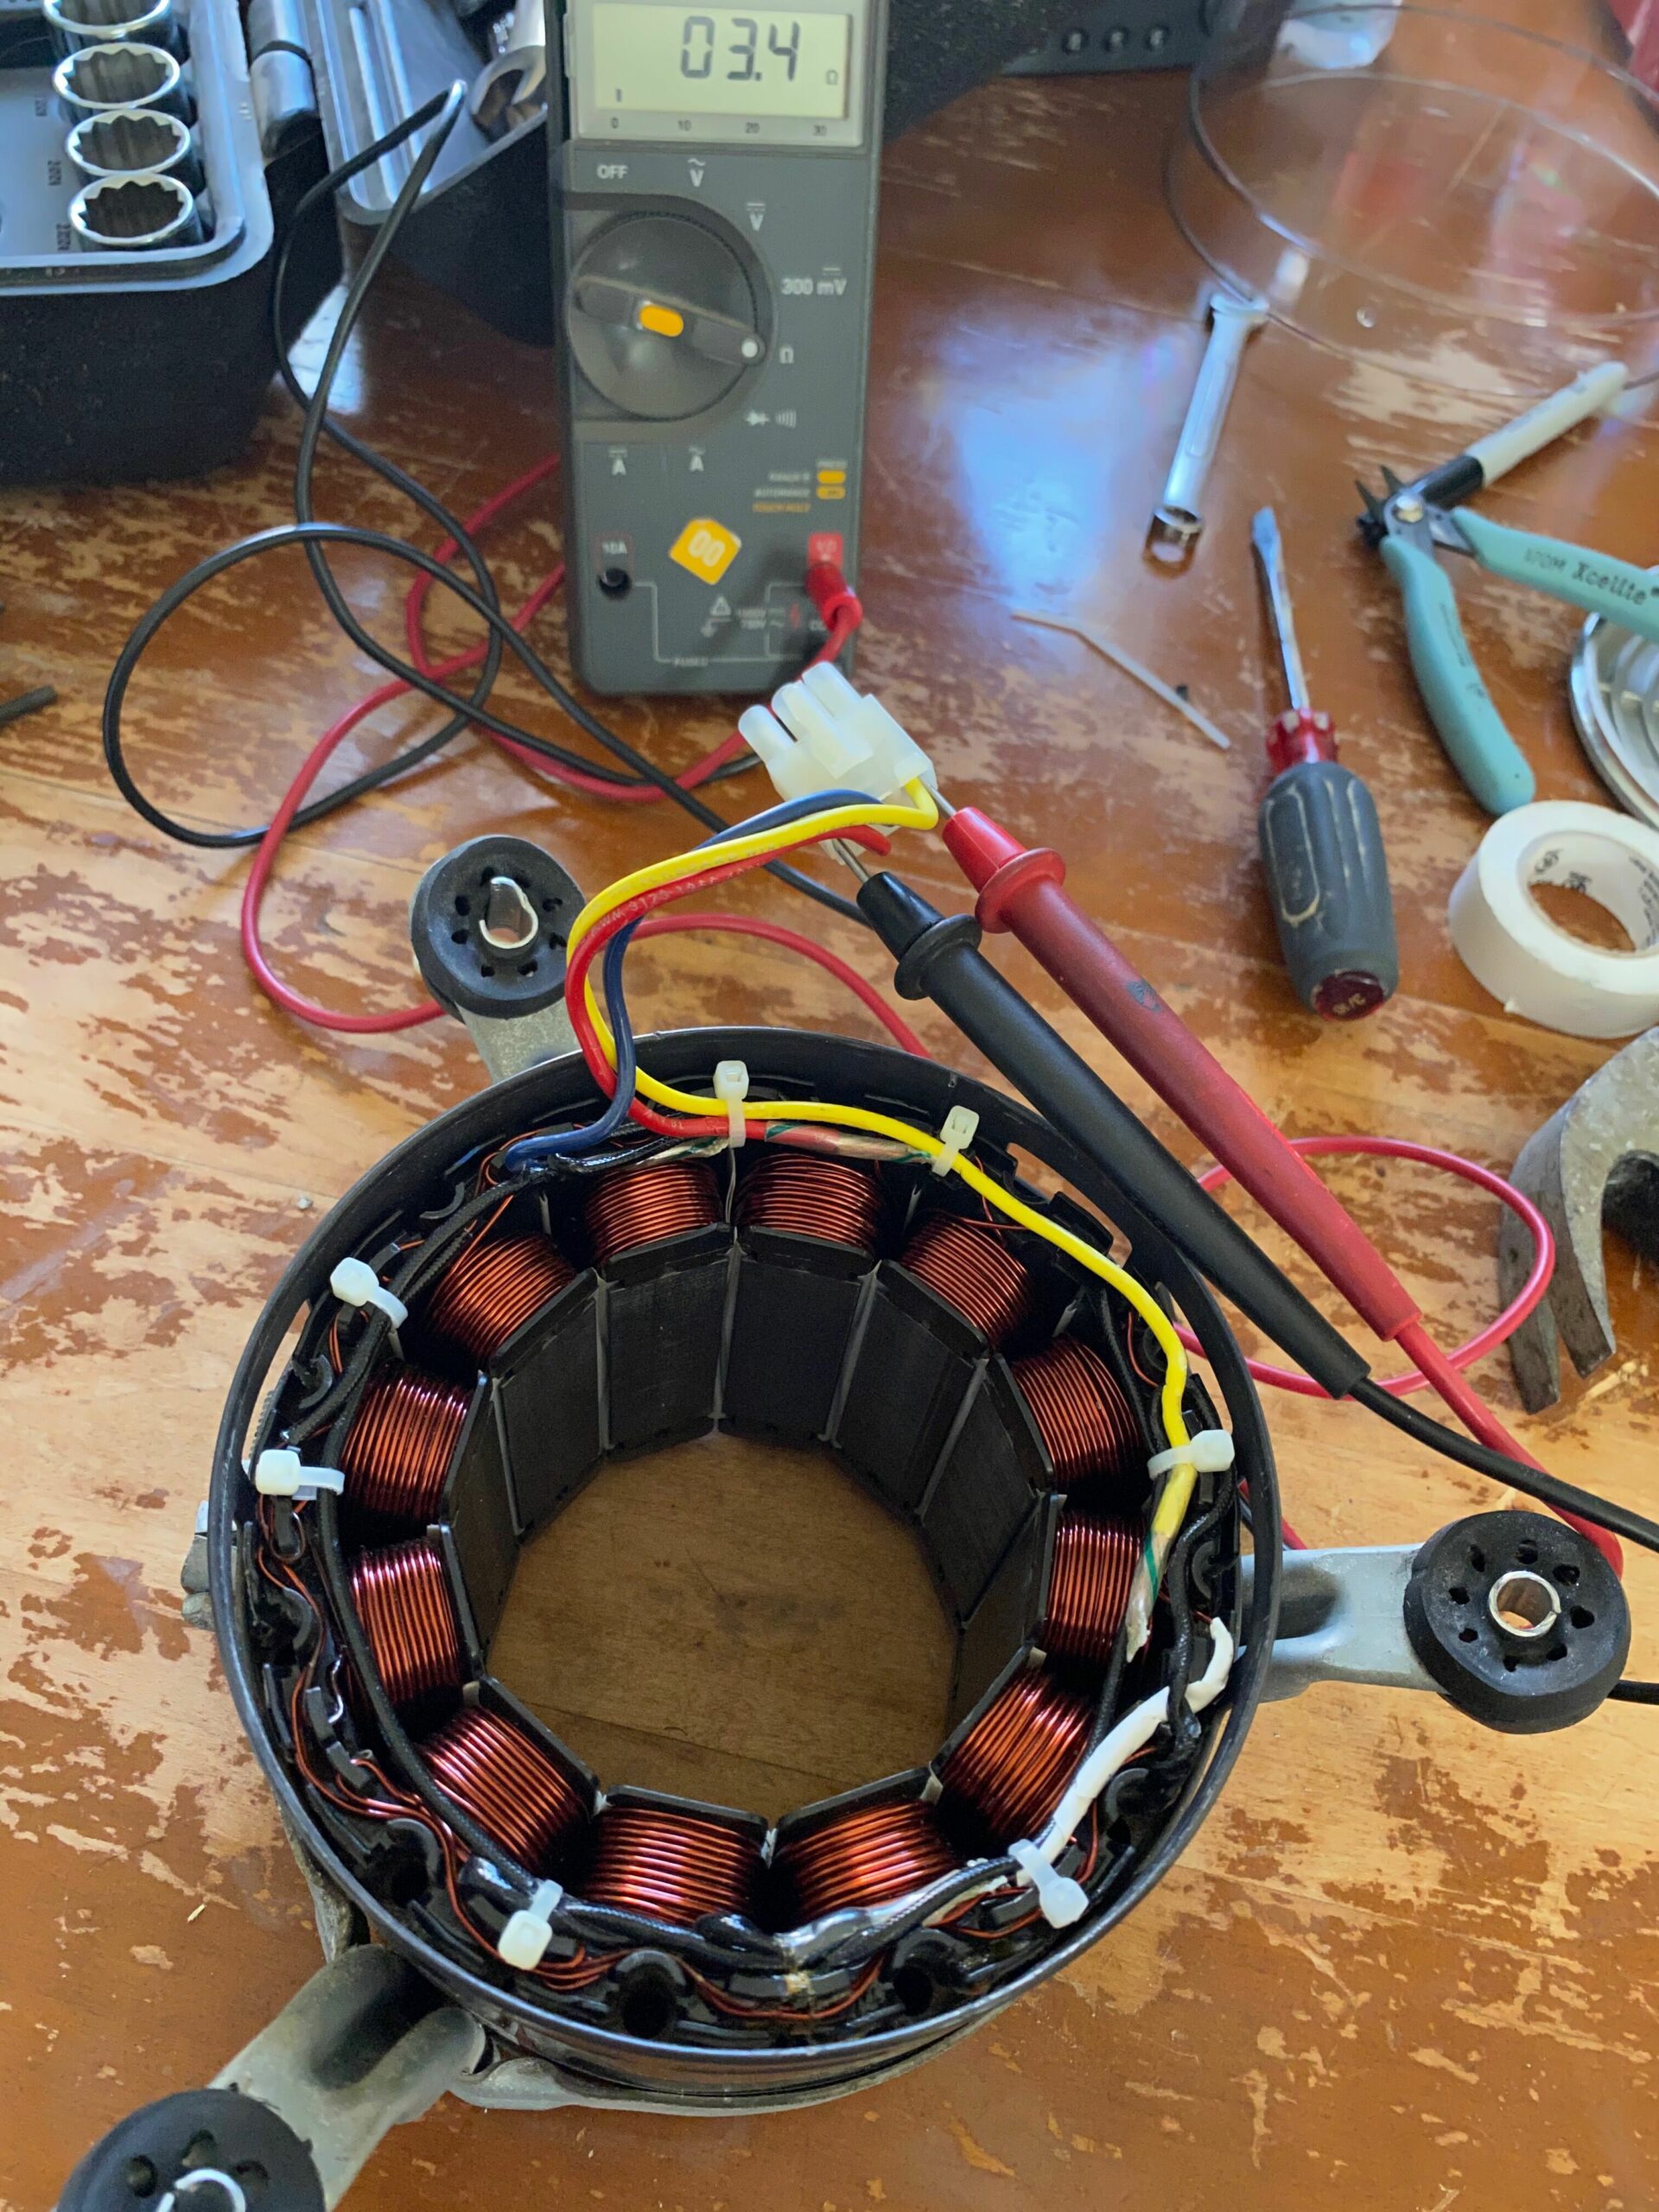
To me it looked clearly exposed. I had the meter plugged in this whole time and I could tell as I freed this bad area the short cleared. To fix, I wrapped it in electrical tape and then put it back down where it was:
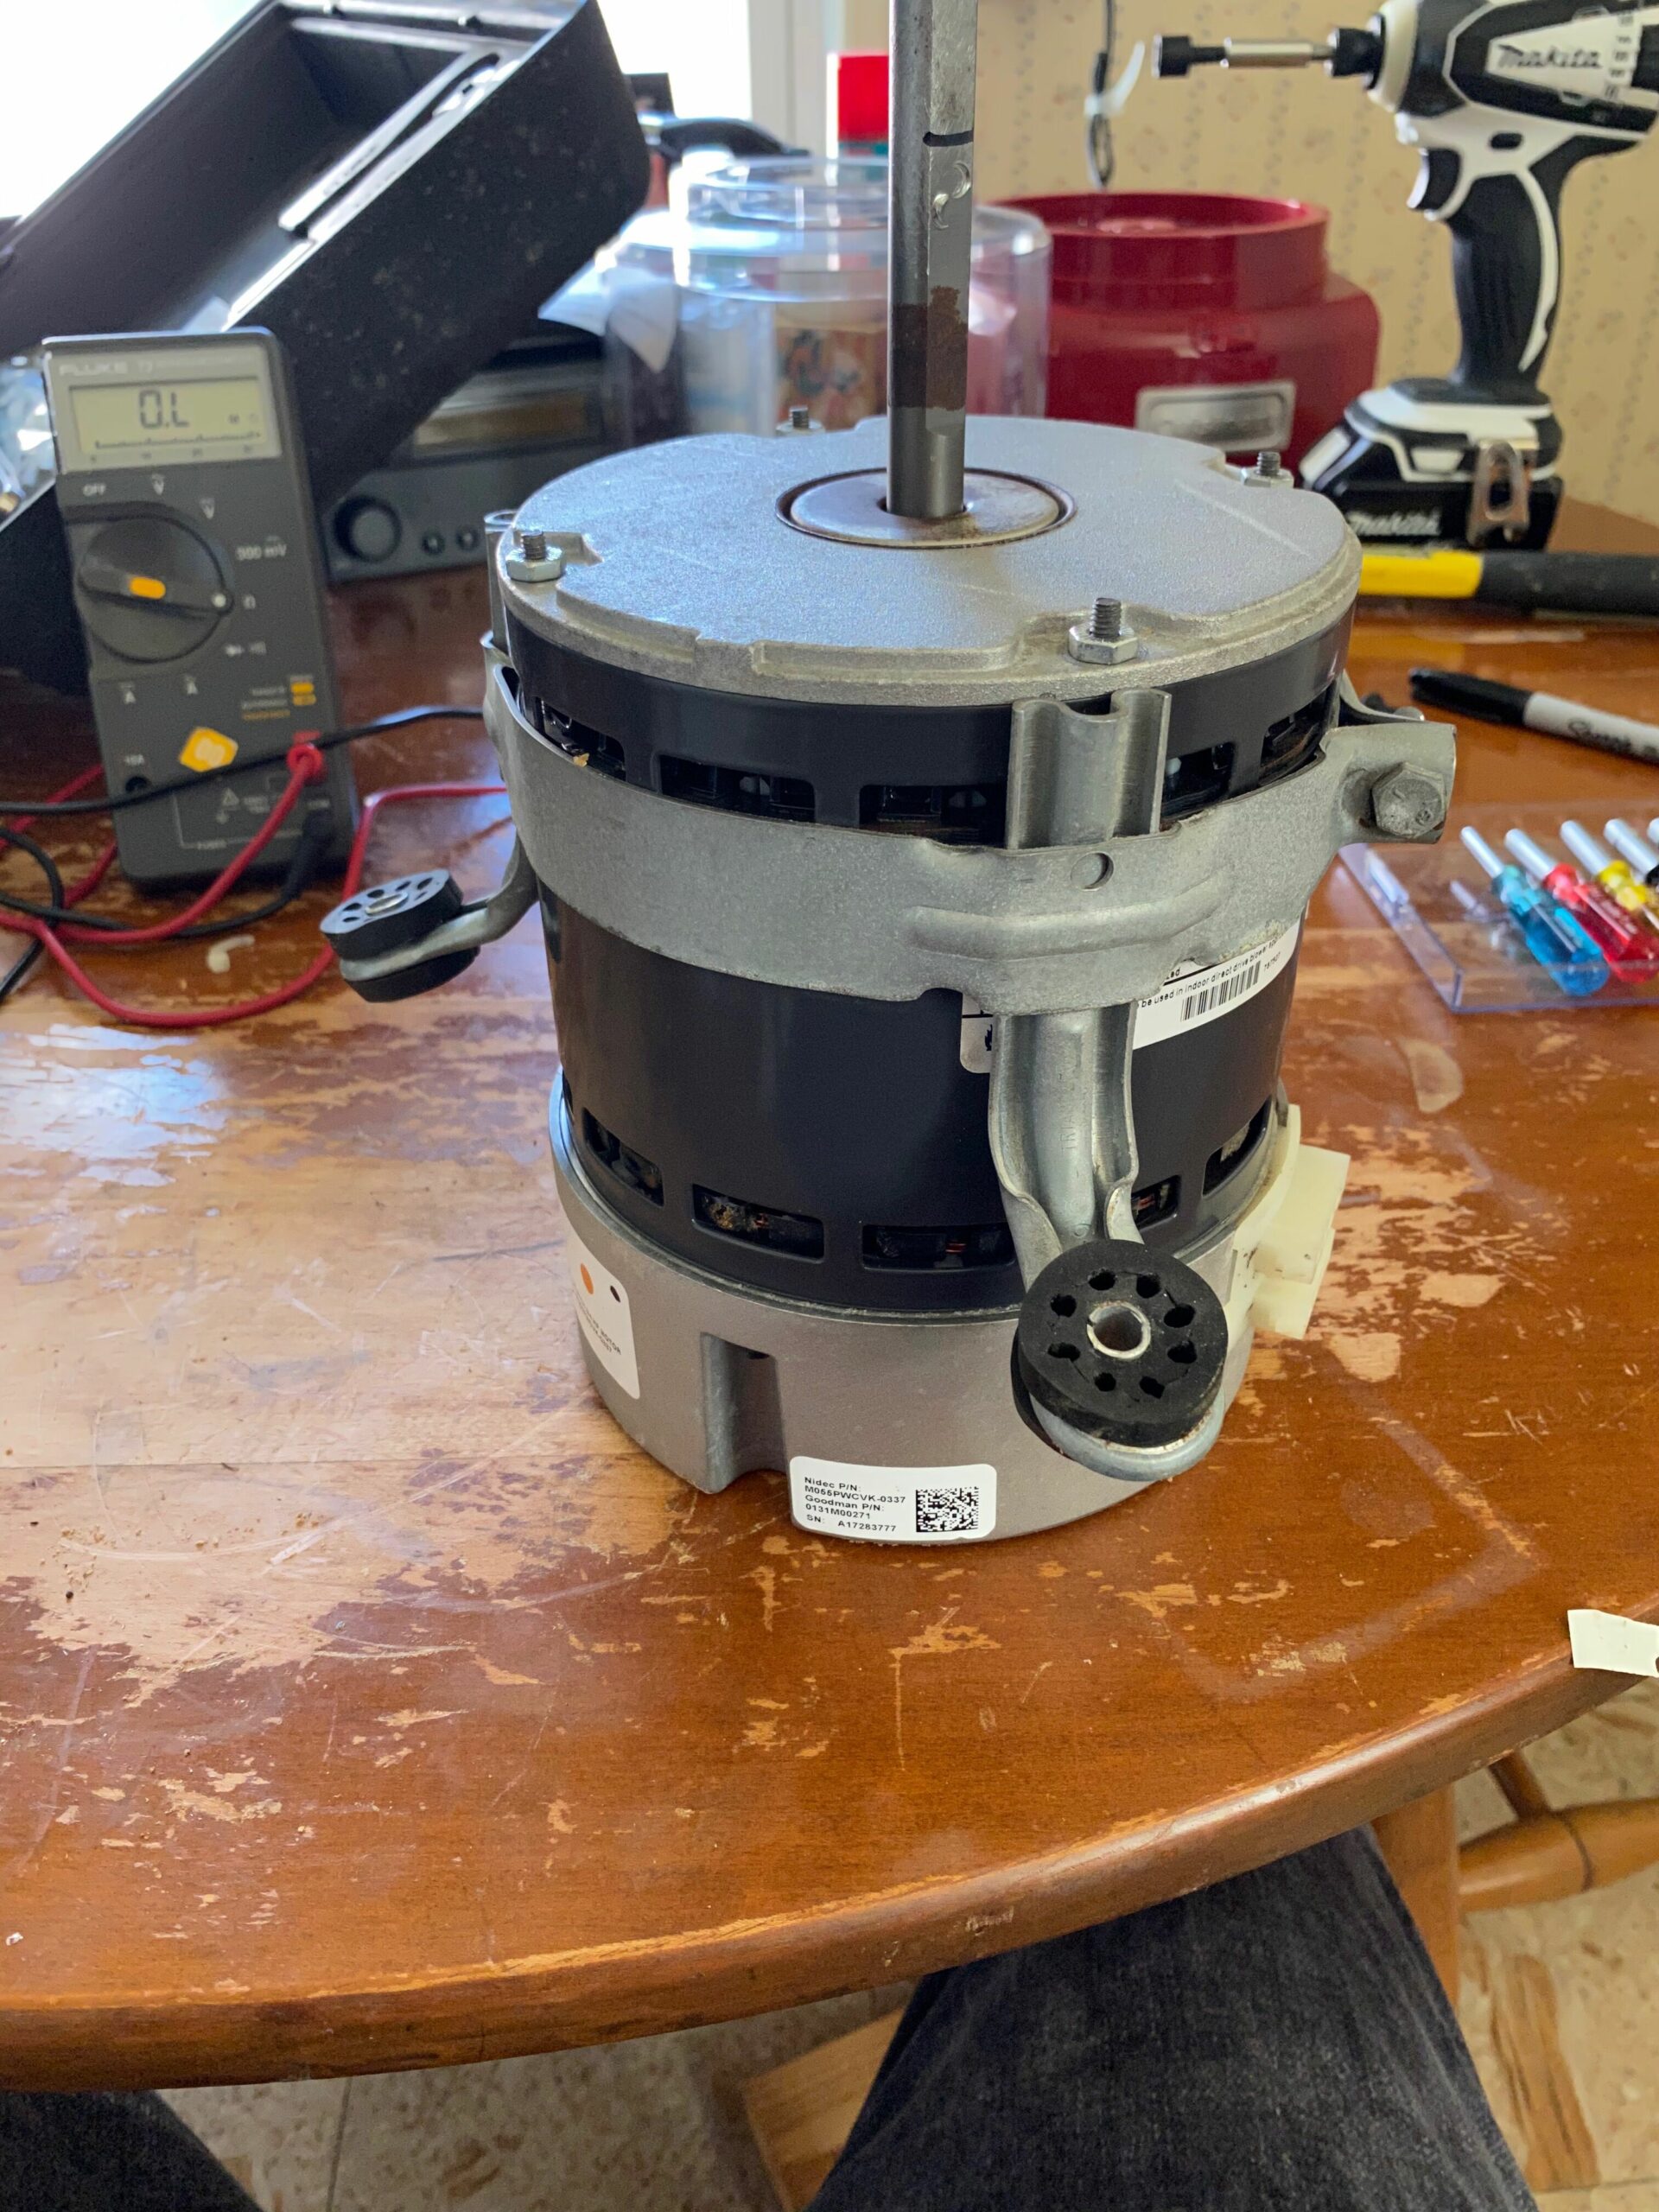
Even pressing it down as much as I could I couldn’t get it to show a short on the meter, so I believed I had it fixed. I put it all back together:
I mounted it up and tested it. It worked! And more importantly, didn’t die after just a couple minutes. Eveything’s been running all day now and my house is finally back down into the sub 80ºF range. I didn’t have central air until a couple years ago, and it’s amazing how fast I’ve transitioned to thinking that 85ºF is unlivably hot.
Now I just have to decide what to do with the replacement I bought off ebay. I just know that if I cancel the order then my motor will die just a couple days later. But if I don’t cancel, then my fix will work for the next 50 years…
What is SSV? Just read the letter—it explains everything. More info can be found here, here, or here, or here.
Here is the email, reproduced with headers for posterity:
Received: from maekong.ohm.york.ac.uk by rewind.indigita.com (NTMail Server 2.11.25 - ntmail@net-shopper.co.uk) id David Mon, 27 Oct 97 10:50:32 +0000 (PST)
Received: by maekong.ohm.york.ac.uk
                  id m0xPtmn-00009TC
                  (/\oo/\ Smail3.1.29.1 #29.7); Mon, 27 Oct 97 18:21 GMT
Sender: <dominion-request@maekong.ohm.york.ac.uk>
Received: from emout29.mail.aol.com ([ 198.81.11.134]) by maekong.ohm.york.ac.uk
                   with smtp id m0xPtmf-00009PC
                   (/\oo/\ Smail3.1.29.1 #29.7); Mon, 27 Oct 97 18:21 GMT
Received: (from root@localhost)
                    by emout29.mail.aol.com (8.7.6/8.7.3/AOL-2.0.0)
                          id NAA28825 for dominion@maekong.ohm.york.ac.uk;
                            Mon, 27 Oct 1997 13:20:53 -0500 (EST)
Date: Mon, 27 Oct 1997 13:20:53 -0500 (EST)
From: Baxville@aol.com
Message-ID: <971027131941_697440177@emout09.mail.aol.com>
To: dominion@maekong.ohm.york.ac.uk
Subject: SSV - Go Figure
Comments: Sisters Of Mercy mailing list
Sender: dominion-request@maekong.ohm.york.ac.uk
X-Info: indigita mail server
Mime-Version: 1.0

SSV  "Go Figure"

After years of stalemate, Mr Andrew Eldritch has managed to get East West to
accept (in lieu of two remaining Sisters albums) a record bearing no
resemblance whatsoever to The Sisters Of Mercy. This album will be released -
if at all - under a completely different name, which is just as well, as it's
got practically nothing to do with the Sisters. Furthermore, East West agreed
not to hear the album in advance....  so it bears no resemblance to *any*
quality product, let alone the Sisters.

....in return for which, Mr Eldritch agrees to let East West keep 75000
pounds which they owe him, and which they were refusing to pay in any event.
Unsurprisingly in the circumstances, Mr Eldritch made sure that East West got
the record they deserve, but made sure that they then paid a lot more for it
than he deserves.... ....especially for one afternoon recording the
occasional mumble on the reject material of some amateur acquaintances from
Hamburg. Go figure.

It is rumoured, indeed, that the whole album only took two days from start to
finish (somewhat less than the usual nine months), and that the "rather bad
sub-techno" music was under-average and boring even before the drums were
mysteriously removed. The "lyrics" dwell almost exclusively on the
glorification of shooting people and selling drugs to schoolchildren. It is
rumoured that the full name of the band (SSV-NSMABAAOTWMODAACOTIATW) stands
for "Screw shareholder value - not so much a band as another opportunity to
waste money on drugs and ammunition courtesy of the idiots at Time Warner".
Go figure.

How desperate must the corporation be? Desperate enough to try and force an
artist to record with threats of massive litigation after a seven-year
impasse, expecting him to make a good record while witholding a fortune in
back-royalties, and then desperate enough to pay "a very large amount" for a
record which the artist neither wrote, nor composed, nor arranged, nor
produced, whose content is merely a puerile attempt to be as offensive as
possible? Go figure.

Finally, rumour has it that the record company are planning to release it,
which would, you might think, be a conscious insult to the general public if
East West were smart enough to know a pile of crap when they hear it. Either
way, go figure.

Anyway, Mr Eldritch is now free to resume his recording career with The
Sisters Of Mercy, who have been waiting very patiently for him at a chemist's
round the corner, and very sensibly having nothing to do with the SSV album
 - because they didn't have to.

The Sisters will be celebrating the liberation with a small tour of Europe
and America in January/February, and the release of a stonking new (Sisters)
single on the day after Mr Eldritch's contract officially expires, which will
be a couple of months later. Work has started on the next (Sisters) album.
Normal service has been resumed.

Oh, and in case you haven't got the picture, we do NOT recommend the purchase
of an SSV album, should East West actually try to sell one to you. We
recommend that you wait for the magic of the Net to mysteriously provide you
with a free one  - just this once.

BaxCorp
diamonds._domainkey.example.com. 3600 IN TXT  "v=DKIM1; k=rsa; t=s; p=MIICIjANBgkqhkiG9w0BAQEFAAOCAg8AMIICCgKCAgEAxDMS3KRFCU4PEtygOUdALBt7jmz5IIX2+KHoV4fd0CLjXRvOqA5H8rU3e+y1lNese9yjPLksPqiOh5vtx8Tysjv2MSTXB1Kgr0tl+1IlJL4ihdpUgR1veKB5X4wK3Ppkr5Oy42H7xNHf/yj6aC1E+alZ8TdssuHY3ReqO6YvGa72UqTMmL1gBl9SXBUl" "vD+FqvfFtkQFFMU9QSTtrIuzcup6NC6z3a4I4UGz4YOZSxeUARKzySGFzPd7vwmrKEZVhlA0HzmJm9eGrjq6IiLVdgTJhSZ8Ecn9h65x9EjhNYYhsufTbcPDljlZYpA4b+dkTEs35a4KjOM2wY7gUdY9ydOqOCfz2BpzJ25Mn3K8nTV8a7fInWCnKg0sm6Fuiwe0DrQjrTe7xGC3Y03CU8eziynOukyWnfsCAnpWcUGa15bp1/O0Le+ZYsKOWxA" "CL5cKlYPw1VJrqz7ZQ1i+s+twOLgEKWm8gwKMsDysgpM1WvE+IhlJkkZLkWavF9pAKeSD6akkHcbkB3QsDKgNugDC4EEm6XV/+hPcTS9Gmd2PYPswxg8nlEdUDjxLul6UbKzWwkYihzKxhMSqCEXTUkt6eHjT+KAIHXVm86elFEmOcuadUWwr+74fgnTpv1XbWIs5qqqh/zROhvUUR8EXZbjOchFEX3YjLO8NDPqHdW4zHt0CAwEAAQ=="
hearts._domainkey.example.com. 3600 IN TXT    "v=DKIM1; t=s; k=ed25519; p=MTGVeSXmIzviF/B+ANc/bLqP2zEWhO/rw6o8HxIl5+8="
Ed25519 is quite compact! t=s:y is found in the DKIM RFC (section 3.6.1). t is for various flags. s is for strict (I’m just guessing the mnemonic)—it means all the domain names have to match. Apparently you don’t want this if you use subdomains in your email addresses (I don’t). y means “This domain is testing DKIM”—ie, don’t worry if it fails. It seemed reasonable to set that while I was playing around.
Next, I had to set up Exim in Debian. This was kind of a pain because there’s the Exim config, then the Debian wrapper around that config. This is made more complicated by the fact that Debian has a debconf option named dc_use_split_config. You can see which way yours is set in /etc/exim4/update-exim4.conf.conf (the double .conf is not a typo!). If it’s false then when you update /etc/exim4/conf.d you first have run /usr/sbin/update-exim4.conf.template which cats everything in the conf.d dir into /etc/exim4/exim4.conf.template. Then you have to run /usr/sbin/update-exim4.conf which combines /etc/exim4/exim4.conf.localmacros and /etc/exim4/exim4.conf.template and puts the resulting final config file in /var/lib/exim4/config.autogenerated. Fwew.
The basic DKIM config is in /etc/exim4/exim4.conf.localmacros. I added these lines:
For my setup this wasn’t enough. The DKIM_* macros are only used by the “remote_smtp” transport (found in /etc/exim4/conf.d/transport/30_exim4-config_remote_smtp). I was using a “satellite” configuration with a smarthost. This means it uses the “remote_smtp_smarthost” transport (found in /etc/exim4/conf.d/transport/30_exim4-config_remote_smtp_smarthost). You can tell what transport is being used by looking for T= in /var/log/exim4/mainlog.
I copied all the DKIM related stuff from /etc/exim4/conf.d/transport/30_exim4-config_remote_smtp into /etc/exim4/conf.d/transport/30_exim4-config_remote_smtp_smarthost, namely these lines:
Today my Jenkins builds were not working because all of the build slaves were offline. Digging around in the logs showed that the couldn’t connect because of name resolution failures. I use mDNS on my network (the slaves are Mac OS X VMs running on a Mac Mini), and so they were named something like xxxx-1.local and xxxx-2.local I tried just pinging the machines and that refused to resolve the name, too.
I verified that Avahi was running, and then used avahi-resolve --name xxxx-1.local to check the mDNS name resolution. It worked just great.
So why would mDNS be working fine network-wise, but no programs were resolving correctly? It struck me that I didn’t know (or couldn’t remember!) how mDNS tied in to the system. Who hooks in to the name resolution and knows to check for *.local using mdns?
It turns out it’s good old /etc/nsswitch.conf (I should have remembered that)! There’s a line in there:
hosts: files mdns4_minimal [NOTFOUND=return] dns
That tells the libc resolver (that everything uses) that when it’s looking for a hostname, it should first look in the /etc/hosts file, then it should check mDNS, then if mDNS didn’t handle it, check regular DNS. Wait, so mDNS is built right in to libc??
Nope! On my Debian system there’s a package called libnss-mdns that has a few files in it:
Those are plugins to the libc name resolver so that random stuff like mDNS doesn’t have to be compiled into libc all the time. In fact, there’s a whole bunch of other libnss plugins in Debian that I don’t even have installed.
So my guess was that this nss-mdns plugin was causing the problem. There are no man pages in the package, but there are a couple README files. I poked around trying random things and reading and re-reading the READMEs many times before this snippet finally caught my eye:
If, during a request, the system-configured unicast DNS (specified in /etc/resolv.conf) reports an SOA record for the top-level local name, the request is rejected. Example: host -t SOA local returns something other than Host local not found: 3(NXDOMAIN). This is the unicast SOA heuristic.
Ok. I doubted that was happening but I decided to try their test anyway:
$ host -t SOA local
local. has SOA record ns1-etm.att.net. nomail.etm.att.net. 1 604800 3600 2419200 900
Crap.
Those bastards at AT&T set their DNS server up to hijack unknown domains! They happily give out an SOA for the non-existant .local TLD. So AT&T’s crappy DNS is killing my Jenkins jobs??? Grrrrr…
The worst part is that I tried to use Cloudflare’s 1.0.0.1 DNS. My router was configured for it. But two things happened: 1. I got a new modem after having connection issues recently, 2. I enabled IPv6 on my router for fun. The new modem seems to have killed 1.0.0.1. I can no longer connect to it at all. Enabling IPv6 gave me an AT&T DNS server through DHCP (or whatever the IPv6 equivalent is).
So, straightening out my DNS (I had to revert back to Google’s 8.8.8.8) caused NXDOMAIN responses to the .localSOA, and that caused mDNS resolution to immediately work, and my Jenkins slaves came back online. Fwew.
My imgur had been acting up for a while now. In my Firefox it wouldn’t render the actual image but rendered most of the rest of the page just fine:
If I went to i.imgur.com (adding the .png or .jpg to the url) then the image loaded just fine. So it wasn’t getting blocked by anything in my network stack (ad-blocker and the like). I opened up the console to take a look and I saw this error:
10:57:53.646 SecurityError: The operation is insecure.                             analytics.js:34:17
             consoleDebug    jafo.js:838:8
             directFire      jafo.js:272:12
             _sessionStart   jafo.js:563:16
             init/<          jafo.js:134:12
             b               lodash.min.js:10:215
             d               raven-3.7.0.js:379:23
             j               https://ajax.googleapis.com/ajax/libs/jquery/2.1.1/jquery.min.js:2:26855
             fireWith        https://ajax.googleapis.com/ajax/libs/jquery/2.1.1/jquery.min.js:2:27673
             ready           https://ajax.googleapis.com/ajax/libs/jquery/2.1.1/jquery.min.js:2:29465
             I               https://ajax.googleapis.com/ajax/libs/jquery/2.1.1/jquery.min.js:2:29656
The line in question was doing localstorage.Get("something-or-other"). So Firefox was mysteriously throwing a SecurityError when accessing local storage. After testing a million different things (disabling ad-blockers, privacy extensions, etc.) and reading countless Stack Overflow and forum posts, I discovered that this was because I had "https://imgur.com" listed in my cookie exceptions as "Block".
This was actually surprisingly hard to find because the Firefox preference UI for cookie exceptions is pretty bad—it doesn't sort nicely and it doesn't have a search. It's very confusing because the "Manage Cookies and Site Data" screen looks almost identical but sorts correctly (all domains and subdomains grouped together) and has a handy search bar. If you are used to that screen and then try to use the cookie exceptions screen I can almost guarantee you'll type the cookie into the text box at the top and then scratch your head for a few seconds trying to figure out why the list isn't reacting to your search, only to realize that the text box is for adding exceptions and not for searching! Sigh. At least you can click the "Website" column header to get a plain radix sort instead of the default sort of "Status" (which apparently doesn't do a secondary sort on the Website so everything is just random!). When sorting by "Website" take care to thoroughly search—"http" and "https" versions of the site are separate (this is what cost me the most time).
Once I removed the block, imgur started working again:
Yay. Kinda sucks that imgur's code isn't defensive enough to deal with localstorage exceptions, which I thought were widely known to happen (I know on sites I run I see them happening for crazy errors like "Disk Full" and "IO Error").
Some people were reporting that an IMAP server wasn’t working on their Mac. It was working from linux machines, and from Thunderbird on all OSes. From Macs I was getting this testing from the command line:
This led me to a recent libssl package upgrade on my server (to version 1.1.0f-4). Checking the changelogs I found this:
  * Disable TLS 1.0 and 1.1, leaving 1.2 as the only supported SSL/TLS
    version. This will likely break things, but the hope is that by
    the release of Buster everything will speak at least TLS 1.2. This will be
    reconsidered before the Buster release.
Ah-ha! To quickly get back up and running I grabbed the old version from http://ftp.us.debian.org/debian/pool/main/o/openssl/libssl1.1_1.1.0f-3_amd64.deb and installed it (and then held the package so it wouldn’t auto-upgrade).
I do hope Debian reconsiders this change, at least in the short term, since I can’t easily force OS upgrades to everyone that uses this server. Ideally Apple would update their old OSes to support TLS 1.2, but I’m not holding my breath.