Decoding the sprite format of a 25 year old game

My brother nerd sniped me the other day. He wanted to see if he could extract the images out of an old game by Ambrosia Software called “Slithereens”. It was released on 1998-12-15 for Mac OS 9. That sounds easy enough…

Digging though resource forks

Old Mac OS had the ability to have a 2nd plane of data on a file called a “resource fork”. Rather than being just arbitrary binary blobs, they had some structure to them. Back in the day there was tool called “ResEdit” from Apple that let you poke around Resource Forks. Today there are open source clones out there. I grabbed “ResForge” to look around with a nice GUI. I could have also used /usr/bin/derez which still ships with the developer tools even on the latest macOS 13.

Here’s the list of resources in the Slithereen Sprites resource files:

There’s just a handful of types. Poking around it looks like the SpRt resources contain metadata about the animations and the SpRd resources are just raw data, probably bitmaps.

Here’s a SpRt resource for the “Player 1 Head” sprite:

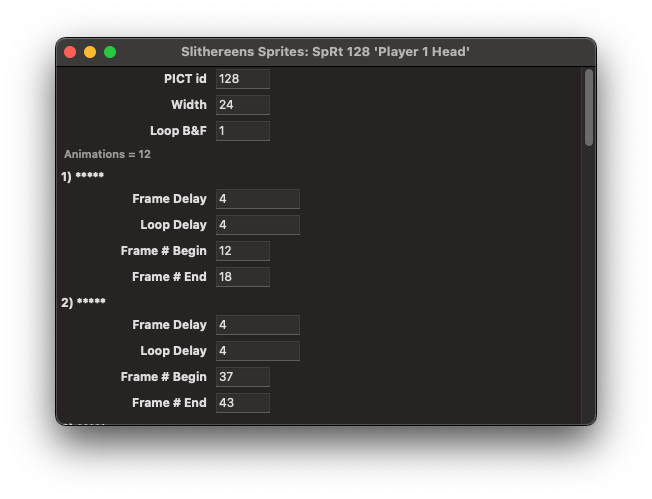
That’s got a bunch of stuff, but really the only super interesting piece of data is the width: 24 pixels.

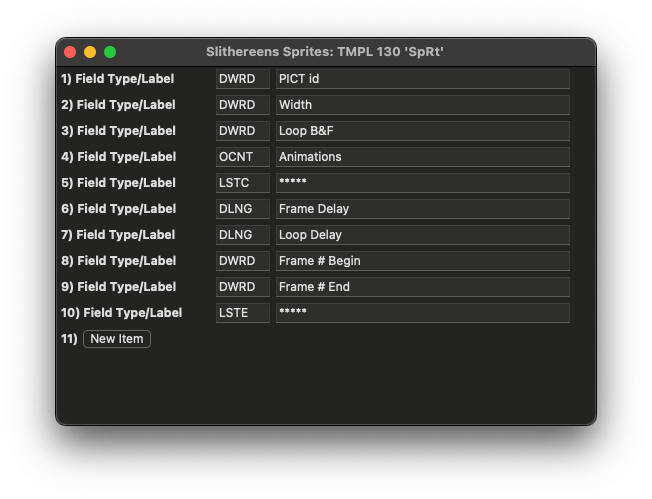
As an aside, how did they get their custom animation data to show up parsed like that? That’s actually a cool feature of ResEdit—you can defined TMPL resources in your file and ResEdit will use them to decode and print your data nicely, allowing you to edit stuff right right from ResEdit and without any custom tools. Many programs would ship with their TMPLs and so you could open the application with ResEdit and poke around their data. It’s sort of the equivalent of finding a .json file in someones app nowadays. Here’s the TMPL for the SpRt resource:

I didn’t want to start with the “Player 1 Head” sprite though. I wanted something more recognizable that would help when looking for patterns. A 24×24 square with a semi-circular snake head in the middle seemed to hard. I checked out the screenshot and noticed the “Level” text in the bottom right corner, which seemed promising:

Distinctive shape, wider than it is tall. It looked like it was in a sprite called “Level”, so I checked out the SpRt resource:

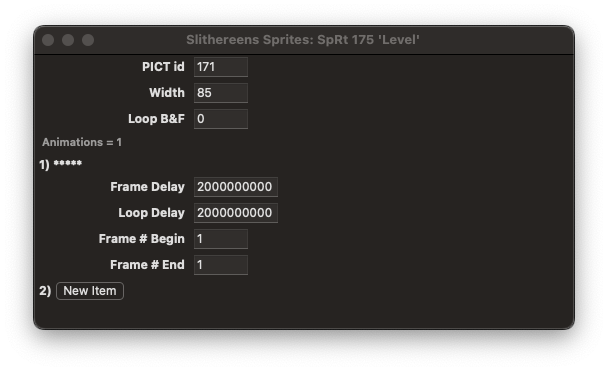
It’s just a single animation frame, which seems like a good idea to start with—less complications up front.

Width 85. I can remember that number… But no Height for some reason. I zoomed up the screenshot and manually counted the pixels in the Level sprite. It looks like it is 22 pixels high.

Now lets look at the data (in the SpRd resource):

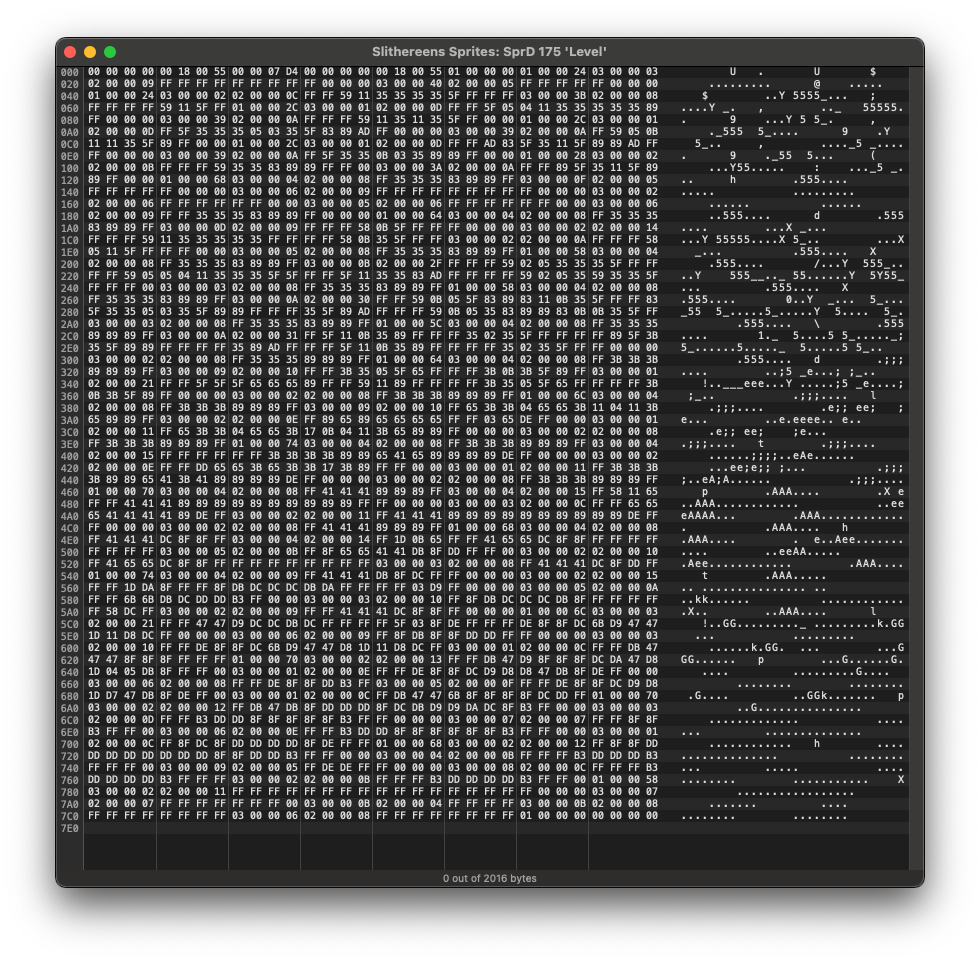
I glance at this a little, but my eyes glaze over. It’s probably just bitmap data, after all.

What I don’t know, though, is the layout of the bitmap data. It probably goes top left to bottom right (as was the style of the time), but that’s not a given. What if it’s rotated or something weird? And how many Bits per Pixel (“BPP”) is it? 8 bit seems reasonable for that timeframe, but it could also be 4—it doesn’t look like the sprites each have a ton of color.

So I’m thinking I want a little data structure that I can read arbitrary bits from so that I can try rendering the bitmap with different BPPs. I decided to write it in Ruby and came up with this little class:

class Bits
  def initialize(bytes=[])
    @bytes = bytes
  end

  def get(offset, length)
    v=0
    while length > 0
      start = offset / 8
      bit   = offset % 8

      bs = bit
      be = [8, bs+length].min
      bits = be - bit
      v = v<<bits | @bytes[start] >> (8 - be) & 0xff >> (8 - bits)

      offset+=bits
      length-=bits
    end
    v
  end
end

I also need the sprite data. I’ve saved the RsRd file out from ResForge and I can poke an prod it from the command line now. I read the man page for xxd and discovered the -i option which sounds perfect:

-i | -include: Output in C include file style. A complete static array definition is written (named after the input file), unless xxd reads from stdin.

Neat. Now I can just do:

$ xxd -i Level.sprd > level.rb

And then convert the C-ism to Ruby-ism in Emacs.

I also write a little dump routine to dump the bitmap in rows and columns:

def dump(data, width, height, bpp, start=0, stride=width)
  (0..height).each {|y|
    (0..width).each {|x|
      pix=data.get(start + y * stride * bpp + x * bpp, bpp)
      printf("%*b ", bpp, pix)
    }
    puts ""
  }
end

I don’t know if I’ll need stride or start, but it’s easy enough to add them now—maybe they’ll turn out to be important later.

dump(head, 12, 12, 4)

produces

   0    0    0    0    0    0    0    0    0    0    1 1000    0
   0    0    1 1000    0    0    0    0    0   10  101    0    0
   0    0    0    0    0    1    1   11    0    0    1 1000    0
   0    1   10 1011    0    1    0    0    0    0    0    0    0
   0    1    0    0    0    0    0    0    0    1    0    0    0
   0    0    0    0    0    1    0    0    0    0    0    0    0
   0    1    0    0    0    0    1  100    0   11    0    0    0
   0    0    0 1010    0   10    0    0    0    0    0 1001 1111
1111 1111 1111 1111 1111 1111 1111 1111 1111 1111 1111 1111 1111
1111 1111 1111 1111 1111 1111    0    0    0    0    0    0    0
   0    1    0    0    0    0    1  100    0   11    0    0    0
   0    0    0 1000    0   10    0    0    0    0    0 1100 1111
1111 1111 1111 1111 1010 1100 1111  110 1000    1 1010  111 1010

It doesn’t really look like anything. If you kind of squint the different patterns look like different greyscale blobs. Kinda. I play around with some numbers and run it a bunch of times but I can’t make the it look like anything except gibberish.

I end up tweaking the code to output either X or Space instead of the numbers (full program here):

dump(level, 85, 22, 8) {|pix| pix==0 ? " " : "X"}

produces

     X X  XX     X XX   X  XX  XX  XXXXXXXXXX   X  XX  XXXXXX   X  XX  XX  XXXXXXXXXXX
XXXX  XX  XXXXXXXXXX  XX  XX  XXXXXXXXXXXXXX   X  XX  XXXXXXXXXXX  X  XX  XX  XXXXXXXX
XXXXXXX   X  XX  XXXXXXXXXXX  X  XX  XX  XXXXXXXXXXXXXX   X  XX  XXXXXXXXXXX  X  XX  X
XX  XXXXXXXXXXXX X  XX  XXXXXXXXXXX  X  XX  XX  XXXXXXXXXX  XX  XXXXXX   X  XX  XXXXXX
XXXXX   X  XX  XXXXXXX  X  XX  XXXXXXX  X  XX  XXXXXXXXXX   X  XX  XX  XXXXXXXXXX  XX
  XXXXXXXXXX   X  XX  XXXXXXXXXXXXXXXXXXXXXX  XX  XXXXXXXXXXX  X  XX  XXXXXXXXXX  XX
 XX  XXXXXXXXXX  XX  XXXXXXXXXXXXXXXXXXXXXXXXXXXXXXXXXXXXXXXXXXXXXXXX X  XX  XXXXXXXXX
XX  XX  XX  XXXXXXXXXX  XX  XXXXXXXXXXXXXXXXXXXXXXXXXXXXXXXXXXXXXXXXXXXXXXXXXX  XX  XX
XXXXXXXXX  XX  XX  XXXXXXXXXX  XX  XXXXXXXXXXXXXXXXXXXXXXXXXXXXXXXXXXXXXXXXXXXXXXXXXX
   X  XX  XXXXXXXXXX  XX  XX  XXXXXXXXXX  XX  XXXXXXXXXXXXXXXXXX  XX  XXXXXXXXXXXXXXXX
XXXXXXXXXXXXXXXXXXX   X  XX  XXXXXXXXXX  XX  XX  XXXXXXXXXX  XX  XXXXXXXXXXXXXXXXXX  X
XX  XXXXXXXXXXXXXXX  X  XX  XXXXXXXXXXXXXXXXXX   X  XX  XXXXXXXXXX  XX  XX  XXXXXXXXXX
X  XX  XXXXXXXXXXXXXXXXXXXXXX   X  XX  XXXXXXXXXXXXXXX  X  XX  XXXXXXXXXXXXXXXXXX   X
  XX  XXXXXXXXXX  XX  XX  XXXXXXXXXX  XX  XXXXXXXXXXXXXXXXXXXXXX   X  XX  XXXXXXXXXXXX
XXX  XX  XXXXXXXXXXXXXXXXXX   X  XX  XXXXXXXXXX  XX  XX  XXXXXXXXXX  XX  XXXXXXXXXXXXX
XXXXXXXXXX  XX  XXXXXXXXXXXX X  XX  XXXXXXXXXXXXXXXXXX  XX  XXXXXXXXXX  XX  XX  XXXXXX
XXXXX   X  XX  XXXXXXXXXXXXXXXXXXXXXX   X  XX  XXXXXXXXXXX  X  XX  XXXXXXXXXXXXXXXXXX
  XX  XXXXXXXXXX   X  XX  XX  XXXXXXXXXXXXXXXXXXXXXXXXXXXXXXXXXX   X  XX  XXXXXXXXXX
  X  XX  XXXXXXXXXXXXXXXXXX  XX  XXXXXXXXXXXXXX  XX  XX  XXXXXXXXXXXXXXXXXXXX X  XX  X
XXXXXXXXXXXXXXX  X  XX  XXXXXXXXXX  XX  XXXXXXXXXXXXXXXX X  XX  XXXXXXXXXXXXXX  XX  XX
X  XXXXXXXXXXXXXXXXXXX  X  XX  XXXXXXXXXXXXXX   X  XX  XXXXXXXX X  XX  XXXXXXXXXXXXXXX
X  X  XX  XXXXXXXXXXXXXX  XX  XX  XXXXXXXXXXXXXXXXXXX  X  XX  XXXXXXXXXXXX X  XX  XXXX
XXX   X  XX  XXXXXXXXXXXXXX  XX  XXXXXXXXXXXX X  XX  XX  XXXXXXXXXXXXXXXXXX   X  XX  X

That doesn’t look like anything. I tweak more numbers but each time I have to edit the file then run it to get results. It feels slow. I need my turn-around time faster! I kinda want a little UI and maybe have it respond to keystrokes. I start to think a web app could be nice…

So I rewrite those same little code chunks in javascript. Now that I have a browser I can drop <input> tags down, grab a canvas and draw actual rectangles of different colors instead of printing Xs. I get it working and it’s still kinda slow, deleting those numbers and incrementing them—sounds dumb but requires thought and I want to focus on looking for patterns not remembering how to type numbers quickly.

The easy answer is to make “PgUp” and “PgDown” increment and decrement the number (and “Home” and “End” to increment and decrement by 10). This finally feels good. So I sit down and play:

Can you get it to display something resembling the words “Level”? I sure couldn’t. I started thinking this probably wasn’t a straight bitmap.

Take 2

My next guess was some sort of run length encoding (“RLE”). This can be used to compress the data (very simply). My brother had another idea though—he thought they might be PICT files. I wasn’t sure—why wouldn’t they put them in PICT resources then? But I don’t remember how PICTs work so I couldn’t rule it out.

Turns out the Inside Macintosh series of books described the PICT format. I still have mine on the shelf in the other room, but it’s much easier to just search google. Luckily, Apple still has them on their web site.

Inside Mac Appendix about Quickdraw had this example picture data:

data 'PICT' (129) {
$"0078"     /* picture size; don't use this value for picture size */
$"0002 0002 006E 00AA"  /* bounding rectangle of picture */
$"0011"     /* VersionOp opcode; always $0011 for version 2 */
$"02FF"     /* Version opcode; always $02FF for version 2 */
$"0C00"     /* HeaderOp opcode; always $0C00 for version 2 */
            /* next 24 bytes contain header information */
   $"FFFF FFFF"   /* version; always -1 (long) for version 2 */
   $"0002 0000 0002 0000 00AA 0000 006E 0000"   /* fixed-point bounding 
                                                   rectangle for picture */
   $"0000 0000"   /* reserved */
$"001E"     /* DefHilite opcode to use default hilite color */
$"0001"     /* Clip opcode to define clipping region for picture */
   $"000A"  /* region size */
   $"0002 0002 006E 00AA"  /* bounding rectangle for clipping region */
$"000A"     /* FillPat opcode; fill pattern specifed in next 8 bytes */
   $"77DD 77DD 77DD 77DD"  /* fill pattern */
$"0034"     /* fillRect opcode; rectangle specified in next 8 bytes */
   $"0002 0002 006E 00AA"  /* rectangle to fill */
$"000A"     /* FillPat opcode; fill pattern specified in next 8 bytes */
   $"8822 8822 8822 8822"  /* fill pattern */
$"005C"     /* fillSameOval opcode */
$"0008"     /* PnMode opcode */
$  "0008"   /* pen mode data */
$"0071"     /* paintPoly opcode */
   $"001A"  /* size of polygon */
   $"0002 0002 006E 00AA"  /* bounding rectangle for polygon */
   $"006E 0002 0002 0054 006E 00AA 006E 0002"   /* polygon points */
$"00FF"     /* OpEndPic opcode; end of picture */
}

Lets hex dump our SpRd data and see if it matches up. All these dumps are big endian, as the all the old 680×0 and PowerPC Macs were big endian machines (technically PowerPC CPUs could run in either little endian or big endian mode, but MacOS Classic always run in big-endian mode):

00000000: 0000 0000 0018 0055 0000 07d4 0000 0000  .......U........
00000010: 0018 0055 0100 0000 [01]00 0024 [03]00 0003  ...U.......$.... => Suspicously aligned 1 #first-byte-1, Suspicously aligned 3 #first-byte-3
00000020: [02]00 0009 ffff ffff ffff ffff ff00 0000  ................ => Suspiciously aligned 2 #first-byte-2
00000030: [03]00 0040 [02]00 0005 ffff ffff ff00 0000  ...@............ => Suspicously aligned 3 #first-byte-3, Suspiciously aligned 2 #first-byte-2
00000040: [01]00 0024 [03]00 0002 [02]00 000c ffff 5911  ...$..........Y. => Suspicously aligned 1 #first-byte-1, Suspicously aligned 3 #first-byte-3, Suspiciously aligned 2 #first-byte-2
00000050: 3535 3535 5fff ffff [03]00 003b [02]00 0008  5555_......;.... => Suspicously aligned 3 #first-byte-3, Suspiciously aligned 2 #first-byte-2
00000060: ffff ffff 5911 5fff [01]00 002c [03]00 0001  ....Y._....,.... => Suspicously aligned 1 #first-byte-1, Suspicously aligned 3 #first-byte-3
00000070: [02]00 000d ffff 5f05 0411 3535 3535 3589  ......_...55555. => Suspiciously aligned 2 #first-byte-2
00000080: ff00 0000 [03]00 0039 [02]00 000a ffff ff59  .......9.......Y => Suspicously aligned 3 #first-byte-3, Suspiciously aligned 2 #first-byte-2

That doesn’t match up, so I decide to rule out PICTs.

But I happen to notice a lot of 03, 02, and 01 in the high byte of u32 aligned words (annotate).

I try dumping the data with xxd -c 4 -g 4 (group by 4, 4 bytes per line):

00000000: 00000000  ....
00000004: 00180055  ...U
00000008: 000007d4  ....
0000000c: 00000000  ....
00000010: 00180055  ...U
00000014: [01]000000  .... => First Byte == 1
00000018: [01]000024  ...$ => First Byte == 1
0000001c: [03]000003  .... => First Byte == 3
00000020: [02]000009  .... => First Byte == 2
00000024: ffffffff  ....
00000028: ffffffff  ....
0000002c: ff000000  ....
00000030: [03]000040  ...@ => First Byte == 3
00000034: [02]000005  .... => First Byte == 2
00000038: ffffffff  ....
0000003c: ff000000  ....
00000040: [01]000024  ...$ => First Byte == 1
00000044: [03]000002  .... => First Byte == 3
00000048: [02]00000c  .... => First Byte == 2
0000004c: ffff5911  ..Y.

Full listing here

That looks more promising. In fact the entire thing seems to be u32 aligned and the first bytes seem mostly similar.

The 01, 02, 03 words don’t start right away, which means there’s probably a file header up front.

I remember that the SpRt resource for the “Level” sprite says the width is “85”—that’s is 0x55 in hex. I see that in the first few words a couple times:

00000000: [00000000]  .... => Unknown zeros #zeros
00000004: [0018][0055]  ...U => Height #height,Width
00000008: [000007d4]  .... => Unknown length #length
[0000000c]: [00000000]  .... => Offset the length is based from #offset, Unknown zeros #zeros
00000010: [0018][0055]  ...U => Height (Again!) #height,Width (Again!)

0x18 is 24 decimal, which is what we think the height of the sprites is (annotate). I got 22 by pixel counting, but 24 is close enough. There are some zeros that I don’t understand yet (annotate), and a 0x7d4 (annotate). That looks big enough to maybe be a length. I ls -l the file which says it’s 2016 bytes long, which is 0x7e0. That’s extremely close to 0x7d4, so it’s probably related. In fact, if we subtract them to see just how close they are then we get 12, or 0xc. Aha! That corresponds to the file offset just after the length (annotate), which means that is the length of the rest of the file.

So far the theory is that this is a header with some zeros that are unknown, a height and width, the length of the file (measure from just after reading that u32), and then the zeros and width and height again for some reason. Let’s not worry about that for now, let’s look at the rest.

After staring at the data for a while I notice that whenever there are words that don’t start with 01, 02, or 03, that they always come after a 02. If we take some random sections of the file and look at them maybe we can see a pattern:

00000020: [02][000009]  .... => Command 2, Length = 9 #data_l
00000024: [ffffffff]  .... => Data #data_b
00000028: [ffffffff]  .... => Data #data_b
0000002c: [ff][000000]  .... => Data #data_b, Padding for alignment #align

000000e8: [02][00000a]  .... => Command 2, Length = 0xa (10) #data_l
000000ec: [ff5f3535]  ._55 => Data #data_b
000000f0: [0b033589]  ..5. => Data #data_b
000000f4: [89ff][0000]  .... => Data #data_b, Padding for alignment #align

000003f0: [02][000008]  .... => Command 2, Length = 8 #data_l
000003f4: [ff3b3b3b]  .;;; => Data #data_b
000003f8: [898989ff]  .... => Data #data_b

0000055c: [02][000015]  .... => Command 2, Length = 0x15 (21) #data_l
00000560: [ffff1dda]  .... => Data #data_b
00000564: [8fffff8f]  .... => Data #data_b
00000568: [dbdcdcdc]  .... => Data #data_b
0000056c: [dbdaffff]  .... => Data #data_b
00000570: [ffff03d9]  .... => Data #data_b
00000574: [ff][000000]  .... => Data #data_b, Padding for alignment #align

The longer the trailing data is (until the next 01 or 03), the larger that lower byte in the 02 u32. In fact, I count them and it looks like that is a precise byte count (annotate). When it doesn’t align to 32 bits it’s filled with zeros (annotate)! Skimming through the file I don’t see anything that counters this. So lets code it up and see if it’s really true. I decide to call these u32s that start with 01, 02 and 03 (and the 00 I notice at the very end) “commands”, though I don’t know exactly what they are yet.

I need to add a couple helper functions to the Bits class (which got converted to Javascript) to read bytes in a more file like way:

seek(offset) { this.cursor = offset }
tell() { return this.cursor }
read(bytes) {
    let b = this.bytes.slice(this.cursor, this.cursor+bytes)
    this.cursor += bytes
    return b;
}
readn(n) { return this.read(n).reduce((acc, b) => acc << 8 | b, 0) }
read8()  { return this.readn(1) }
read16() { return this.readn(2) }
read24() { return this.readn(3) }
read32() { return this.readn(4) }

and an ambitiously titled unpack() (ambitious because it does nothing of the sort) to test the theory:

function unpack(data) {
    console.log("header")
    console.log(`  x,y?   ${data.read16()},${data.read16()}`)
    console.log(`  height ${data.read16()}`)
    console.log(`  width  ${data.read16()}`)
    let length = data.read32()
    console.log(`  length ${dec_and_hex(length)} ` +
                   `(end:${dec_and_hex(data.tell() + length)})`)
    console.log(`  again x,y?   ${data.read16()},${data.read16()}`)
    console.log(`  again height ${data.read16()}`)
    console.log(`  again width  ${data.read16()}`)

    let c = 0
    while (true) {
        let command = data.read(4)
        console.log(`command[${c} (${hex(data.tell())})] ${command[0]} ` +
                        `[${hex(...command)}]`)
        if (command[0] == 0) break;
        if (command[0] == 2) {
            let chunk = data.read(command[3]);
            // this is wrong if len == 0: -1%4 => -1 in js. yuck.
            let align = data.read((3 - ((command[3]-1) % 4)));
            console.log(`    chunk  ${hex(...chunk)} | ${hex(...align)}`);
        }
        c += 1
    }

    console.log(`end @ ${hex(data.tell())}`)
}

Full code here.

The output looks like:

header
  x,y?   0,0
  height 24
  width  85
  length 2004 [7d4] (end:2016 [7e0])
  again x,y?   0,0
  again height 24
  again width  85
command[0 (18)] 1 [01 00 00 00]
command[1 (1c)] 1 [01 00 00 24]
command[2 (20)] 3 [03 00 00 03]
command[3 (24)] 2 [02 00 00 09]
    chunk  ff ff ff ff ff ff ff ff ff | 00 00 00
command[4 (34)] 3 [03 00 00 40]
command[5 (38)] 2 [02 00 00 05]
    chunk  ff ff ff ff ff | 00 00 00
command[6 (44)] 1 [01 00 00 24]
command[7 (48)] 3 [03 00 00 02]
command[8 (4c)] 2 [02 00 00 0c]
    chunk  ff ff 59 11 35 35 35 35 5f ff ff ff |

[... snip ...]

command[189 (7bc)] 3 [03 00 00 0b]
command[190 (7c0)] 2 [02 00 00 08]
    chunk  ff ff ff ff ff ff ff ff |
command[191 (7cc)] 3 [03 00 00 06]
command[192 (7d0)] 2 [02 00 00 08]
    chunk  ff ff ff ff ff ff ff ff |
command[193 (7dc)] 1 [01 00 00 00]
command[194 (7e0)] 0 [00 00 00 00]
end @ 7e0

Full output here.

Hey, that theory looks correct. It even ends on a nice 00 command as some kind of null terminator.

But what are 01 and 03 for??

000000e4: [03][000039]  ...9 => Command 3, Repeat count #repeat_l
000000e8: [02][00000a]  .... => Command 2, Data count #+data_l
000000ec: [ff5f3535]  ._55 => Data #+data_b
000000f0: [0b033589]  ..5. => Data #+data_b
000000f4: [89ff][0000]  .... => Data #+data_b, Padding for alignment #+align
000000f8: [01][000028]  ...( => Command 1, Skip count? #skip_l
000000fc: [03][000002]  .... => Command 3, Repeat count? #repeat_l
00000100: [02][00000b]  .... => Command 2, Data count #+data_l
00000104: [ffffff59]  ...Y => Data #+data_b
00000108: [35358389]  55.. => Data #+data_b
0000010c: [89ffff][00]  .... => Data #+data_b, Padding for alignment #+align
00000110: [03][00003a]  ...: => Command 3, Repeat count? #repeat_l
00000114: [02][00000a]  .... => Command 2, Data count #+data_l
00000118: [ffff895f]  ..._ => Data #+data_b
0000011c: [35115f89]  5._. => Data #+data_b
00000120: [89ff][0000]  .... => Data #+data_b, Padding for alignment #+align
00000124: [01][000068]  ...h => Command 1, Skip count? #skip_l
00000128: [03][000004]  .... => Command 3, Repeat count? #repeat_l
0000012c: [02][000008]  .... => Command 2, Data count #+data_l
00000130: [ff353535]  .555 => Data #+data_b
00000134: [838989ff]  .... => Data #+data_b
00000138: [03][00000f]  .... => Command 3, Repeat count? #repeat_l
0000013c: [02][000005]  .... => Command 2, Data count #+data_l

Since I suspect it’s some sort of RLE, I start thinking along those lines. With a run length encoding you usually have some sort of “repeat” code. I notice that the 03 command always comes before a 02 command. So I make a guess. I think maybe 03 is a “repeat” command (annotate). But then what is 01? I think that may be a “skip” command (annotate)—it’s kind of sporadic but it always comes before the repeat. And the 02 command must be verbatim data (annotate). Well… Just theorizing gets us nowhere, lets try it out!

First I need another couple functions in the Bits class, one for writing and a quickie hex dump function to check my work…

write(data) {
    this.bytes.splice(this.cursor, data.length, ...data)
    this.cursor += data.length
}
dump() {
    return this.bytes.reduce((acc,b,i) => { let ch = Math.floor(i/16);
                                            acc[ch] = [...(acc[ch]??[]), b];
                                            return acc }, [])
        .map(row => row.map(b => hex(b)).join(", ") + "\n")
        .join('');
}

The write() function replaces the bytes at the cursor with the data passed in (it does not insert).

Now I modify up the unpack() function (which is finally living up to its name!):

function unpack(data) {
    let out = new Bits()
    console.log("header")
    console.log(`  x,y?   ${data.read16()},${data.read16()}`)
    console.log(`  height ${data.read16()}`)
    console.log(`  width  ${data.read16()}`)
    let length = data.read32()
    console.log(`  length ${dec_and_hex(length)} ` +
                   `(end:${dec_and_hex(data.tell() + length)})`)
    console.log(`  again x,y?   ${data.read16()},${data.read16()}`)
    console.log(`  again height ${data.read16()}`)
    console.log(`  again width  ${data.read16()}`)

    let c = 0
    let repeat;
    while (true) {
        let command = data.read(4)
        console.log(`command[${c} (${hex(data.tell())})] ${command[0]} ` +
                        `[${hex(...command)}]`)
        if (command[0] == 0) break;
        if (command[0] == 1) // skip forward (write zeros)?
            out.write(Array(command[3]).fill(0))
        else if (command[0] == 3) // repeat the next command n times?
            repeat = command[3]
        else if (command[0] == 2) {
            let chunk = data.read(command[3]);
            // this is wrong if len == 0: -1%4 => -1 in js. yuck.
            let align = data.read((3 - ((command[3]-1) % 4)));
            console.log(`    chunk  ${hex(...chunk)} | ${hex(...align)}`);
            out.write(Array(repeat).fill(chunk).flat())
        }
        c += 1
    }

    console.log(`end @ ${hex(data.tell())}`)

    console.log(out.dump())
    return out;
}

I get some data out! Lets graph it to see if it works:

Play around, can you find the image?

[spoiler] I couldn’t either. 🙁

Hmm. I start looking at the output, and it just doesn’t make any sense. First off it’s way too big—85×24 at 8 bits per pixel is 2040 bytes and the output is 9627 bytes long. And that’s not off by a good multiple either. Second off, the repeat counts on some stuff is really high which seems wrong.

Back to the drawing board

I decide this is just wrong and stare at the “command list” again. My brother and I started screen sharing so we could have 2 heads working on the problem. I really wanted to figure out what the 01 commands are for. That first one with zeros is weird, and there’s another one like that at the end. So my initial “skip” thought doesn’t really make sense because why skip zero? What could its number mean? We search through the file and notice the number after the 01 command generally gets bigger as we go farther into the file. On a whim I go through and stick a newline before each 01 command. It ends up looking like this:

00000000: [00000000]  .... => Unknown zeros #+zeros
00000004: [0018][0055]  ...U => Height, Width
00000008: [000007d4]  .... => File length #+length
[0000000c]: [00000000]  .... => Offset the length is based from #+offset, Unknown zeros #+zeros
00000010: [0018][0055]  ...U => Height (Again!) #+height, Width (Again!) #+width

00000014: [01][000000]  .... => Command 1, Length (0 + 0x00000018) #command_1_l

[00000018]: [01][000024]  ...$ => Offset the above length is based from #command_1_o, Command 1, Length (0x24 + 0x0000001c == 0x00000040) #command_1_l
[0000001c]: 03000003  .... => Offset the above length is based from #command_1_o
00000020: 02000009  ....
00000024: ffffffff  ....
00000028: ffffffff  ....
0000002c: ff000000  ....
00000030: 03000040  ...@
00000034: 02000005  ....
00000038: ffffffff  ....
0000003c: ff000000  ....

00000040: [01][000024]  ...$ => Command 1, Length (0x24 + 0x00000044 = 0x00000068) #command_1_l
[00000044]: 03000002  .... => Offset the above length is based from #command_1_o
00000048: 0200000c  ....
0000004c: ffff5911  ..Y.
00000050: 35353535  5555
00000054: 5fffffff  _...
00000058: 0300003b  ...;
0000005c: 02000008  ....
00000060: ffffffff  ....
00000064: 59115fff  Y._.

[... snip ...]

0000077c: [01][000058]  ...X => Command 1, Length (0x58 + 0x00000780 = 0x7d8) #command_1_l
[00000780]: 03000002  .... => Offset the above length is based from #command_1_o
00000784: 02000011  ....
00000788: ffffffff  ....
0000078c: ffffffff  ....
00000790: ffffffff  ....
00000794: ffffffff  ....
00000798: ff000000  ....
0000079c: 03000007  ....
000007a0: 02000007  ....
000007a4: ffffffff  ....
000007a8: ffffff00  ....
000007ac: 0300000b  ....
000007b0: 02000004  ....
000007b4: ffffffff  ....
000007b8: 0300000b  ....
000007bc: 02000008  ....
000007c0: ffffffff  ....
000007c4: ffffffff  ....
000007c8: 03000006  ....
000007cc: 02000008  ....
000007d0: ffffffff  ....
000007d4: ffffffff  ....

000007d8: [01][000000]  .... => Command 1, Length (0 + 0x000007dc) #command_1_l

[000007dc]: 00000000  .... => Offset the above length is based from #command_1_o

Interestingly, not only do the numbers get bigger through the file, the distance between 01 commands gets bigger, too. Also I notice those numbers are very round, the lower nibble of every 01 command is 0, 4, 8, or c. That’s u32 aligned. It must be a length! Sure enough, That first non-zero chunk has a 0x24. If we add that to the next address (same as the length in the header) we get 0x24+0x1c => 0x40, which is exactly the address where the next 01 commands starts (annotate). Eureka! We spot check a few more and they all agree with this.

Still, what does 01 signify? It has a length like it’s wrapping something, but what concept is it wrapping? I decided to see how many there are in the file. There are 24 including the ones with 00 length. Hey! 24 is the height! These are lines! (annotate) And that makes some sense, too: earlier I said I pixel counted and got 22 pixels on the level font, but the file said it was 24 high. The reason for that discrepancy is 2 blank lines, and 00 length makes a lot of sense for a blank line.

So that seems like very strong evidence to me but we can’t decode without figuring out what the other commands do. I’m pretty sure I was right about the 02 command meaning “verbatim data”, but what is the 03? Well, let’s look at the first non-blank line again:

00000018: [01][000024]  ...$ => Line Command, Line length (0x24 + 0x0000001c == 0x00000040) #+command_1_l
0000001c: [03][000003]  .... => Command 3 #+skip, Skip count #skip_c
00000020: [02][000009]  .... => Verbatim Data Command #+data, Verbatim Data Length #+data_l
00000024: [ffffffff]  .... => Data #+data_b
00000028: [ffffffff]  .... => Data #+data_b
0000002c: [ff][000000]  .... => Data #+data_b, Padding #+align
00000030: [03][000040]  ...@ => Command 3 #+skip, Skip count #skip_c
00000034: [02][000005]  .... => Verbatim Data Command #+data, Verbatim Data Length #+data_l
00000038: [ffffffff]  .... => Data #+data_b
0000003c: [ff][000000]  .... => Data #+data_b, Padding #+align

I have a guess… I think it’s the skip (which I previously thought was command 01). (annotate) Before coding we can do a spot check to see if this seems correct: We can look at the commands in this line and see if they make sense.

That would be: skip 0x3, verbatim 0x9, skip 0x40, verbatim 0x5. In total that’s 0x51, which is 81 in decimal. That’s very close to the width of 85! It’s even kind of centered comparing against the first skip (3 vs 4). So that’s looking promising, let’s code it up!

function unpack(data) {
    console.log("header")
    console.log(`  x,y?   ${data.read16()},${data.read16()}`)
    console.log(`  height ${data.read16()}`)
    console.log(`  width  ${data.read16()}`)
    let length = data.read32()
    console.log(`  length ${dec_and_hex(length)} ` +
                   `(end:${dec_and_hex(data.tell() + length)})`)
    console.log(`  again x,y?   ${data.read16()},${data.read16()}`)
    let height = data.read16();
    let width = data.read16();
    console.log(`  again height ${height}`)
    console.log(`  again width  ${width}`)

    let out = new Bits(Array(width * height).fill(0))

    let c = 0
    let repeat;
    let line = -1
    while (true) {
        let command = data.read(4)
        console.log(`command[${c} (${hex(data.tell())})] ${command[0]} [${hex(...command)}]`)
        if (command[0] == 0) break;
        else if (command[0] == 1) { // Line header
            line += 1
            let sol = line * width
            out.seek(sol)
        } else if (command[0] == 3) { // Skip forward (write zeros)?
            out.write(Array(command[3]).fill(0))
        } else if (command[0] == 2) {
            let chunk = data.read(command[3])
            // this is wrong if len == 0: -1%4 => -1 in js. yuck.
            let align = data.read((3 - ((command[3]-1) % 4)));
            out.write(chunk)
        }
        c += 1
    }
    return out;
}

And that produces…

Woohoo! Success!

“But what about the colors”, my brother asks. Oh. Well, that’s probably not too hard…

Color

I explain about color lookup tables (often called “cluts”) and we find one named “standard” in a resource file. He dumps it to binary and we take a look with xxd -c 8:

00000000: [0000 0000] [0000 00ff]  ........ => First color index #zeros, Last color index #max_color
00000008: [0000] [ffff] [ffff] [ffff]  ........ => Color index #index, Red #red, Green #green, Blue #blue
00000010: [0001] [ffff] [ffff] [cccc]  ........ => Color index #index, Red #red, Green #green, Blue #blue
00000018: [0002] [ffff] [ffff] [9999]  ........ => Color index #index, Red #red, Green #green, Blue #blue
00000020: [0003] [ffff] [ffff] [6666]  ......ff => Color index #index, Red #red, Green #green, Blue #blue
00000028: [0004] [ffff] [ffff] [3333]  ......33 => Color index #index, Red #red, Green #green, Blue #blue
00000030: [0005] [ffff] [ffff] [0000]  ........ => Color index #index, Red #red, Green #green, Blue #blue
00000038: [0006] [ffff] [cccc] [ffff]  ........ => Color index #index, Red #red, Green #green, Blue #blue
00000040: [0007] [ffff] [cccc] [cccc]  ........ => Color index #index, Red #red, Green #green, Blue #blue
00000048: [0008] [ffff] [cccc] [9999]  ........ => Color index #index, Red #red, Green #green, Blue #blue
[ ... ]
000007d8: [00fa] [7777] [7777] [7777]  ..wwwwww => Color index #index, Red #red, Green #green, Blue #blue
000007e0: [00fb] [5555] [5555] [5555]  ..UUUUUU => Color index #index, Red #red, Green #green, Blue #blue
000007e8: [00fc] [4444] [4444] [4444]  ..DDDDDD => Color index #index, Red #red, Green #green, Blue #blue
000007f0: [00fd] [2222] [2222] [2222]  .."""""" => Color index #index, Red #red, Green #green, Blue #blue
000007f8: [00fe] [1111] [1111] [1111]  ........ => Color index #index, Red #red, Green #green, Blue #blue
00000800: [00ff] [0000] [0000] [0000]  ........ => Color index #index, Red #red, Green #green, Blue #blue

Full output here.

That looks pretty straightforward. A u32 0 (probably the minimum color number), a u32 max color (255 in this case), and then each entry is u16[4]: index, r, g, b. (annotate) So we write a little clut decoder:

function load_clut(inc) {
    inc.read(7);
    let colors = inc.readn(1);
    let table = Array(colors);
    while (inc.tell() < inc.length()) {
        inc.read8();
        let c = inc.read8();
        table[c] = { r: inc.read16() / 65535 * 255,
                     g: inc.read16() / 65535 * 255,
                     b: inc.read16() / 65535 * 255 }
    }
    return table;
}

And then use the clut in the draw function instead of just making up a greyscale value:

diff a/main.js b/main.js
--- a/main.js
+++ b/main.js
@@ -12,7 +13,7 @@ function erase() {
     view.clearRect(0,0, view_el.width, view_el.height);
 }

-function draw(data, width, height, bpp, start=0, stride=undefined) {
+function draw(clut, data, width, height, bpp, start=0, stride=undefined) {
     if (stride==undefined)
         stride = width * bpp;
     else
@@ -22,8 +23,7 @@ function draw(data, width, height, bpp, start=0, stride=undefined) {
     for (let y=0; y<height; y++) {
         for (let x=0; x<width; x++) {
             let pix=data.get(start*8 + y * stride + x * bpp, bpp);
-            let pix255=pix*255/(2**bpp-1);
-            view.fillStyle = `rgb(${pix255},${pix255},${pix255})`;
+            view.fillStyle = `rgb(${clut[pix].r},${clut[pix].g},${clut[pix].b})`;
             view.fillRect(x*zoom, y*zoom, zoom, zoom);
         }
     }
@@ -40,13 +40,15 @@ function main() {
     let level_packed = new Bits(level_sprd);
     let level = unpack(level_packed);

+    let clut = load_clut(new Bits(Standard_clut));
+
     let width, height, bpp, offset;
     let go = (event) => {
         width = +el.width.value;
         height = +el.height.value;
         bpp = +el.bpp.value;
         offset = +el.offset.value;
-        draw(level, width, height, bpp, offset);
+        draw(clut, level, width, height, bpp, offset);
     };
     Object.values(el).forEach(el => el.oninput = go);

And…

Success again!

Wait, it’s not done??

Now that we’ve gotten “Level” to render, we plug in the snake head sprite in its place:

Uh oh! Why one head? It’s supposed to have a bunch of frames of animation… And why is it so wide?

Time to dive back into the command stream, but let’s just start with the header:

00000000: [0000][0000]  ....   => Unknown zeros #+b-top, Unknown zeros #+b-left,
00000004: [0018][0018]  ....   => Height #+b-bottom, Width #+b-right
00000008: [00000250]  ...P     => File length #+length
[0000000c]: [0000][0113]  .... => Offset the length is based from #+offset, Unknown zeros #+d-top, Wait those aren't zeros! #+d-left
00000010: [0018][012b]  ...+   => Height (Again!) #+d-bottom, Wait that's not the width! #+d-right

Right off the bat it’s different. The other header had the length/width repeated twice, this one has totally different stuff the 2nd time. Also That 0x250 length doesn’t look quite right: the file is 64K and that’s nowhere close to it. This header must just represent one animation frame and not the whole file (annotate). But what is with those 2nd sets of numbers?

Previously I kind of skimmed over the zeros in the first and fourth u32s since they didn’t really seem to affect anything, but now one of them was a 0x113. And why is the width 0x12b (299 decimal)? I started thinking it may be a stride—an offset between rows somehow. That kind of explained why the sprite with a single frame had the stride equal to the width. But then what was the 0x113 (275 decimal) number? Some sort of vertical stride/interleave number? Neither of those seemed reasonable. We pursued a bunch of leads here, adding and subtracting offsets from all over the file trying to make things line up. And then at one point it suddenly dawned on us: 0x12b0x113 was 0x18. Then it struck me—that’s not an (x,y) offset plus (width,height) that I was assuming—it’s the old Mac standard way of specifying a rectangle (top, left, bottom, right)! (annotate) Aha, and that explained the zeros in the first u32. Those first 4 u16s are also a rectangle. They must be the bounds of the sprite, and the second rectangle must be the destination in the sprite sheet they’re building (annotate).

Let find out how to find the other sprite frames and maybe it will become clear. Using the 0x250 length (at offset 8 in the header) and adding it to 0xc (I am able to do that addition in my head) we can check what’s past the first sprite:

[00000258]: [00][000000]  .... => #line-258, Picture command terminator #+command-null, Zeros #+command-null

[0000025c]: [0000][0000]  .... => #line, Bounds rect top #b-top, Bounds rect left #b-left,
[00000260]: [0018][0018]  .... => #line, Bounds rect bottom #b-bottom, Bounds rect right #b-right
[00000264]: [0000022c]  ...,   => #line, Frame length #length
[00000268]: [0000][012c]  ..., => Offset the frame length is based from #offset, Destination rect top #d-top, Destination rect left #d-left
[0000026c]: [0018][0144]  ...D => #line, Destination rect bottom #d-bottom, Destination rect right #d-right

(The 0x258 line is the null termination command of the first sprite, shown here just for context).

Well… that just looks like another whole header. That seems easy enough. (annotate) But how do we know how big to make our sprite sheet? I guess we could go through every sprite and calculate the max (bottom,left) to know how big we need to make our canvas. But… I don’t really want to do that, it seems annoying. Then I had a thought, “what if I just ignore their ‘destination’ rectangle?”

After all, we just want to be able to grab one and display it, we don’t necessarily need to recreate their sprite sheet verbatim. That also makes it really easy. We’ll pass an extra parameter to our unpack() function (the sprite number) and to a loop over all the pictures until we get to the one we want. That’s super easy because we can just jump to the next one using the length in the header—we don’t need to parse anything in the actual picture.

Here’s just the top half of the new unpack() function (since it’s getting big now and the bottom part didn’t really change):

function unpack(data, want_frame=0) {
    data.seek(0);
    let frame = 0;
    let width,height,out;
    while (data.tell() < data.length()) {
        console.log("header")
        let bounds_top    = data.read16()
        let bounds_left   = data.read16()
        let bounds_bottom = data.read16()
        let bounds_right  = data.read16()
        height = bounds_bottom - bounds_top
        width = bounds_right - bounds_left
        console.log(`  bounds rect (${bounds_top},${bounds_left},${bounds_bottom},${bounds_right}) ` +
                                  `(width  ${width}, height ${height})`)
        let length = data.read32()
        let next_frame = data.tell() + length;
        console.log(`  length ${dec_and_hex(length)} (end:${dec_and_hex(next_frame)})`)
        let dest_top    = data.read16()
        let dest_left   = data.read16()
        let dest_bottom = data.read16()
        let dest_right  = data.read16()
        console.log(`  dest rect (${dest_top},${dest_left},${dest_bottom},${dest_right})`)

        if (frame != want_frame) {
            data.seek(next_frame);
            frame++;
            continue;
        }

        out = new Bits(Array(width * height).fill(0))
[ ... ]

I also decided to add another text entry for setting which frame to look at (just like all the others you can PgUp and PgDown to increment or decrement), and a popup menu to set which sprite-set to display:

\o/

Now I think we’re done—we’ve successfully figured out every byte of the file format and can unwrap any sprite and display it on the screen with the correct colors.

32-bit clang deficiencies on Mac OS X

I was pulling my hair out getting this compiler message tonight:

warning: property 'x' requires method 'x' to be defined - use @synthesize, @dynamic or provide a method implementation in this class implementation [-Wobjc-property-implementation]

According to Apple’s Objective C documentation:

By default, these accessor methods are synthesized automatically for you by the compiler, so you don’t need to do anything other than declare the property using @property in the class interface.

And yet, there was the compiler telling me otherwise! It turns out there’s a huge caveat that I don’t see mentioned in the docs anywhere: auto-synthesis of properties only works in 64 bit targets. If you are also including 32 bit targets in your build (as I was) then you have to do the whole manual synthesis thing. Yuck.

Thanks, random Stack Overflow commenter, for pointing this out!

Daemon-Manager: Manage your non-privileged daemons

It seems I’ve been writing little daemons a lot lately–small things that don’t want to run as root but still need to be launched in the background as services. I’ve been noticing because it’s such a pain to integrate them into the system once they are written (or installed). I have to mess around as root creating /etc/init.d shell scripts (probably by copy and pasting–who out there can actually make those from scratch?) or maybe tweaking some upstart or systemd config file.

And then when I’m done it annoys me that I have to be root to start or stop a daemon that ends up running as my login user anyway.

Enter Daemon Manager

So last October (2010) I sat down and wrote daemon-manager. It started from a few core ideas:

  1. It must be possible for a user to set up and configure their daemons—no root access must be required for a user to create a new daemon or restart one of their daemons.
  2. It must be secure—users should not be allowed to control other users’ daemons (unless they are given explicit permission).
  3. It should allow for good security practices—users should be allowed to launch a daemon as a user other than themselves if root has explicitly allowed it. This is so you can run your daemons as a “nobody” style user.1
  4. It should restart the daemons if they crash (I’m looking at you, php-cgi).
  5. It should be easy to use—1 config file per daemon and a simple command line interface to interact with the running daemons.

There are programs out there that do parts of that list, but none that do everything:

  • daemon tools: I’ve used it before and I really like its philosophy of being small and simple. But it seems to really want to run as root which means you have to be root to control it. Also, setting up new daemons is kind of a pain.
  • Upstart: It’s very similar and it makes setting up a new daemon pretty easy but since it’s an “init” replacement it doesn’t seems very adept at running programs meant for non-root users. I’ve done it before but there was a lot of “sudo” configuration and it wasn’t easy. Also the config files are stored in /etc/init and only root can write new ones.
  • Systemd: I really love systemd. Or the idea of it, really—some day it will make it into Debian and I’ll start actually using it. But its philosophy is great. But again, being an “init” replacement gives it most of the same downsides as upstart.

A Quick Tutorial Through Examples

Master config: /etc/daemon-manager.conf

[runs_as]
david: www-data
michaelc: www-data
amy: www-data
joann: www-data
jim:
greenfelt: greenfelt-daemon

[manages]
david: michaelc,amy,joann,greenfelt
michaelc: amy, joann
bill: joann
jim: greenfelt

The main section is the “runs_as” section. This section tells Daemon Manager which users are allowed to start daemons and which users the daemons can be run as. In the above example, “david”, “michaelc”, “amy”, and “joann” can launch daemons as themselves and also “www-data”. “greenfelt” can launch daemons as itself and the “greenfelt-daemon” user. “jim” is only allowed to launch daemons as himself. No other users on the system are allowed to launch daemons at all because they weren’t explicitly listed.

The “manages” section is a little experimental at this point, but the idea is that “david” is allowed to manage (start, stop, or restart) the daemons of “michaelc”, “amy”, “joann”, and “greenfelt” in addition to his own daemons. This is so you can have help desk type users who can stop or restart other users’ daemons even though they may not have read or write access to the users’ home directories. As you might expect, “root” is always allowed to start and stop anyone’s daemons.

Daemon: deluged.conf

dir=/home/david
start=exec deluged -d

This is a simple Daemon Manager config file that launches the deluge bittorrent daemon. “dir” and “start” are the only required entries in the config file. “dir” is the working directory and “start” is a one line shell script to run. Because it is a shell script it needs to “exec”, otherwise Daemon Manager can’t manage it properly.2

Daemon: wordpress.conf

dir=/home/amy/wordpress
user=www-data
start=exec php-cgi -q -b wordpress.socket

This starts a PHP FastCGI daemon in a WordPress directory and starts it running with as the “www-data” user (“amy” was given explicit permission to start daemons as the www-data user in “/etc/daemon-manager.conf”).

Daemon: greenfelt.conf

dir=/var/www/greenfelt.net
user=greenfelt-daemon
start=exec ./script/greenfelt_fastcgi.pl -l greenfelt.socket -n 1
output=log

This is a paraphrase of the config file that runs greenfelt.net which is a Catalyst app that talks to nginx via FastCGI through the “greenfelt.socket” unix domain socket. It runs as the user “greenfelt-daemon” so it can have less privileges than the main “greenfelt” user. The “output” parameter tells Daemon Manager to collect the stdout and stderr of the daemon and save it to a log file in the “~/.daemon-manager/logs/” directory (the default setting is to throw away stdout and stderr).

Controlling Daemon Manager

Daemon Manager is controlled using the “dmctl” command. It is relatively simple at this point, allowing you to start, stop and restart daemons. It also lets you scan for new config files and query for daemon statistics. Here’s an example output the “status” command:

$ dmctl status
daemon-id                      state              pid respawns cooldown   uptime    total
david/deluge-web               running           2948        0       0s     3w3d     3w3d
david/deluged                  running           2950        0       0s     3w3d     3w3d
david/greenfelt                stopped              0        0       0s       0s       0s
david/minecraft                stopped              0        0       0s       0s       0s
david/moviefile                running           2951        0       0s     3w3d     3w3d
david/pytivo                   running          22905        0       0s     4d7h     4d7h
david/streamium                running           2958        0       0s     3w3d     3w3d
david/wordpress                running          27012       33       0s   12h57m     3w3d

Notice that the wordpress server (good old php-cgi) has crashed 33 times (and has been automatically respawned by Daemon Manager).

Download and Use

Daemon Manager is licensed under the GPL and can be downloaded here (the source is also available on github). If you use Debian there’s a Debian branch available for building a package. The version as of this writing is 0.9 which means that there are some obvious things that need to be fixed3 and that I’m not sure it’s 100% secure or bug free yet, though I have been using it for months now and I absolutely love it–it filled a void I wasn’t even sure was really there when I started.

For a more detailed version of the history of Daemon Manager, see this blog post.

  1. That way, if there is a security hole in your code the attacker doesn’t get access to your main login account.
  2. I would like to change that but I’m having trouble getting dash (/bin/sh on my Debian system) to pass signals onto its child processes. Bash seems to work correctly and so the exec is not needed if /bin/sh is bash on your system.
  3. The dmctl commands and arguments should be reversed so it’s more like system v init scripts or the “service” command: “dmctl wordpress stop” instead of the current “dmctl stop wordpress”.

Introducing Daemon Manager

The idea for Daemon Manager came about when I was converting a web site from Apache to Nginx. Nginx doesn’t launch FastCGI programs itself—it only connects to FastCGI sockets and so it requires that you manage the FastCGI server yourself.

For a simple web site it might be OK to manually create an /etc/init.d script, but even for our relatively simple solitaire site we ended having about 5 separate FastCGI servers (between the blog, the forum, and our test servers). At home I host virtual servers for various members of my family and so there’s a ton of accounts and blogs and forums and other random stuff. I just can’t abide copy and pasting 20 /etc/init.d scripts and then managing them all as they slowly fork away from each other over time. Not to mention that ordinary users can’t manage /etc/init.d scripts themselves (without compromising system security) and if the script does any sort of setuid() calls then they can’t even restart their FastCGI servers without there being some sort of arcane sudo configuration.

I also ran into a problem with PHP. I wanted to run WordPress on Nginx which meant I had to run the “php-cgi” FastCGI server. The problem is that “php-cgi” seems to just die randomly which means I needed some sort of watchdog that starts it back up when it fails.

What I really wanted is a program that lets non-privileged users launch and respawn their own daemons securely and very simply.

Daemon Manager is the result.

Design

The main principles of Daemon Manager’s design were:

  1. It must be possible for a user to set up and configure their daemons—no root access must be required for a user to create a new daemon or restart one of their daemons.
  2. It must be secure—users should not be allowed to control other users’ daemons (unless they are given explicit permission).
  3. It should allow for good security practices—users should be allowed to launch a daemon as a user other than themselves if root has explicitly allowed it. This is so you can run your FastCGI server as a “nobody” style user.1
  4. It should restart the daemons if they crash (I’m looking at you, php-cgi).
  5. It should be easy to use—1 config file per daemon and a simple command line interface to interact with the running daemons.

There are programs out there that do parts of that list, but none that do everything:

  • daemon tools: I’ve used it before and I really like its philosophy of being small and simple. But it seems to really want to run as root which means you have to be root to control it. Also, setting up new daemons is kind of a pain.
  • Upstart: It’s very similar and it makes setting up a new daemon pretty easy but since it’s an “init” replacement it doesn’t seems very adept at running programs meant for non-root users. I’ve done it before but there was a lot of “sudo” configuration and it wasn’t easy. Also the config files are stored in /etc/init and only root can write new ones.
  • Systemd: I really love systemd. Or the idea of it, really—some day it will make it into Debian and I’ll start actually using it. But its philosophy is great. But again, being an “init” replacement gives it most of the same downsides as upstart.

Implementation

From those ideas Daemon Manager was born. I prototyped it in Perl in about 8 hours. The idea seemed sound but I was unhappy with the memory requirements of Perl. I wanted it to be something really small and lean, without any external dependencies. So I rewrote it in C++. It now takes up hardly any RAM which makes it suitable for smaller or embedded environments. The main loop just poll()s on the control sockets and calls wait() when necessary, occasionally restarting a crashed daemon.

I tried to think about security because if it’s insecure then nobody is going to want to use it seriously. Daemon Manager will refuse to read config files that don’t have the right permissions. It uses Unix domain sockets to communicate with users (1 socket for each user in ~/.daemon-manager/command.sock) and makes sure that each socket has the correct permissions when it starts—this way user authentication is handled by the operating system’s filesystem permissions layer. By default users of the system are not allowed to run anything—root must authorize each user and specify which users their daemons can be run as.

A Quick Tutorial Through Examples

Master config: /etc/daemon-manager.conf

[runs_as]
david: www-data
michaelc: www-data
amy: www-data
joann: www-data
jim:
greenfelt: www-data

[manages]
david: michaelc,amy,joann,greenfelt
michaelc: amy, joann
bill: joann
jim: greenfelt

The main section is the “runs_as” section. This section tells Daemon Manager which users are allowed to start daemons and which users the daemons can be run as. In the above example, “david”, “michaelc”, “amy”, “joann”, and “greenfelt” can launch daemons as themselves and also “www-data”. “jim” is only allowed to launch daemons as himself. No other users on the system are allowed to launch daemons at all because they weren’t listed.

The “manages” section is a little experimental at this point, but the idea is that “david” is allowed to manage (start, stop, or restart) the daemons of “michaelc”, “amy”, “joann”, and “greenfelt” in addition to his own daemons. This is so you can have help desk type users who can stop or restart other users’ daemons even though they may not have read or write access to the users’ home directories.

Daemon: deluged.conf

dir=/home/david
start=exec deluged -d

This is a simple Daemon Manager config file that launches the deluge bittorrent client daemon. “dir” and “start” are the only required entries in the file. “dir” is the working directory and “start” is a one line shell script to run. Because it is a shell script it needs to “exec”, otherwise Daemon Manager can’t manage it properly.2

Daemon: wordpress.conf

dir=/home/user/wordpress
user=www-data
start=exec php-cgi -q -b wordpress.socket

This starts a PHP FastCGI daemon in a WordPress directory and starts it running with as the “www-data” user.

Daemon: greenfelt.conf

dir=/var/www/greenfelt.net
user=www-data
start=exec ./script/greenfelt_fastcgi.pl -l greenfelt.socket -n 1
output=log

This is a paraphrase of the config file that runs greenfelt.net which is a Catalyst app. The “output” parameter tells Daemon Manager to collect the stdout and stderr of the daemon and save it to a log file in the “~/.daemon-manager/logs/” directory.

Controlling Daemon Manager

Daemon Manager is controlled using the “dmctl” command. It is relatively simple at this point, allowing you to start, stop and restart daemons. It also lets you scan for new conf files and query for daemon statistics. Here’s an example output the “status” command:

$ dmctl status
daemon-id                      state              pid respawns cooldown   uptime    total
david/deluge-web               running           2948        0       0s     3w3d     3w3d
david/deluged                  running           2950        0       0s     3w3d     3w3d
david/greenfelt                stopped              0        0       0s       0s       0s
david/minecraft                stopped              0        0       0s       0s       0s
david/moviefile                running           2951        0       0s     3w3d     3w3d
david/pytivo                   running          22905        0       0s     4d7h     4d7h
david/streamium                running           2958        0       0s     3w3d     3w3d
david/wordpress                running          27012       33       0s   12h57m     3w3d

Notice that the wordpress server (good old php-cgi) has crashed 33 times (and has been automatically respawned by Daemon Manager). Also notice that despite FastCGI being the impetus for creating Daemon Manager, most of my running daemons are not actually FastCGI servers.

Download and Use

Daemon Manager is licensed under the GPL and can be downloaded here (the source is also available on github). If you use Debian there’s a Debian branch available for building a package. The version as of this writing is 0.9 which means that there are some obvious things that need to be fixed3 and that I’m not sure it’s 100% secure or bug free yet, though I have boldly started using it on a couple sites and so far it’s been working great.

  1. That way, if there is a security hole in your code the attacker doesn’t get access to your main login account.
  2. I would like to change that but I’m having trouble getting dash (/bin/sh on my Debian system) to pass signals onto its child processes. Bash seems to work correctly and so the exec is not needed if /bin/sh is bash on your system.
  3. The dmctl commands and arguments should be reversed. “dmctl wordpress stop” instead of the current “dmctl stop wordpress”.

CentOS (RHEL) 5.4 kernel source

My annoying, non-google-able problem of the day: Say you want to build the source tree for a RHEL/CentOS 5.4 kernel (2.6.18-164.11.1.el5 in my case) and you are running a recent Debian or Fedora system. You might get patch failure errors that look like this:

Patch #212 (linux-2.6-x86-support-rdtscp-for-gtod.patch):
+ + /bin/cat /Users/david/rpmbuild/SOURCES/linux-2.6-x86-support-rdtscp-for-gtod.patch
/usr/bin/patch -s -p1 --fuzz=0
1 out of 7 hunks FAILED -- saving rejects to file arch/x86_64/kernel/time.c.rej
error: Bad exit status from /var/tmp/rpm-tmp.5n4IVi (%prep)


This is caused by newer versions of rpmbuild passing --fuzz=0 to patch. You can fix it by putting this line in the kernel-2.6.spec file:

%define _default_patch_fuzz 2

That’s it. I just saved you 8 hours of screwing around and looking for pre-patched kernels sources. ;-)

PC – Perl Calculator

History

For years I was GUI calculator fanatic. Desperately searching for that perfect calculator that did all the things I wanted it to do. I wanted a programmers calculator that did hex and binary operations and didn’t treat them as second class citizens. I used PCalc on the Mac for a while, and I even liked the built in Windows 95 calculator (that was the last time I had a dedicated Windows machine for working). But I was still left wanting.

At some point I decided to write my own. My idea was that I wanted a text entry box where the equation you were typing would go. Then you could edit the text and produce a new result without retyping the whole thing. I only got as far as being able to parse the text and convert it to reverse polish for easy evaluation before I gave up. But I kept the idea in the back of my mind for years.

At some point the idea morphed and I realized I didn’t need any of the GUI buttons to click on when I always had a perfectly good keyboard sitting in front of me. I looked into bc and dc but they were both too complex for me. Finally one day it hit me that Perl’s eval() was really what I wanted. And so “pc”, Perl Calc, was born.

pc started of very simple:

#!/usr/bin/perl

while (<>) {
    $a = eval($_);
    printf("%d 0x%x 0%o %f\n",$a,$a,$a,$a);
}

But it has now grown many features over the years designed to make my life more pleasant.

Getting PC

You can download it here or you can check it out from darcs like this:

darcs get http://porkrind.org/pc

Edit (2013-05-30): I am no longer using darcs for this project. It is now available on github.

You can give it input one of 2 ways: from the command line (this way you get all the editing and history niceties of your shell), or by running with no command line and typing into its stdin (this way you don’t have to quote characters your shell would like to steal).

How to use pc

The basics

$ pc 11+3
14 0xe 016

The first number is the integer result, followed by the hex and octal representations. Simple enough.

Order of operations

This shows that pc uses Perl’s order of operations (operator precedence if you are in a programming mood):

$ pc 1+3*2
7 0x7 07

ASCII

$ pc 1+3*20
61 0x3d 075 '='

Here we see an extra field was printed. In this case pc detected the final integer value was in the ASCII range and printed the character represented by the value 61, an equal sign.

Bitwise Operations

We also get Perl (and C) style bitwise operators:

$ pc '1+3*20<<2 & 0xff'
244 0xf4 0364

Also notice that we had to quote it since (a) I put a space in the expression and (b) I used the ‘<’ and ‘&’ characters which mean something to the shell.

Floating point

Of course it’s not restricted to only integers, it can handle floats too:

$ pc 1+3*20/55
2 0x2 02 2.0909090909090 23/11

You’ll notice it shows the result of the floating point math in addition to the integer math.

Fractions

You might have noticed a fraction in the output of the previous example. pc uses Perl’s “bigrat” library to do fractions:

$ pc 3/4+1/2
0 0x0 01 1.25 5/4

Human readable

$ pc 1000*2000
2,000,000 2000000 0x1e,8480 0x1e8480 07502200 1.90MB

You’ll notice that the integer and hex results are printed twice—one with commas and one without. The one with commas is so that you the human can read the output easily. The one without commas is for copying and pasting. You should also notice that pc helpfully told you the number was 1.90MB. If a number is bigger than 1024 (1KB) it will print it in human readable byte quantity.

Power of 2 magnitude suffixes

It also accepts magnitude suffixes on the input:

$ pc 16m
16,777,216 16777216 0x100,0000 0x1000000 0100000000 16MB

The following suffixes are allowed: kmgtpezy (lowercase, no b). Note that the human readable output “16MB” doesn’t have a decimal point. It will remove the decimal point if the number is exactly that value. So:

$ pc 16m+1
16,777,217 16777217 0x100,0001 0x1000001 0100000001 16.0MB

Since “16.0MB” has a decimal point, we know the value isn’t exactly 16 megabytes.

Large numbers

pc uses Perl’s bigint so that it can handle numbers bigger than 32 bits:

$ pc '<<40'
1,099,511,627,776 1099511627776 0x100,0000,0000 0x10000000000 020000000000000 1TB

Random Perl code

$ pc 'ord("a")'
0x61 0141 97 'a'

Since pc uses Perl’s eval you can do arbitrary perl code too. Though frankly the only thing I’ve ever used is ord().

Conclusion

So there you have it. It’s designed to give you all the output you ever could want without having to memorize any stupid command line switches. There are none, in fact. It also doesn’t overload you with redundant data. If the floating point answer is the same as the integer answer then it doesn’t show it to you. Same with the fractions.

So, if you read this far, go get it already!

Efficient JavaScript or Inefficient Browser?

I caught this article on Reddit this weekend and had definite mixed feelings about it. Many of their suggestions were obviously good ideas—calling SetTimeout() with a string is obviously stupid, as are 90% of the possible uses of eval() and Function(). The advice on what causes the DOM to repaint and reflow was interesting and informative.

It would have been a really good article except that some of their advice seemed weak. Some of what was masquerading as optimization “advice” seemed more like work-arounds for a substandard javascript implementation.

Take this for example:

var min = Math.min(a,b);
A.push(v);

These alternatives provide the same functionality, while performing better:

var min = a < b ? a : b;
A[A.length] = v;

Yes, I can see in someone’s world that might perform better. But come on, the compiler/scanner should be able to produce the equivalent code. Anything less is a failing of your browser and not an “unoptimized” program. Do you really expect people to crappify their programs because your browser can’t properly optimize javascript for you?

“Well,” I hear you say, “it’s interpreted, not compiled.” To which I say, yeah, well there’s your first problem. Fix that before telling me that I need to use stupid constructs to make my program go fast.

Here’s another example:

This example requires the script engine to create 21 new string objects, once for each time the length property is accessed, and once each time the charAt method is called:

var s = '0123456789';
for( var i = 0; i < s.length; i++ ) {
  s.charAt(i);
}

This equivalent example creates just a single object, and will perform better as a result:

var s = new String('0123456789');
for( var i = 0; i < s.length; i++ ) {
  s.charAt(i);
}

Again, this strikes me as being a failing of the compiler. I see no reason why the browser should instantiate a string object just to call its length(). A little bit of hard coding in your implementation can optimize that to a strlen() call or better—No object instantiation at all. What if someone overrode String.prototype.length()? That’s one if statement in C and some fallback code. Again, I don’t think my program should suffer because your browser doesn’t properly optimize things.

But then again, maybe I’m just crazy.

Calling Applescript from Perl

First off, I don’t like Applescript. In fact, I hate it with a passion. You would think the Apple would learn from Cobol that natural language programming languages just suck. But no, Apple created the abomination called Applescript anyway and foisted it upon us and now sometimes you just have to suck it up and use it. Preferably from a distance with gloves on (and maybe a 10 foot pole) so that it doesn’t dirty your soul too much. But I digress.

I needed to call some Applescript from perl and was quite proud of my end result:

sub osascript($) { system 'osascript', map { ('-e', $_) } split(/\n/, $_[0]); }

The usage looks like this:

osascript <<END;
 tell application "Finder"
 display dialog "Hello"
 end tell
END

So basically the Applescript sits right inside your perl program and gets launched without needing any temporary files on the disk.

How does it work?

If the perl line is incomprehensible to you, let me break it down. The inner most expression is:

split(/\n/, $_[0]);

That takes the first argument to the function, breaks it apart at the line endings and puts the parts into a list. If we were to dump the result of the split using the dialog example above it would look like this:

(' tell application "Finder"', ' display dialog "Hello"', ' end tell')

Next, it uses the map function to insert “-” before every item in the list. It does that by using the fact that perl flattens arrays. The dump of the output of the map function conceptually looks like:

(('-e', ' tell application "Finder"'), ('-e', ' display dialog "Hello"'), ('-e', ' end tell'))

but really perl immediately flattens it to:

('-e', ' tell application "Finder"', '-e', ' display dialog "Hello"', '-e', ' end tell')

At that point it calls the system function with “osascript” and that last array as arguments. When system is passed a list instead of a string it runs the command with the arguments directly instead of launching a shell. This way all the arguments are effectively quoted correctly but without ever having to worry about quotes. This is an extremely clean way of launching commands. You really should never pass system (or open) a string: (a) it needlessly launches a shell, and (b) you have to worry about quotes.

In the end, I like that it fits on one line and that it lets the Applescript sit in the program in its native form.

Edit: Also check out my Ruby version.

“Commit Patch”: Managing your mess

I consider myself to be chaotically organized. If you look at my workbench you’ll see stacks of papers and half finished projects. However, when I finally clean up I end up filing things away meticulously.

The same chaos applies to my development work. If I’m working on a bug or a new feature I end up making other random enhancements or fixes that aren’t at all related (except for the fact that they exist in the same file). Judging from other people I’ve worked with, I’m hardly alone in this behavior.

The problem comes when I’m ready to become organized and check in my work (the software equivalent of “file things away meticulously”). Version control systems don’t cater to the messy development model. Take CVS and Mercurial: They only let you commit a whole file at a time, not just pieces of it. Darcs is better, as it allows you to commit pieces of a file, but even it doesn’t let you commit just one part of a single line.

Why would anyone want to do this? Look at this made up example:

 void player_died()
 {
     game_over(score);
     char x[50];
     get_name(x);
     add_high_score(x, score);
 }

Say I need to change the way get_name() works—I need to make sure I don’t overrun my buffer. While I’m doing that I decide that “x” is a really stupid name for the variable, so I fix that too. The code now looks like:

 void player_died()
 {
     game_over(score);
     char name[50];
     get_name(name, sizeof(name));
     add_high_score(name, score);
 }

Fine. But now I have 2 unrelated changes that touch the same source line. In the past I’d just check them both in with a comment like this:

 - Pass in length with high score string storage.
 - x -> name for clarity.

Enter commit-patch With commit-patch I now can precisely specify the patch I want to commit and leave the rest behind as uncommitted changes in my working directory.

Ok, so how does it work?

First I use emacs to get a diff (I make sure I have an emacs library for whatever version control system I’m using). Here’s an example of what darcs might show me:

 diff -rN -u old-test/game.c new-test/game.c
 --- old-test/game.c     2006-08-22 23:09:44.000000000 -0700
 +++ new-test/game.c     2006-08-22 23:09:44.000000000 -0700
 @@ -1,8 +1,8 @@
  void player_died()
  {
      game_over(score);
 -    char x[50];
 -    get_name(x);
 -    add_high_score(x, score);
 +    char name[50];
 +    get_name(name, sizeof(name));
 +    add_high_score(name, score);
  }

Emacs has diff-mode which makes editing patches trivial. I now edit it down to this:

 --- old-test/game.c 2006-08-22 23:11:52.000000000 -0700
 +++ new-test/game.c 2006-08-22 23:11:52.000000000 -0700
 @@ -1,8 +1,8 @@
  void player_died()
  {
      game_over(score);
      char x[50];
 -    get_name(x);
 +    get_name(x, sizeof(x));
      add_high_score(x, score);
  }

Now I can check this in with commit-patch (along with the corresponding change in the get_name() function’s file). Since I’m using emacs I can just use the “C-c C-c” key sequence in any diff-mode buffer which runs commit-patch for me. Or I could save the patch out to a file and run commit-patch from the command line. Either way, it commits only what was in the the patch and leaves the working directory effectively untouched. To demonstrate, my diff after I’ve committed the above patch looks like this:

 diff -rN -u old-test/game.c new-test/game.c
 --- old-test/game.c     2006-08-23 14:58:54.000000000 -0700
 +++ new-test/game.c     2006-08-23 14:58:54.000000000 -0700
 @@ -1,8 +1,8 @@
  player_died()
  {
      game_over(score);
 -    char x[50];
 -    get_name(x, sizeof(x));
 -    add_high_score(x, score);
 +    char name[50];
 +    get_name(name, sizeof(name));
 +    add_high_score(name, score);
  }

Now I can check in the file again, this time for just the variable name change.

commit-patch allows you to keep your commits short and to the point instead of forcing you to check in a bunch of unrelated changes just because they happen to be in the same file (or the same line). It relies on you editing patches which I admit can be scary at first, but after a few times you really start to get the hang of it. I now always look over the diff of my uncommitted changes and weed out stupid changes in my code—debug prints, commented out dead code, and all the other junk I shouldn’t check in.

Ok, sounds great, what are the downsides?

Glad I asked. Checking in patches effectively means checking in untested code. Despite your best intentions, you can screw up the code when editing a patch. Generally the projects I work on where this really matters all have internal infrastructure to make sure builds work. One project I am involved with that uses CVS has an auto-builder to check for broken code. Another large darcs project I deal with requires ‘make’ to run successfully before it accepts a patch. Both of these provide good enough insulation for bad patches. The truth is, I’ve been using commit-patch for a few years now and I rarely have accidental errors checked in that were caused by bad patch editing. I would say I’m more likely to forget to check in a file completely than I am to check in a bad patch.

The only other downside is that it requires you to be able to edit patches. I use emacs which makes it pretty trivial. If you are not an emacs user then you’d have to look around and see what other patch editing options are out there. I honestly don’t know what other tools exists. So if you consider needing to use emacs a downside, then there you go. If you don’t, well then I salute you. 🙂

Conclusion

commit-patch fits my development style like a glove. I frankly cannot imagine working on a project without it any more. That is an interesting statement because before we wrote it, Jim and I felt that it would be a script we would use only occasionally. But once I started using it I found more and more situations where it would be useful.

I think commit-patch is one of those tools that you don’t realize you need until it suddenly becomes indispensable. So do yourself a favor and try it out for a week or two.

Get commit-patch here

Closures In Straight C

I’ve read a lot lately about closures. I’ve read articles where people wonder what they are, others where someone is lamenting the fact that they only recently discovered them. I too only recently discovered the joy of closures. I’ve been writing a lot of javascript recently and I love the way writing anonymous callback functions works. But it turns out I have already been using closures for a long, long time.

A friend and I were discussing C (our language of choice for embedded programming) and the things we like about it and somehow the subject of closures came up. I started thinking about what it would take to implement closures in C. Would you do it in the compiler as a language extension or just build them up by hand using in C itself in a cross-platform way?

And then it struck me: I’ve already been using, in straight, boring old C, the concept of closures. And I’ve been using them practically forever. I would say almost since I first learned C on my Macintosh back in high school.

The original Mac API (which still mostly lives on in Mac OS X’s “carbon” API) has an element in almost every major structure called “refCon”. The Apple documentation sorted of glazed over them (or maybe I glazed over when reading about them) and so I puzzled over these for a long time until I realized that they were pieces of memory that the Mac system would never look at or change. They are for the application writer to use as they see fit.

Apple also uses them when you register a function that the system will call at some later time. Here’s an example I grabbed from the current carbon window manager documentation:

OSStatus InstallWindowContentPaintProc(WindowRef window,
                                       WindowPaintUPP paintProc,
                                       WindowPaintProcOptions options,
                                       void *refCon); 

What might you use one for? Well typically you’d create a structure with whatever local data needs to be associated with the call back function and put the pointer to that structure into the refCon. The callback function (since you’re writing it) knows to cast the refCon to the appropriate structure pointer so that it can get access to the fields of the structure.

This is by no means some great thing that Apple discovered. Almost every C API that has callbacks uses the same sort of concept. Here’s a function prototype from glib (one of the gnome base libraries):

guint g_io_add_watch(GIOChannel *channel,
                     GIOCondition condition,
                     GIOFunc func,
                     gpointer user_data);

Here “user_data” serves the same purpose as “refCon” did in the first example. The function you pass in “func” will get “user_data” passed to it (unmolested) by glib.

I’ve used this in almost every API I’ve ever written that has callbacks. Here’s another example from an embedded project I’m working on:

void add_timer(int (*timer)(), void *cookie, int timeout_ms); 

I always name my refCons “cookie”, for some reason. Arguably “user_data” is a more descriptive name, but I sort of like the arbitrariness of “cookie”. Or maybe it just makes me think of cookies… MMMM… Cooookies…

So when I learned javascript and started coding Green Felt I wrote a little XMLHttp() wrapper to make the interface nicer (like every other ajax developer on the planet) and I put in a cookie. Later I realized that everything I was passing in the cookie was a local variable and therefore was already saved in the closure. So passing it explicitly through my ajax function was pointless.

It turns out that all those “cookie”, “user_data”, and “refCon” pointers that I had been using since I first learned C transform the user supplied function pointers into “closures”. They do it explicitly and without any syntactic sugar, but they are 100% the same conceptually. In effect you allocate some memory, put references to some of your local variables into the structure and then pass the structure along with the function pointer to be called back later. The callback can use the structure all it wants which ends up being equivalent to a real closure having direct access to those same local variables.

So… Closures aren’t anything new. C has had closures forever. Yes, you have to manually allocate and deallocate the memory for your variables without syntactic sugar… But, hey, that’s C!

3 big problems with Javascript

For years I had an irrational loathing of javascript. It was to the point where I’d always have it switched off in my browser. To me it was synonymous with bad web design and crappy menus that didn’t ever work in netscape. Then google maps came out and I was completely impressed. They did all that with javascript? I didn’t know javascript could *do* that. So about a year ago I decided to actually look at the language and see what you could do with it. I updated an old cgi script game of mine into a modern javascript game complete with XMLHttpRequest high score stuff. And I was generally very happy with everything. My friend Jim wrote a card game and we developed it into a very nice game site

I really love javascript now, but that doesn’t mean it doesn’t have its faults. I can make a number of little nitpicks but I want to focus on three major deficiencies of the language.

Problem 1: No include directive

This is particularly annoying when dealing with many libraries that also depend on other libraries. It forces you to know all the dependencies up front and hurts the modularity of your site.

I’ve read that an include directive was not ..er.. included in the language because they didn’t want to specify what it meant. The argument goes like this: Javascript is a nicely generic language and so if it was used as a scripting language of a video game (for instance) it would be annoying if the spec said “include” was a URL. I don’t see why that precludes adding the include directive to the language. I would argue that it’s better to have it in the spec with the argument being “implementation defined” and let the w3c guys say that it’s a URL and the game guys make it a virtual file inside some zip archive.

The other argument I’ve heard is that the language designer wanted something nicer than a simple “#include” style of include—something like the class importing of java or a “use” directive of perl. I can understand that. But I would argue that not having anything is much worse than having a simple file/URL based include system.

A third argument I’ve heard is that including files is gross since you have to protect against multiple inclusions with big ugly protection “if” statements like every C header file you’ve ever seen. I don’t buy this either—Objective C solved this 20 years ago. Objective C has “#include” and “#import”. “#include” includes the file verbatim and “#import” includes it only if has not been imported before. It’s very simple and it covers all the cases that might occur.

Problem 2: “this” is wrong in callbacks

Javascript programs, being functional and non-threaded, end up having a lot of callbacks. Especially if you use things like timers and XMLHttpRequest objects. If you pass a function to something and it runs it, your function gets run with all your local variables (since it’s a closure) but the “this” points to something stupid like the callee or the global context (I don’t remember but it’s not your local “this”).

I’m not sure why it does this but I imagine it makes some part of the language designer or language implementer’s life easier. The problem is that it makes every programmers life hell. Yes, it’s easy to get around: just make a local variable and set it to “this”. Look around greenfelt.net and you’ll see variable named “me” and “_this” littering the code. But I shouldn’t have to do that at all—the language should just do the right thing (maybe that’s the perl side of me talking).

My argument against this is that it is *never* what you want as a developer. *Never!* Why force every program to have stupid little work arounds just because it makes the spec of the language cleaner at some level? I think the spec writers and language implementors need to suck it up and take one for the team here.

How much time have I spent debugging a problem caused by the stupid “this” pointing to the wrong context? Days, I’m sure.

Problem 3: Inheritence sucks

The javascript object model is simple. I generally like it. But its simplicity causes problems when trying to do inheritence. I looked around for ways to do inheritence and everyone seems to have a different way of doing it. And all the methods seem to have some drawback. In the end I ended up settling on a method that seemed to minimize code, but it’s still ugly:

The base class:

function baseclass(a,b) {
    if (arguments.length) this.init(a,b);
}
baseclass.prototype.init = function(a,b) {
    ...
}

And the inheriting class:

function subclass(a,b) {
    baseclass.prototype.init.call(this,a,b);
    ...
}
subclass.prototype = new baseclass();

This allows for “new baseclass(a,b)” and “new subclass(a,b)”. But there’s a lot of scaffolding there. It really needs some good syntactic sugar.

From what I’ve read they’re trying to rectify this in the new version of javascript being developed.

I can only hope they also fix the other 2 problems.


Addendum

[Mon Mar 6 01:09:49 PST 2006]

Thanks to a comment from Pasha I’ve been experimenting with a different way of working around problem #2 using a the apply() function:

function wrap(context, f) {
    return function() {
        f.apply(context, arguments);
    };
}

Usage:

div.onclick = wrap(this, function() { ... });

I’m liking this better than my previous work around, the “var me=this” closure variable trick. It’s better because it actually makes “this” be correct and so the inner code doesn’t have to use a different variable name. The downside is you have to pass “this” into the wrap() function—it would be better if it could climb up the call chain and get “this” out of whatever context came before it.

Hardware friendly C structures

What I really want is a language that has really good structures. That is, they can represent hardware/fixed layouts effectively.

Say I were to enhance C (instead of designing a whole new language). I want something like this:

struct FATBoot {
    uint8_t BS_jmpBoot[3];
    char BS_OEMName[8];
    little uint16_t BPB_BytsPerSec;
    uint8_t BPB_SecPerClus;
    little uint16_t BPB_RsvdSecCnt;
    uint8_t BPB_NumFATs;
    little uint16_t BPB_RootEntCnt;
    little uint16_t BPB_TotSec16;
    uint8_t BPB_Media;
    little uint16_t BPB_FATSz16;
    little uint16_t BPB_SecPerTrk;
    little uint16_t BPB_NumHeads;
    little uint32_t BPB_HiddSec;
    little uint32_t BPB_TotSec32;
    union {
        struct { // FAT12 and FAT16 only:
            uint8_t BS_DrvNum;
            uint8_t BS_Reserved1;
            uint8_t BS_BootSig;
            little uint32_t BS_VolID;
            char BS_VolLab[11];
            char BS_FilSysType[8];
        };
        struct { // FAT32 only:
            little uint32_t BPB_FATSz32;
            little uint16_t BPB_ExtFlags;
            little uint16_t BPB_FSVer;
            little uint32_t BPB_RootClus;
            little uint16_t BPB_FSInfo;
            little uint16_t BPB_BkBootSec;
            uint8_t BPB_Reserved[12];
            uint8_t BS32_DrvNum;
            uint8_t BS32_Reserved1;
            uint8_t BS32_BootSig;
            little uint32_t BS32_VolID;
            char BS32_VolLab[11];
            char BS32_FilSysType[8];
        };
    };
    align(510)
        little uint16_t BS_FATMagic;
};

I picked this structure because I was unable to represent it in my fat C code because of the crazy alignment. The only thing new yet is the “little” and “align” keywords to specify endian, and alignment/offset respectively. You would probably end up using typedefs like “luint16_t” instead of “little uint16_t”. “big”, of course, would also exist. If neither is specified, then you don’t care and therefore should be implementation defined.

Then what I want is this:

{
    tight FATBoot diskBoot;
    loose FATBoot memBoot;
    pread(fd, &diskBoot, sizeof(diskBoot), 0);
    memBoot = diskBoot;
}

memboot is the structure using the alignment and endianness of the host processor (the “loose” keyword). diskBoot is the structure packed as specified and using the endian specified. The endian would be enforced so that the memory image of diskBoot would always be correct. Accessing diskBoot.BPB_TotSec32 would evaluate to the EXACT same thing as memBoot.BPB_TotSec32 but memBoot would be quicker since it doesn’t have to reverse (potentially) or read the bytes out and reconstruct the uint16 in some odd way (because of the weird alignment of the structure). This puts a lot of extra burden on structure copies when one is loose and one is tight, so you would expect them to be slow–certainly not memcpy() speeds.

You could also use “strict” and “relaxed” but “loose” and “tight” are both 5 letters. 🙂

Basically, I want the compiler to deal with stupid endianness for me. I also want my structure to not be compiler dependant. I should be able to publish the structure in my spec and it should work on all compilers and architectures. Bit fields, for instance would be specified a certain way and not be “implementation defined”. At lease the tight ones would. Loose means “implementation defined, and fast”. Tight means “standards defined, but possibly slower”.

Scotch tape and chewing gum should fix that right up!

We came in today and went directly to the practice track. While waiting in line there we did a few warm up tests and discovered that the steering was not working right. It was turning hard left no matter what we did. So we took a look around and discovere the belt that turned our feedback pot had broken. So we had to drive back and figure out how to fix a belt a) without a new belt, and b) without taking off the steering column. We hashed around for a while but no clear solutions came up. Then Jeff arrived and suggested staples. I thought maybe the velcro we had would be a nice material to use since it was totally flexible but non elastic. So we threaded the belt around, used the velcro to tape it together (it had glue on the back of the velcro, and then stapled the velcro to the belt. Amazingly it seemed to work. We felt that this was a true MacGuiver moment. Turns out we found out later the belt was occassionally slipping and so we ended up having to recalibrate the center about 3 times during the day.

We discovered that someone had left Richards code commented out so last night’s run was really just waypoint following plus a small tweak (don’t just go straight if you go off course). Commented in Richard’s code and it started crashing. He fixed it and then we tried following way points but it just didn’t work. The truck would veer off course. I found that I had swapped latitude and longitude at one point, so we thought that would fix it but it did not. We asked for one more QID try but were told they had just declared the day done. Seems odd because usually they stop only after sun down but today it was only 5:30 or so. We don’t know if that is a good sign for us or a bad sign. Richard went to the team meeting but they said nothing about who qualified and who did not.

Came home and got to listen to music in my car and answer my email for the first time in 5 days. I had 1600 spams (that weren’t caught). Ugh.

DARPA Grand Destruction Derby

Tried to get the code I wrote all night to compile but I was litterally falling asleep on the keyboard. I made Jim get my stuff to compile and he had to delete large rows of ssssssssssssssssssssssssssssss and such from the source code wherre I had fallen asleep and my hands had rested on the keyboard too hard. Fell asleep for about an hour on an air matress in the garage. Woke up to a tremendous wind that caused us to keep the garage door closed all day.

We did a practice run and did the U-Turn paved course. We did pretty well and it was the longest the car had driven autonomously with no one sitting inside ready to pull kill switches. Then we tried a S-turn course and failed miserably.

Jim and I cancelled a second practice and countless QIDs (qaulifying sessions) to try to tune the controller constants in the car. We ended up feeling certain things were wrong but when we tried to fix them the overall system was even worse. So we backed out our changes. Richard and Josh argued loudly that we needed to qualify that day so we drove over to the queue.

Jim decided that it was pointless to do a QID when we were at the same point we were the day before softwarewise. So he got richard in the car and they threw together some code that tied the final parts of there code together (basically finished what I had done the night before). Then Jim left and I verified what he had done (and fixed a bunch of bugs), then Richard looked it over. We finished this all up while we were in the chute.

So we decided to just go for it and run the new code. The truck came out nicely and turned when it was supposed to. Then came the sandbags. Our huge wheels just plowed right over them. Then came the fence with a narrow gap. We didn’t detect it and blew right through the (fairly beefy) fence part. Just plowed it right down. Then we came to the part where there is an old van parked in the middle of the street. Our car went right up to it and smashed into it. Oops. But we were so excited that it had even gotten that far down the course that we considered it a victory. There was no damage to the truck at all as it has a monsterous 1/2 thick custom made metal bumper. After that they wouldn’t let us continue becuase it was getting too dark.

6 of us went to dinner at Chevy’s and talked about what worked and what didn’t and tried to decide what the important things left to do were. We went back to the hotel and crashed, having been awake for 39 hours with basically no sleep.

Race day (or so close, yet so far)

Jim and Richard had left when I woke up at 7am so Maribeth (Richard’s wife) and I drove to the speedway where the opening ceremony was about to begin.

All the robots were lined up and the press was there mingling among the teams and everyone was inspecting everyone else’s robot. There was a surprising amount of designs, from full custom vehicles, to converted SUVs, and some converted ATVs. Very few of them had what our team considers a feature, complete driveability.

The opening ceremony was your standard boring affair, with a flag presentation, a singing of the national anthem, a speech from the head of DARPA, and the introduction of the team leaders.

After that we went back to the garage, pondered schedules, and headed out for a test run around the parking lot.

Right before we headed out, though, we hooked up the e-stop “pause” signal so that the car could come to a stop but then could continue on its way when unpaused. We hooked it up to an input on our microcontroller but it turns out the line we hooked it to was a signal to the build in loader code to not run our firmware. It took us almost 2 hours of backtracking and comparing with a known good board before we figured that out though. When it was done I was very stressed.

So then we finally got to do some practice driving. Jim had inverted a term that we suspected was wrong last night and when we tested it, it started working correctly! So we started actually letting the car steer itself around the parking lot while we tweaked controller constants and tried to get it not to over or under correct too much. After about an hour or so we got the go ahead to go over to the practice run and try our code out.

To get around to the practice run we exited through the pit area got to drive on the actual racetrack till we got to the other side! It was very cool. Mike took some pictures. I hope some came out ok!

When we got to the practice area we found out that it wasn’t for maybe practicing fully autonomous mode, it was exclusively for practicing fully autonomous mode. As in we weren’t allowed to drive along in the car! This was bad because until then our controllers had always had a running start. We couldn’t just go from stopped state to 10 mph. We could go from 10 to 20, or from 20 to 10, or hold 10 indefinitely, but not starting from zero. Not onl that but the pause functionality had to work before we could go and we had only just hooked up the signal that morning! It turns out Jim (with me looking over his shoulder and helping and also trying not to let Josh inerrupt him too much) got all the code written in about 45 minutes. And then we were ready.

So I set up the computer like I normally do, but this time engaging everything, which we have never done. I make sure we get paused and that the brake is completely engaged. Then Jim puts the car into park… To me this feels like we just wound up some Giant catapult and disengaged the safety. At any moment the car may spring to life and go nuts. Or just calmly navigate through the waypoints (which we were hoping was the outcome).

So we go back behind the barrier (the whole field is surrounded by huge concrete barriers to help protect against giant runaway robots) and we signal the guy in charge to unpause the car…

… And nothing happens.

Oy.

So we trudge back on the field and try to figur out what has gone wrong. It turns out the servo that drives the engine throttle has burnt out (something strange happened that morning and had left the servo going full bore against an object that it couldn’t budge). We decide the test run is over and leave back around the track again (which is still very cool!) and head back to the trailer.

At this point Jim and Richard go off looking for hobby shops to buy a replacement servo while Josh and I smuggle my parents into the pits using his tinted windows and leveraging the “only look in the front seat” mentality of the security guards (parents in the back, us up front waving wristbanded arms.

Eventually I take a 1 hour nap while Jim and Richard return with a new servo. We miss our first qualifying run (it was supposed to be at 4:30pm that day) but we get it rescheduled for Tuesday at 9:30am. The servo gets installed, Olive Garden gets our patronage, and Richard, Jim and I go back to the hotel and crash.

Off to the races!

Today I spent the afternoon at my house rewriting the visualization code in perl and OpenGL. I ended up getting bout 60 to 100 frames per second and the LADAR data now plots in real time and looks real good. I put in waypoint plotting code so we can see big squares where the waypoints are. . The car is represented as a yellow triangle pointing in the direction given to us by gps. The velocity is plotted along the bottom as a bar graph.

So I got up to El Segundo at about 7pm and everyone is frantically trying to get the truck ready for the drive to the California Speedway in Fontana for the pre-meating at 9pm. I Basically just stood around and watched as the hardware guys tried to get a new hall-effect sensor working that used graderature modulation to do the velocity instead of just a single signal. It didn’t work so they put the old one back on. It turns out that wasn’t working either but we didn’t find it out till we were on the road. Jim and I didn’t even get on the road until 8:45pm. So we expected to be late to the meeting.

So Josh installed a new “feature” to the estop hardware where when the e-stop triggers, it engages the brakes in addition to killing the engine. Jim wanted him to put a single switch bypass so that we could drive on the highway safely, but Josh kept resisting. So they finally stopped arguing and sped off down the 105.

Jim had made a software change to the LADAR code and it suddenly stopped working. Of course, he had forgotten that he had made the change so we (erroneously) blamed the malfunction on the LADAR’s finicky state machine that we sometimes get out of sync with. So he kept trying to reset the LADAR by flicking it’s power switch while continually stopped and restarted our code hoping that one time the LADAR would come up. All while driving 60 mph on the freeway.

So Jim goes to flick the switch and suddenly we are braking to a stop in the middle of traffic on a major LA freeway. Uh Oh. We quickly figure out the e-stop has activated and killed the engine. Jim frantically flicks the switch back, hits the hazard light, starts the car (though not in that particular order, and some of them happened multiple times) while I try to click back into our program to enter the cryptic “bd” command to dump the brake pressure so we can move again. It lasted a couple of seconds, but it felt like 5 minutes. I was just sure that someone was going to smash into our rear end and was continually bracing for the impact while we got it back going again.

Josh was right behind us and had to swerve out of the way to avoid smashing his BMW and our cool robot truck. We let him have it later about the override switch. Amazingly, he is still resisting.

So then we get to the speedway and get our credentials for the week (wristband). We then get ushered to our garage in the pit area of the speedway where we are immediately surrounded by a group of teenagers from the Palos Verdes high school team. Their car has been donated by Acura and has been washed recently, while ours is a souped up truck. The difference is striking…

We meet our DARPA TLOs (team liason officers) Tim and Pete. They are real nice and dedicated to getting us qualified for the race. They are also the people, should we actually get qualified, that will tail our vehicle and make sure it doesn’t crash.

We discover that we are not allowed to remove the truck from the premises once we have entered, so Jim and I drive around in circles from 2am to 4:30am while Tim the DARPA guy tails us in his car (the rules say that we have to remain in eyesight of one of our TLOs when our vehicle is moving). We get some good data but some troubling data as well: our car is veering off the path for some reason, even though it seems to turn corners correctly when we come to the given way point. Jim theorizes that a sign is wrong somewhere in the controller but we are just too tired to really think about it so he, Richard, and I head back to Richards hotel room and crash for 2 hours.

Slow and steady loses the race

Today started off great with me writing a really nice framework for our controller visualization program. I wrote a driver for the LADAR and we got to watch actual driving LADAR data for the first time. You could see blips where cars were on the road and even see the road boundaries and intersections pretty clearly. It was a success.

Then I started trying to draw the waypoints. And I started hitting snags. And more snags. And more. And even more. I’ve been working on this code for about 8 hours now and have accomplished almost nothing. I am very disappointed in the outcome. The Tcl canvas is just too slow. I’m think I’m going to split up the program into a perl OpenGL section (for the real time display) and a Tcl/Tk section (for the interface). Then I can have the best of both worlds.

Jim and I were hoping to drive tonight and get real time waypoint visualization. He actually fell asleep on the couch before midnight and was still asleep when I left so he probably wouldn’t have gone anyway.

I got some good ideas but I’m just too tired to implement them. First thing tomorrow I’m going to start cracking….

Midnight and the tweaking of stop and going

Today started badly when I couldn’t get my Titanium Powerbook to use the wireless connection reliably. I had a 10.3 beta installed on so I thought maybe that was the problem. I tried to update to the latest beta (since Apple didn’t have the downgrader for the version I had installed on their site any more) but after I finished updating the dumb thing panicked every time it booted. So there went all my programming ideas. I pretty much tried to just help out whoever needed it.

I discussed logging and log visualizations with Jim. I’m going to write an OpenGL program to parse the log file from Jim’s main control loop and display all the pieces of information in nice graphical form. Right now we just have ascii-art for the LADAR visualizations and we haven’t even got the radar power supply worked out yet. As cool as the ascii-art is, I feel we can get a better representation of the data with and nice OpenGL app.

Jim and I discussed adding accelerators for the gas pedal so that the gas pedal doesn’t get floored when you tell the car to go 20mph from a dead stop. We want it to go nice and smoothly like you do when you accelerate from a intersection after a red light (assuming you are not racing the guy next to you).

I had to replace a power supply after Rob put together the radar computer for us. After that we got it to boot and installed RealVNC on it so that we could run it headless (it has to run windows).

At some point we were out during to test the truck when the Kill Switch system failed and shut down the car. Jim had to phone Josh and make him drive down to us and bypass the kill switch hardware so we could get out of the road. Oy!

The most memorable part of today was when we tested the servo system. From about 12am to 3am We drove all around El Segundo and on PCH from Manhattan beach to past LAX at 15 MPH. The first half of the time we were testing the throttle servo system and tweaking all the constants so that the system didn’t overshoot too much and so it was generally responsive.

The exciting parts came at the beginning when we discovered a wrapping bug that caused the servo to go full throttle when we least expected it! Luckily Jim was fast with the servo override switch and all that happened was that we got a little scared. I must say it’s a very strange feeling to be tweaking parameters on a control system that you also happen to be a passenger in — I was very tense at first but it was strangely exhilarating.

Testing the brakes was just as exciting, especially the very first time. We just did a full brake to see what it could handle. We had the pressure tweaked so that there was no skidding, just a nice, if slightly heavy footed, deceleration.

We kept driving past police cars and desperately hoping that they wouldn’t pull us over. Luckily none ever did.

Jim wanted to test the steering control, but we decided we were both too tired and so we called it a night.

Last Modified on: Dec 31, 2014 18:59pm