iMessage on Mac OS X not working

My iMessage suddenly stopped working in the Messages app and I couldn’t get it to log in properly. In the accounts section it would spin for a while when I typed my password and then give this error:

The registering device does not have appropriate credentials

I finally decided it must be some background task that was hosed and so I poked around and discovered “imagent”:

/System/Library/PrivateFrameworks/IMCore.framework/imagent.app/Contents/MacOS/imagent

Killing that processes caused launchd to re-launch it and after that I could log in again. So if you’re having those symptoms, just do this in Terminal:

killall imagent

If you don’t want to do that, then just reboot.

libvirt based QEMU VM pausing by itself

I just debugged this for hours. I have a bunch of QEMU VMs and different sets of them would start pausing themselves. If I resumed them they would immediately pause themselves again. Checking logs showed nothing. I found a disk with a bunch of S.M.A.R.T. errors but it turned out to be a red herring (though it’s still getting replaced ASAP). In the end I was reading the QEMU man page and found this:

werror=action,rerror=action

Specify which action to take on write and read errors. Valid actions are: “ignore” (ignore the error and try to continue), “stop” (pause QEMU), “report” (report the error to the guest), “enospc” (pause QEMU only if the host disk is full; report the error to the guest otherwise).  The default setting is werror=enospc and rerror=report.

After reading that and checking to see that those options were not specified on my QEMU command line, it finally dawned on me that maybe my disk was out of space. Sure enough, one of the VMs had filled its sparse image to the point where there was no room left on the real disk.

Poor planning on my part, yes, but I still wish that ENOSPC would show up in some log file somewhere. It would have saved me hours of debugging.

VLC 64 Bit Problems

I just spent way too long trying to figure out why VLC wasn’t opening DVDs. I was getting this error in the log window:

no access module matched "dvdnav"

Turns out the problem is that VLC 1.1.11 only has 32-bit versions of its DVD plugins (or perhaps its 64-bit versions are broken–the end result is the same). So if you download the main 32/64 bit universal binary from their site it will not work unless you check the “Open in 32-bit mode” checkbox in Finder’s “Get Info” window.

Daemon-Manager: Manage your non-privileged daemons

It seems I’ve been writing little daemons a lot lately–small things that don’t want to run as root but still need to be launched in the background as services. I’ve been noticing because it’s such a pain to integrate them into the system once they are written (or installed). I have to mess around as root creating /etc/init.d shell scripts (probably by copy and pasting–who out there can actually make those from scratch?) or maybe tweaking some upstart or systemd config file.

And then when I’m done it annoys me that I have to be root to start or stop a daemon that ends up running as my login user anyway.

Enter Daemon Manager

So last October (2010) I sat down and wrote daemon-manager. It started from a few core ideas:

  1. It must be possible for a user to set up and configure their daemons—no root access must be required for a user to create a new daemon or restart one of their daemons.
  2. It must be secure—users should not be allowed to control other users’ daemons (unless they are given explicit permission).
  3. It should allow for good security practices—users should be allowed to launch a daemon as a user other than themselves if root has explicitly allowed it. This is so you can run your daemons as a “nobody” style user.1
  4. It should restart the daemons if they crash (I’m looking at you, php-cgi).
  5. It should be easy to use—1 config file per daemon and a simple command line interface to interact with the running daemons.

There are programs out there that do parts of that list, but none that do everything:

  • daemon tools: I’ve used it before and I really like its philosophy of being small and simple. But it seems to really want to run as root which means you have to be root to control it. Also, setting up new daemons is kind of a pain.
  • Upstart: It’s very similar and it makes setting up a new daemon pretty easy but since it’s an “init” replacement it doesn’t seems very adept at running programs meant for non-root users. I’ve done it before but there was a lot of “sudo” configuration and it wasn’t easy. Also the config files are stored in /etc/init and only root can write new ones.
  • Systemd: I really love systemd. Or the idea of it, really—some day it will make it into Debian and I’ll start actually using it. But its philosophy is great. But again, being an “init” replacement gives it most of the same downsides as upstart.

A Quick Tutorial Through Examples

Master config: /etc/daemon-manager.conf

[runs_as]
david: www-data
michaelc: www-data
amy: www-data
joann: www-data
jim:
greenfelt: greenfelt-daemon

[manages]
david: michaelc,amy,joann,greenfelt
michaelc: amy, joann
bill: joann
jim: greenfelt

The main section is the “runs_as” section. This section tells Daemon Manager which users are allowed to start daemons and which users the daemons can be run as. In the above example, “david”, “michaelc”, “amy”, and “joann” can launch daemons as themselves and also “www-data”. “greenfelt” can launch daemons as itself and the “greenfelt-daemon” user. “jim” is only allowed to launch daemons as himself. No other users on the system are allowed to launch daemons at all because they weren’t explicitly listed.

The “manages” section is a little experimental at this point, but the idea is that “david” is allowed to manage (start, stop, or restart) the daemons of “michaelc”, “amy”, “joann”, and “greenfelt” in addition to his own daemons. This is so you can have help desk type users who can stop or restart other users’ daemons even though they may not have read or write access to the users’ home directories. As you might expect, “root” is always allowed to start and stop anyone’s daemons.

Daemon: deluged.conf

dir=/home/david
start=exec deluged -d

This is a simple Daemon Manager config file that launches the deluge bittorrent daemon. “dir” and “start” are the only required entries in the config file. “dir” is the working directory and “start” is a one line shell script to run. Because it is a shell script it needs to “exec”, otherwise Daemon Manager can’t manage it properly.2

Daemon: wordpress.conf

dir=/home/amy/wordpress
user=www-data
start=exec php-cgi -q -b wordpress.socket

This starts a PHP FastCGI daemon in a WordPress directory and starts it running with as the “www-data” user (“amy” was given explicit permission to start daemons as the www-data user in “/etc/daemon-manager.conf”).

Daemon: greenfelt.conf

dir=/var/www/greenfelt.net
user=greenfelt-daemon
start=exec ./script/greenfelt_fastcgi.pl -l greenfelt.socket -n 1
output=log

This is a paraphrase of the config file that runs greenfelt.net which is a Catalyst app that talks to nginx via FastCGI through the “greenfelt.socket” unix domain socket. It runs as the user “greenfelt-daemon” so it can have less privileges than the main “greenfelt” user. The “output” parameter tells Daemon Manager to collect the stdout and stderr of the daemon and save it to a log file in the “~/.daemon-manager/logs/” directory (the default setting is to throw away stdout and stderr).

Controlling Daemon Manager

Daemon Manager is controlled using the “dmctl” command. It is relatively simple at this point, allowing you to start, stop and restart daemons. It also lets you scan for new config files and query for daemon statistics. Here’s an example output the “status” command:

$ dmctl status
daemon-id                      state              pid respawns cooldown   uptime    total
david/deluge-web               running           2948        0       0s     3w3d     3w3d
david/deluged                  running           2950        0       0s     3w3d     3w3d
david/greenfelt                stopped              0        0       0s       0s       0s
david/minecraft                stopped              0        0       0s       0s       0s
david/moviefile                running           2951        0       0s     3w3d     3w3d
david/pytivo                   running          22905        0       0s     4d7h     4d7h
david/streamium                running           2958        0       0s     3w3d     3w3d
david/wordpress                running          27012       33       0s   12h57m     3w3d

Notice that the wordpress server (good old php-cgi) has crashed 33 times (and has been automatically respawned by Daemon Manager).

Download and Use

Daemon Manager is licensed under the GPL and can be downloaded here (the source is also available on github). If you use Debian there’s a Debian branch available for building a package. The version as of this writing is 0.9 which means that there are some obvious things that need to be fixed3 and that I’m not sure it’s 100% secure or bug free yet, though I have been using it for months now and I absolutely love it–it filled a void I wasn’t even sure was really there when I started.

For a more detailed version of the history of Daemon Manager, see this blog post.

  1. That way, if there is a security hole in your code the attacker doesn’t get access to your main login account.
  2. I would like to change that but I’m having trouble getting dash (/bin/sh on my Debian system) to pass signals onto its child processes. Bash seems to work correctly and so the exec is not needed if /bin/sh is bash on your system.
  3. The dmctl commands and arguments should be reversed so it’s more like system v init scripts or the “service” command: “dmctl wordpress stop” instead of the current “dmctl stop wordpress”.

Snow Leopard Time Machine Tweaks

Sparse bundles created by Time Machine in the latest versions of Snow Leopard are created slightly differently than they used to be. It used to be that Time Machine would create a sparse bundle with a name like “machine-name_001122334455.sparsebundle” where the “001122334455” part was your main ethernet port’s MAC address. Now it creates just “machine-name.sparsebundle”. So how does it associate a machine with the sparsebundle?

Well, it turns out they added a new file inside the bundle. Now, alongside “Info.plist” there is a new file called “com.apple.TimeMachine.MachineID.plist”. Inside this file is some info:

<?xml version="1.0" encoding="UTF-8"?>
<!DOCTYPE plist PUBLIC "-//Apple//DTD PLIST 1.0//EN" "http://www.apple.com/DTDs/PropertyList-1.0.dtd">
<plist version="1.0">
<dict>
	<key>VerificationDate</key>
	<date>2011-04-09T19:57:48Z</date>
	<key>VerificationExtendedSkip</key>
	<false/>
	<key>VerificationState</key>
	<integer>1</integer>
	<key>com.apple.backupd.BackupMachineAddress</key>
	<string>00:11:22:33:44:55</string>
	<key>com.apple.backupd.HostUUID</key>
	<string>01234567-1234-5678-9abc-12345678abcd</string>
</dict>
</plist>

The “com.apple.backupd.BackupMachineAddress” is where the MAC address is now stored, but there’s one other extra field: “com.apple.backupd.HostUUID”. This value can be found by launching “System Profiler” (hold down the option key while selecting the Apple menu to get there quickly). On the first page (titled “Hardware Overview”) is something called “Hardware UUID”. This is what goes in the HostUUID field.

So if you ever need to create a Time Machine sparse bundle from scratch, you’ll need to make this file and fill out those 2 fields. There are some other fields in there but I have no idea what they do. I think they have to do with when “fsck” was last run on the sparse bundle and whether or not the bundle is valid, but I haven’t explored it yet.

Introducing Daemon Manager

The idea for Daemon Manager came about when I was converting a web site from Apache to Nginx. Nginx doesn’t launch FastCGI programs itself—it only connects to FastCGI sockets and so it requires that you manage the FastCGI server yourself.

For a simple web site it might be OK to manually create an /etc/init.d script, but even for our relatively simple solitaire site we ended having about 5 separate FastCGI servers (between the blog, the forum, and our test servers). At home I host virtual servers for various members of my family and so there’s a ton of accounts and blogs and forums and other random stuff. I just can’t abide copy and pasting 20 /etc/init.d scripts and then managing them all as they slowly fork away from each other over time. Not to mention that ordinary users can’t manage /etc/init.d scripts themselves (without compromising system security) and if the script does any sort of setuid() calls then they can’t even restart their FastCGI servers without there being some sort of arcane sudo configuration.

I also ran into a problem with PHP. I wanted to run WordPress on Nginx which meant I had to run the “php-cgi” FastCGI server. The problem is that “php-cgi” seems to just die randomly which means I needed some sort of watchdog that starts it back up when it fails.

What I really wanted is a program that lets non-privileged users launch and respawn their own daemons securely and very simply.

Daemon Manager is the result.

Design

The main principles of Daemon Manager’s design were:

  1. It must be possible for a user to set up and configure their daemons—no root access must be required for a user to create a new daemon or restart one of their daemons.
  2. It must be secure—users should not be allowed to control other users’ daemons (unless they are given explicit permission).
  3. It should allow for good security practices—users should be allowed to launch a daemon as a user other than themselves if root has explicitly allowed it. This is so you can run your FastCGI server as a “nobody” style user.1
  4. It should restart the daemons if they crash (I’m looking at you, php-cgi).
  5. It should be easy to use—1 config file per daemon and a simple command line interface to interact with the running daemons.

There are programs out there that do parts of that list, but none that do everything:

  • daemon tools: I’ve used it before and I really like its philosophy of being small and simple. But it seems to really want to run as root which means you have to be root to control it. Also, setting up new daemons is kind of a pain.
  • Upstart: It’s very similar and it makes setting up a new daemon pretty easy but since it’s an “init” replacement it doesn’t seems very adept at running programs meant for non-root users. I’ve done it before but there was a lot of “sudo” configuration and it wasn’t easy. Also the config files are stored in /etc/init and only root can write new ones.
  • Systemd: I really love systemd. Or the idea of it, really—some day it will make it into Debian and I’ll start actually using it. But its philosophy is great. But again, being an “init” replacement gives it most of the same downsides as upstart.

Implementation

From those ideas Daemon Manager was born. I prototyped it in Perl in about 8 hours. The idea seemed sound but I was unhappy with the memory requirements of Perl. I wanted it to be something really small and lean, without any external dependencies. So I rewrote it in C++. It now takes up hardly any RAM which makes it suitable for smaller or embedded environments. The main loop just poll()s on the control sockets and calls wait() when necessary, occasionally restarting a crashed daemon.

I tried to think about security because if it’s insecure then nobody is going to want to use it seriously. Daemon Manager will refuse to read config files that don’t have the right permissions. It uses Unix domain sockets to communicate with users (1 socket for each user in ~/.daemon-manager/command.sock) and makes sure that each socket has the correct permissions when it starts—this way user authentication is handled by the operating system’s filesystem permissions layer. By default users of the system are not allowed to run anything—root must authorize each user and specify which users their daemons can be run as.

A Quick Tutorial Through Examples

Master config: /etc/daemon-manager.conf

[runs_as]
david: www-data
michaelc: www-data
amy: www-data
joann: www-data
jim:
greenfelt: www-data

[manages]
david: michaelc,amy,joann,greenfelt
michaelc: amy, joann
bill: joann
jim: greenfelt

The main section is the “runs_as” section. This section tells Daemon Manager which users are allowed to start daemons and which users the daemons can be run as. In the above example, “david”, “michaelc”, “amy”, “joann”, and “greenfelt” can launch daemons as themselves and also “www-data”. “jim” is only allowed to launch daemons as himself. No other users on the system are allowed to launch daemons at all because they weren’t listed.

The “manages” section is a little experimental at this point, but the idea is that “david” is allowed to manage (start, stop, or restart) the daemons of “michaelc”, “amy”, “joann”, and “greenfelt” in addition to his own daemons. This is so you can have help desk type users who can stop or restart other users’ daemons even though they may not have read or write access to the users’ home directories.

Daemon: deluged.conf

dir=/home/david
start=exec deluged -d

This is a simple Daemon Manager config file that launches the deluge bittorrent client daemon. “dir” and “start” are the only required entries in the file. “dir” is the working directory and “start” is a one line shell script to run. Because it is a shell script it needs to “exec”, otherwise Daemon Manager can’t manage it properly.2

Daemon: wordpress.conf

dir=/home/user/wordpress
user=www-data
start=exec php-cgi -q -b wordpress.socket

This starts a PHP FastCGI daemon in a WordPress directory and starts it running with as the “www-data” user.

Daemon: greenfelt.conf

dir=/var/www/greenfelt.net
user=www-data
start=exec ./script/greenfelt_fastcgi.pl -l greenfelt.socket -n 1
output=log

This is a paraphrase of the config file that runs greenfelt.net which is a Catalyst app. The “output” parameter tells Daemon Manager to collect the stdout and stderr of the daemon and save it to a log file in the “~/.daemon-manager/logs/” directory.

Controlling Daemon Manager

Daemon Manager is controlled using the “dmctl” command. It is relatively simple at this point, allowing you to start, stop and restart daemons. It also lets you scan for new conf files and query for daemon statistics. Here’s an example output the “status” command:

$ dmctl status
daemon-id                      state              pid respawns cooldown   uptime    total
david/deluge-web               running           2948        0       0s     3w3d     3w3d
david/deluged                  running           2950        0       0s     3w3d     3w3d
david/greenfelt                stopped              0        0       0s       0s       0s
david/minecraft                stopped              0        0       0s       0s       0s
david/moviefile                running           2951        0       0s     3w3d     3w3d
david/pytivo                   running          22905        0       0s     4d7h     4d7h
david/streamium                running           2958        0       0s     3w3d     3w3d
david/wordpress                running          27012       33       0s   12h57m     3w3d

Notice that the wordpress server (good old php-cgi) has crashed 33 times (and has been automatically respawned by Daemon Manager). Also notice that despite FastCGI being the impetus for creating Daemon Manager, most of my running daemons are not actually FastCGI servers.

Download and Use

Daemon Manager is licensed under the GPL and can be downloaded here (the source is also available on github). If you use Debian there’s a Debian branch available for building a package. The version as of this writing is 0.9 which means that there are some obvious things that need to be fixed3 and that I’m not sure it’s 100% secure or bug free yet, though I have boldly started using it on a couple sites and so far it’s been working great.

  1. That way, if there is a security hole in your code the attacker doesn’t get access to your main login account.
  2. I would like to change that but I’m having trouble getting dash (/bin/sh on my Debian system) to pass signals onto its child processes. Bash seems to work correctly and so the exec is not needed if /bin/sh is bash on your system.
  3. The dmctl commands and arguments should be reversed. “dmctl wordpress stop” instead of the current “dmctl stop wordpress”.

How to get fsaclctl off your Leopard install DVD

Leopard came with a program called fsaclctl that let you turn on and off ACL control for a filesystem. For some reason they stopped shipping it in Snow Leopard and so if you’ve upgraded the file has been deleted from your disk.

Well, I couldn’t find anyone that had an Intel 10.5 install (well, couldn’t find anyone quickly–I’m impatient) and so I stuck in the 10.5 install DVD that came with my computer to see if I could extract it from there. I was able to do–here’s how:

First, get into Terminal and go to where the package all hang out:

cd "/Volumes/Mac OS X Install Disc 1/System/Installation/Packages"

Then look for a likely candidate. I tried ACL.pkg first but it wasn’t there and then I tried “BaseSystem.pkg” but it wasn’t there either. Finally I found it in “BSD.pkg”.

Ok, so what are these .pkg files? They are not normal installer .pkg files. Turns out they are “xar” files. Some weird package format Apple invented so they could put crazy meta data in the header or something. Anyway, xar is installed by default (at least on my 10.6 machine) so you just have to extract it:

mkdir /tmp/bsd
xar -xzf BSD.pkg -C /tmp/bsd

That runs for a minute and leaves 5 or so files in /tmp/bsd:

Bom
PackageInfo
Payload
Scripts

The “Bom” file (Bill of Materials) is the first thing we are interested in. Use “lsbom” to check it out:

lsbom /tmp/bsd/Bom | grep fsaclctl

Success! This is where it’s at. So all that’s left is extracting it. One of the other files in there is called “Payload” and is just a tar file. Extracting is easy:

tar xf /tmp/bsd/Payload -C /tmp/bsd/ *fsacl*

Now if you check the /tmp/bsd directory you will see that tar has extracted the stuff to “usr”.

find /tmp/bsd/usr

…will produce:

/tmp/bsd/usr
/tmp/bsd/usr/sbin
/tmp/bsd/usr/sbin/fsaclctl
/tmp/bsd/usr/share
/tmp/bsd/usr/share/man
/tmp/bsd/usr/share/man/man1
/tmp/bsd/usr/share/man/man1/fsaclctl.1

Yay!

How to find out what Mac OS X system is installed on a random disk

Ok, so you have a random disk lying around and you plug it in and it looks like it has Mac OS X installed on it. How do you tell what version it is without booting into it?

First, launch terminal and cd into the root of the disk (“/Volumes/whatever“). Then run this command:

sed -e 's/.*\(10\.[[:digit:]]*\.[[:digit:]]*\).*/\1/' \
    -e '/^10/q' -e d System/Library/CoreServices/SystemVersion.plist

Magic! :-)

What I had to do to get Snow Leopard to install on my MacBook

I was getting this message:

Mac OS X cannot be installed on “silver”, because this disk cannot be used to start up your computer.

The problem turns out to be that the Mac OS really wants 128MB of unused space after your main Mac OS partition. If your partitions are back to back then you will get this message. The fix seemed like it would be easy. But unfortunately it was not. When I tried using Disk Utility to tweak my partition around it would immediately get the error “MediaKit reports no such partition”. Great. So I booted into the Snow Leopard CD, launched terminal and ran the following command:

$ diskutil list

This let me figure out what my disk partition number and what the new size should be. Here is my output:

/dev/disk0
   #:                       TYPE NAME         SIZE       IDENTIFIER
   0:      GUID_partition_scheme             *500.1 GB   disk0
   1:                        EFI              209.7 MB   disk0s1
   2:                  Apple_HFS silver       452.8 GB   disk0s2
   3:       Microsoft Basic Data              21.7 GB    disk0s3
   4:       Microsoft Basic Data NO NAME      21.5 GB    disk0s4
   5:                 Linux Swap              3.8 GB     disk0s5

So my OS X disk is “silver”. I took 452.8 and subtracted 128MB which is basically .1 and then subtracted another .1 for good measure. Then I ran the disk resizing command like this:

$ diskutil resizevolume /dev/disk0s2 452.6GB

This went through and did an fsck (verified the disk format) and spit cool little text progress bars at me (I’ve never seen a barbershop pole in text before, thanks Apple). When it was finished checking the disk it went ahead and shrunk my partition. Yay for command line tools that actually work!

After resizing my partition the Snow Leopard installer magically decided it was bootable and I was able to install.

My brother had this exact same thing happen to him except his Disk Utility (and even diskutil) told him that there wasn’t enough space on his disk when he tried to resize it. So I had him grab a disk defrag utility and check out the disk. It appears he had some stuff at the end of the disk and we are theorizing that Disk Utility doesn’t move files around in order to shrink the disk. So he started up a defrag process and went to bed while it chugs along. I’ll update later and report whether that fixes his problem or not. I have high hopes though.

Update: His defrag finished and he was able to resize his partition in Disk Utility and after that Snow Leopard let him install.

All My Stupid Man Pages Are Out Of Date

I got annoyed today when I ls-ed on my Mac OS X 10.5 system and saw this:

drwxr-xr-x@ 3 root  wheel  170 Jun  7 17:35 F9D86DAF-2868-4918-948A-110BB55DAB11

Well, that’s not what got me annoyed. I tried to look up what the ‘@’ after the permissions meant in the man page and it didn’t mention it at all. I searched the web and found someone quote an excerpt of the man page that explained the ‘@’. And it was not in my man page at all! That is when I got annoyed.

Then I remembered an exchange with a commenter: earlier where it seemed like my docs were old.

So I set out to find why my man pages were out of date. After some poking around I discovered this:

$ ls -l /usr/share/man/man1/ls.1*
-r--r--r--    1 root     wheel       15708 Mar  1  2006 /usr/share/man/man1/ls.1
-r--r--r--    1 root     wheel        6220 Apr 20  2008 /usr/share/man/man1/ls.1.gz

So at some point the system installed new, nicely gzipped man pages but somehow failed to remove the old ones. And it turns out the man give the non-gzipped version precedence. Giving me old out of date documentation when I ask for it. Weak.

A quickie perl script seemed in order:

find /usr/share/man -name "*.gz" -or -print \
    | perl -ne 'chomp; print "$_n" if -f "$_.gz" && -M $_ > -M "$_.gz"' \
    | xargsn -n 10 sudo rm

where xargsn is defined in my .bashrc file as:

alias xargsn="tr '\n' '\0' | xargs -0"

Using GNU xargs you can just do xargs -d\\n which is way easier for me to remember but stupid bsd xargs doesn’t appear to have the nice -d option. Weak, but I digress.

Anyway, the script finds non-gzipped files in the system man hierarchy and, if they have an equivalent gzipped version that happens to be newer, deletes them.

I had about 4500 that I was able to delete, and now my ls and chmod man pages have up-to-date info again. Aaaahhhhh.

You might notice that I only deleted the non-gzipped version if it was older. It turns out I had about 10 man pages where the opposite was true. So I tweaked my script a little and did this:

find /usr/share/man -name "*.gz" -or -print \
    | perl -ne 'chomp; print "$_n" if -f "$_.gz" && -M $_ < -M "$_.gz"' \
    | xargsn -n 1 sudo gzip -f

This one gzips the man page and replaces the older gzipped version when they both exist and the gzipped is older.

Upgrading from Debian 32 bit to 64 bit

I got a new Intel core i7 computer and migrated my Debian server over to it. Here’s how to do it without installing from scratch:

First off, read this article. I followed the instructions and only deviated in a couple places.

I found that during the 64-bit libc install I had to run

dpkg --force-architecture -i libc6-i386_2.7-18_amd64.deb libc6_2.7-18_amd64.deb

instead of:

dpkg --force-architecture -i libc6-i386_2.7-18_amd64.deb

Yeah, even though libc6-i386_2.7-18_amd64.deb had already been installed.

Cheating with a chroot

One thing I did in addition to what the article suggested was to build a chroot for 64 bit stuff so I could download things with ease.

debootstrap --arch=amd64 lenny `pwd`/root64

Then,

chroot root64

From there I could “apt-get install” and look through dependencies and none of it was impacted by the state of my main machine. Apt gets screwed up for a while in the process and it was helpful to go find what a packages real dependencies were.

In particular I did “apt-get install ia32-libs” which got all the compat libraries. From there I could go into root64/var/cache/apt/archives/ and get right to the .deb files.

I also used aptitude to resolve many of the apt-get -f install problems (once I had reinstalled enough by hand to stop the ELFCLASS errors).

apt-get -f install

My biggest “apt-get -f install” problem was some old java stuff that couldn’t run its post-upgrade or post-rm scripts and so couldn’t be upgraded or removed. Paying very close attention to what the script was doing I was able to remove a package the script used, rendering it a NOP (it was only doing something if the other package was installed).

Binary incompatibility

My biggest problem in general was that stupid Sleepycat morons made their %$#@! db’s binary format incompatible between 32 and 64 bit machines. Way to go guys—that’s thinking. This means that any packages you have that rely on libdb4.2 are screwed. For me this was Netatalk and the Cyrus IMAP server.

Netatalk

Netatalk turned out to be pretty easy. Just delete the .AppleDB files in the share directories. Netatalk uses them as caches and so it’s perfectly acceptable for them to go away (though if you have aliases that point into your share then they may break—I didn’t so I didn’t care).

Cyrus

Cyrus turned out to be pretty easy too, once I figured out what was happening. This post on the gentoo bugzilla explained how to recover, and it worked as advertised. Thanks to Rumi Szabolcs for posting that.

I installed Cyrus on a 32 bit linux machine I (luckily) had and converted the mailboxes file. Though it looks from the man page of cyrreconstruct (what it’s called in debian, by the way) that the -f command will reconstruct the mailboxes.db file from the directory layout, which might be handy if you don’t have a 32 bit Debian machine handy.

All my menu extras are gone!

For most of the day today I’ve been missing all the OS X menu extras in the top right of my MacBook screen, including my clock, airport and volume controls. I never knew how much I used that stuff until it suddenly wasn’t there. I knew I could probably restart my system and get it all back up and running, but I’m not going to kill 8 days of uptime for that! So I look around the net and find out that those menus are controlled by a process called SystemUIServer. Luckily they say it will restart itself if you kill it so I force quit it with Activity Monitor. The process comes back (with a new pid so I know it’s new) but my menus are still missing. Hmmph.

I look in the console and don’t see anything that looks like an error. I hit Command-space to invoke spotlight and nothing happens but I do get a console message that says “-[MDMenuWindow _checkTopRight] the window is off the screen topRight point is {-10, 778}”. Interesting. Somehow it pops into my head that I had my MacBook hooked into my HDTV yesterday and that maybe the menu bar is just confused about the width of the screen. So I open System Preferences and change my window size to something random and suddenly all my menu extras show up! Yay! I change my screen back and a few window resizes later everything is back to normal.

All without a reboot. Ahhhhh….

Time Machine and a Linux server

I have a Debian GNU/Linux server with a large raid 5 disk. I recently upgraded my RAID disks and suddenly have ample free space. I put OS X 10.5 on my MacBook back in November but didn’t have enough space at the time to try out Time Machine. Getting Time Machine to work with my Linux server was annoyingly hard–the default Debian server doesn’t support Leopard out of the box and Time Machine itself doesn’t support non-apple file shares. Not to mention Time Machine seems slow and completely bug ridden (I’m generally unimpressed, but when it finally works it’s nice). Anyway, here’s what I had to do to get it to work.

Step 1: rebuild netatalk with ssl support

Apple, starting with Leopard, won’t connect to appleshare servers that don’t support SSL (encryption). This is a good thing, really. What is annoying is that Debian doesn’t ship their netatalk package with encryption enabled (there’s apparently some sort of licensing mismatch and they’re fairly pedantic about those things–witness “iceweasle”).

If you are familiar with Debian packages, the key thing is rebuilding the netatalk package like this:

DEB_BUILD_OPTIONS=ssl debuild

If you are not familiar with Debian packages, first google for “debian ssl netatalk” or “ubuntu ssl netatalk”. There’s a bunch of people out there with instructions. They basically boil down to:

apt-get source netatalk
sudo apt-get build-dep netatalk
sudo apt-get install cracklib2-dev
cd netatalk-2.0.3
DEB_BUILD_OPTIONS=ssl debuild
sudo dpkg -i ../netatalk-*.deb

At this point you should be able to mount an your Linux server on your Mac.

Step 2: Getting The Mac To See The Server

Time Machine, for some stupid reason, doesn’t seem to want to see network shares from non-Apple servers. There’s a well known secret preference (how’s that for an oxymoron) that you have to set from Terminal:

defaults write com.apple.systempreferences TMShowUnsupportedNetworkVolumes 1

You can make sure it’s set with this command:

defaults read com.apple.systempreferences TMShowUnsupportedNetworkVolumes

It should print “1″ if it is enabled. With that set, you should now mount the drive you wish to back up to with Finder, then go to Time Machine’s Preferences. If all is well then your network drive will show up when you press the “Change Disk…” button.

If the drive does not show up then you are going to have to mess around. I had a terrible time getting it to show up on a computer with 10.5.2 installed. One thing to try is adding a file to the root of the network share called “.com.apple.timemachine.supported”. Also try deleting the .0016cbcbc4c8 file in the root of the share (that number is for my computer–your computer will have a different number).

Step 3: Try a small backup

Go into Time Machine preferences and hit the “Options…” button. Keep adding excluded directories until only a small part of your disk is set to back up. Right click on Time Machine in the Dock and select “Back Up Now”. If all goes well then Time Machine will chug along for a while “preparing” (going through your whole disk sizing everything up), then doing the actual backup, then “finishing” (Deleting interim backups–if you have a lot of these then finishing can take a really really long time).

If it gets an error then you might need to create the sparse bundle for it.

An aside–sparse bundles and Time Machine

A “sparse bundle” is a new format of disk image added in OS X 10.5. This follows a long line of disk image formats from the old “.img” of System 7 to “.dmg” introduced in OS X.

Sparse bundles are actually pretty neat. They are almost the same as “sparse image” “.dmg”s from previous versions of OS X. Traditional disk images allocate all the room up front. So if you create a 10GB disk image then it would create a 10GB file on your disk.

The sparse image is different–if you create a 10GB sparse disk image then the file that is created on the disk is actually much smaller, basically just the size of the HFS+ filesystem. When you add files to the disk image then the .dmg file itself grows to accommodate new data.

Sparse bundles work the same way except that instead of one gargantuan 10GB file (assuming you fill up the whole disk image), the data is spread out in a large number of small “bands”. Each band is a file that is a specific size (8MB for Time Machine sparse bundles) that holds just one little section of the disk image’s data.

Why is this good? I’m glad I asked! It’s particularly nice when you are syncing the image between 2 computers. Say I mount a normal disk image and change one letter in a TextEdit document. If I try to sync the disk image to another computer I basically have to copy the whole thing over (barring some cool rsync-like behavior). With a sparse bundle, I probably have to only copy one or two bands of data across. According to what I’ve read, Apple create the sparse bundle format so that File Vault was more compatible with Time Machine (it can back up bands instead of entire disk images).

Anyway, when you back up to an external FireWire or USB disk, Time Machine backs up directly to the disk. When you back up to a network disk, Time Machine puts a sparse bundle disk image on the network share and then backs up to the disk image. This theoretically allows them to back up to a network filesystem that by itself doesn’t have the necessary capabilities for Time Machine. NFS, or SMB, for instance should be able to be able to host Time Machine backups with no issues–I haven’t tried this though.

The problem is that OS 10.5.2 seems to have a bug where you can’t always create a sparse bundle on a network share. If you try to do this with Disk Utility you will get an “operation not supported” error.

The solution is to create a sparse bundle on your disk that is the size of your network backup disk and then copy it over. My backup disk is 2.25 TB, so I’d create a 2.25 TB sparse bundle disk image. Once you copy it over to the network drive you can delete it from your local disk. I used this technique to get my dad up and running with his shiny new Ubuntu server.

By the way, for this to work you have to name the sparse bundle disk image correctly, which takes a little trick. Start a Time Machine backup and look in your network disk. Time Machine will have started creating a sparse bundle on the disk. Copy the name of this sparse bundle before it gets the error and deletes it on you. Mine is called “black_0016cbcbc4c8.sparsebundle” (my computer name is “black”). Either create the sparse bundle with that name or rename it once you’ve created it.

Other issues

My computer behaved very, very strangely before I got everything running smoothly. One thing it did was stick in the “preparing” phase for huge periods of time (24 hours, sometimes). I’d just stop the backup and let it try again later. After a couple tries it would mysteriously work.

Another thing it did was get confused with the progress. It would start up a backup and say something reasonable in the progress bar (0GB completed out of 30GB). Everything moved along but when it hit the “end” it would suddenly start incrementing the total size: “32GB completed out of 32GB”. And it would just keep growing and growing. It would reach ludicrous numbers sometimes, saying “2TB completed out of 2TB” while backing up my 250GB disk. Sometimes it would complete on its own and sometimes I just stopped it after 24 hours.

Interestingly, both of these strange symptoms might be related. I captured both of these situations using 10.5’s dtruss and found that in both cases if was seemingly looping through my disk multiple times. I would see the same files and folders being iterated through over and over again, like there was something wrong with my filesystem. I did a fsck with Disk Utility, though, and it reported that everything was fine.

So I think both of those issues are just stupid bugs in Time Machine (or one stupid bug hitting in two places). It’s times like these when I curse Apple’s crappy proprietary software. If this were a linux app I’d just download the source and fix it myself. But the Bastards at Apple think it’s better for Time Machine to be a %$#@! black box. Which is OK when it works, but really sucks when it doesn’t work. </rant>

Step 4: Slowly remove excludes

To get around these issues I would alternately let it run for huge long periods of time and then stop it if it were running for more than 10 minutes. I also excluded almost all my disk in the Preferences (as I mentioned before) and then slowly removed exclusions until my whole disk was being backed up.

I’m at the point now where Time Machine just mounts up my network drive, backs up and only takes a couple minutes to finish. Getting there was slow (it took me about a month to get to this point!!!) and even though it is fairly stable now, I still can’t help feeling like Time Machine is a buggy pile of crap.

Some helpful links:

Leopard Permissions Going Crazy

So a couple days ago I noticed I had no permission to access one of my directories. Since it was a directory that I use in command line mode I naturally checked the permissions that way:

$ ls -ld Downloads
drwxrwxr-x   81 david    david       27370 Feb 23 11:18 Downloads/

Looks ok! So it works, right?

$ cat > Downloads/eat
-bash: Downloads/eat: Permission denied

What?

After puzzling for a few moments I decide to get info in Finder:
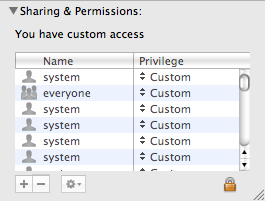
Oooo. I didn’t know OS X had ACLs. I don’t really like ACLs in general because they seem too complicated for normal usage.

Well, I’ll just click that nice little minus sign button and delete all the extra ACL things. Except that the minus sign button just straight up doesn’t work. I’ve unlocked it and typed in my password so I should have root permission at that point but the dumb button just doesn’t do anything. Something must be screwed up. Sigh. Back to the command line…

So I do some googling and fine you can check the ACLs at the command line with ls -e.

$ ls -e Downloads/
ls: invalid option -- e
Try `ls --help' for more information.

What? Oh yeah, I put GNU ls on my machine so I could do color ls (turns out Leopard ls can do color with -G). Ok, let’s use the system ls:

$ /bin/ls -ld Downloads/
drwxrwxr-x+ 81 david  david  27370 Feb 23 11:18 Downloads/

Aha!. There’s a + on the end of the permissions to show me ACLs exist.

$ /bin/ls -lde Downloads/
drwxrwxr-x+  81 david  david     27370 Feb 23 11:18 Downloads
 0: user:root allow list,add_file,search,delete,add_subdirectory,delete_child,readattr,writeattr,readextattr,writeextattr,readsecurity,writesecurity
 1: group:everyone deny add_file,delete,add_subdirectory,delete_child,writeattr,writeextattr,chown
 2: user:root allow list,add_file,search,delete,add_subdirectory,delete_child,readattr,writeattr,readextattr,writeextattr,readsecurity,writesecurity
 3: user:root allow list,add_file,search,delete,add_subdirectory,delete_child,readattr,writeattr,readextattr,writeextattr,readsecurity,writesecurity
 4: user:root allow list,add_file,search,delete,add_subdirectory,delete_child,readattr,writeattr,readextattr,writeextattr,readsecurity,writesecurity
 5: user:root allow list,add_file,search,delete,add_subdirectory,delete_child,readattr,writeattr,readextattr,writeextattr,readsecurity,writesecurity
 6: user:root allow list,add_file,search,delete,add_subdirectory,delete_child,readattr,writeattr,readextattr,writeextattr,readsecurity,writesecurity
 7: user:root allow list,add_file,search,delete,add_subdirectory,delete_child,readattr,writeattr,readextattr,writeextattr,readsecurity,writesecurity
...

The list goes on exactly like that up to 127! Ok. That looks a bit screwey! So I figure out that you can manipulate ACLs with chmod, but annoyingly chmod doesn’t have an option to just wipe all the ACLs clean. Grrr… Ok, so I get to write a little loop in shell:

$ while /bin/ls -ld Downloads | f 1 | grep -q '+'; do chmod -a# 0 Downloads; done

f is a little program I stole from here.

So… Did it work?

$ /bin/ls -led Downloads/
drwxrwxr-x  81 david  david  27370 Feb 23 11:18 Downloads/

Yes!

Now let’s make that a shell function so I can run it easier:

clear-acls() { while /bin/ls -ld $1 | f 1 | grep -q '+'; do chmod -a# 0 $1; done }

Now I can just do clear-acls Music and fix my music directory, which is also screwed up.

It also occurred to me that fixing the permissions with Disk Utility might work as well, so I am trying that now. The progress bar is not moving and it has been saying it will be done in “less than a 1 minute” for the past 10 minutes. Nice. Does anything work in Leopard?

Half an hour later… Disk Utility fixed some ACLs, but only on system directories. My home directory still has a bunch of folders with weird ACLs on them. I have no idea who put them there (I can only assume some stupid Apple bug, probably in Time Machine–what else scans my whole disk?), but at least I can manually fix it when it happens.

Darwin Ports Pextlib Problem

I decided to try Darwin Ports out today. I’ve used Fink in the past but I hate the fact that their unstable distro is source only. Try installing anything on fink and not having TeX build for an hour. So reacting on the bad taste that fink always leaves me with I set out installing Ports from source (since I want it in /usr/local/ports and not crappy “/opt”).

Everything appeared to install with no errors but when I’d run “port” I’d get this:

$ port sync
can't find package Pextlib 1.0
    while executing
"package_native require Pextlib 1.0"
    ("eval" body line 1)
    invoked from within
"eval package_native $args"
    (procedure "package" line 14)
    invoked from within
"package require Pextlib 1.0"
    (procedure "dportinit" line 310)
    invoked from within
"dportinit ui_options global_options global_variations"
Error: /usr/local/ports/bin/port: Failed to initialize ports system, can't find package Pextlib 1.0

Web searching turned up nothing helpful

After playing around and brushing up on my Tcl I discovered that /usr/local/ports/share/darwinports/Tcl/pextlib1.0/pkgIndex.tcl contained only a comment:

 # Tcl package index file, version 1.1
 # This file is generated by the "pkg_mkIndex" command
 # and sourced either when an application starts up or
 # by a "package unknown" script.  It invokes the
 # "package ifneeded" command to set up package-related
 # information so that packages will be loaded automatically
 # in response to "package require" commands.  When this
 # script is sourced, the variable $dir must contain the
 # full path name of this file's directory.

Seems something got screwed up in the installation process and didn’t generate the pkgIndex.tcl file correctly. On a hunch I checked and discovered I had an old PowerPC tcl sitting in /usr/local/bin (and not stowed — I hate stupid Mac installers that install into /usr/local. That is *my* directory). I deleted all the Tcl-ish things in

/usr/local/bin

(and didn’t find anything anywhere else, oddly enough), reinstalled Darwin Ports, and it worked! Yay.

Now I’ll see if it’s worth the 2 hours I spent debugging. 🙂

Last Modified on: Dec 31, 2014 18:59pm